Jennifer,
Hope these play well with others! I realized my stash is short on solids and jewel tones. I enjoyed making them tremendously - quick and very interesting!
Can wait to see this quilt when you’re done.
Happy Quilting,

Chris

Jennifer,
Hope these play well with others! I realized my stash is short on solids and jewel tones. I enjoyed making them tremendously - quick and very interesting!
Can wait to see this quilt when you’re done.
Happy Quilting,
This was a quick and easy sew for August. I don't have a ton of solids to choose from so I hope this yellow suits your theme alright.


I've included an angel block for a member who couldn't participate this month. I look forward to seeing the finish.
Kind regards,
Nicole P


Hi Chris!
July flew by and then some... I put your block in the mail on Saturday and then totally forgot to post!

This will be a fun quilt to assemble, I can't wait to see it finished!
~Adrienne
Hello!
Way back in February, I saw the block requested by Cathleen in Hive 4 and LOVED it! I was planning on requesting the exact same block, same colors and all. But as I was pulling fabrics at the quilt shop, I developed more of a deep, jewel-toned palette including colors like plum, garnet, deep blue, coral, and tangerine. So, I'm requesting that you follow Cathleen's tutorial, only with the following palette.


For medium and light tones, I think cream or light shades of blue, pink, yellow, tan or green will look lovely.

I would prefer all solids, and to avoid black, white, and bright red. However, I know some people don't keep a lot of solids, so tone-on-tone fabrics that read as solids will work as well. If you don't have anything along these lines, just pick whatever you think is best. A few pops of pattern scattered throughout might end up looking super awesome!

I've made a couple of blocks, and laid out a few more, and can't wait to play around with all of the lovely blocks I'll be receiving! Thank you in advance!!
Hello Hive 3!
This is my first time participating in Stashbee and my first time ever writing a tutorial! I love blue fabrics and have a lot of scraps so my blocks will all be made from medium to dark blue fabrics and low volume white/ivory. A bowtie block should be familiar to most quilters and I chose an easy tutorial from Elea Lutz. You can find her bowtie block tutorial HERE.
Here is a photo of the fabrics I pulled to add to my scraps:

I made 4 - 6 1/2 inch blocks (unfinished) and sewed them together to create a 12 1/2 block (unfinished).

Cutting for one 6 1/2 block:
Light or white background fabric: (A) 2 squares 3 ½”
Solid or print bow tie fabric: (B) 2 squares 3 ½”; (C) 2 squares 1 ½” same fabric
Cut four different sets.




These blocks finish to 8 inches (8.5 inches unfinished) so I'm requesting 2 blocks in opposite colorways. Only 2 different fabrics are needed. Instead of orange and white fabrics, I've chosen aqua/turquoise and black & white prints. Please no solids, batiks or novelties except as noted below.
Aqua/turquoise - these colors are similar and discerning between the two is subjective - think of the Caribbean Sea and beautiful turquoise jewelry. I'm hoping for color saturation; small amounts of other colors is fine, as long as the fabric reads aqua/turquoise.
Black & white - pretty self-explanatory. The fabric can be either a black print on a white background, or a white print on a black background. You can use a novelty print here, as long as it's not too juvenile and does not contain holiday, religious or political motifs.
My fabric pull:

Construction
You will need one aqua/turquoise fabric, and one black & white fabric for 2 blocks. From each fabric cut the following:

For the first block, use the aqua/turquoise square, and the black/white
rectangles. With right sides together and using a 1/4 inch seam, sew the smaller rectangles to the
sides of the square and press seams open.


Next, with right sides together and using a 1/4 inch seam, sew the longer rectangles to the top and bottom of the square/sides. Please press seams open. Your block should measure 8.5 inches square.


Now, construct the second block in the same manner with the black/white square in the center and the aqua/turquoise rectangles as the border. And you're done!

Thanks for sewing for me 😊.
Greetings from Tennessee. This is Mary Siemen. I've picked an improv Bear Paw for my block this month! Hold on to your seats and take a deep breath. It will be ok! Here's a sample block:

Notice how the block above is not squared up? The arrows are pointing to places you might normally square. Not needed!
Here's the first block I made that is smaller. After sewing first and then thinking, I realized a directional print for the triangles was not a good choice!

Fabrics
You'll need 4 different fabrics: a bright solid or something that roughly reads as a solid. I'm not too picky here. This is for the large rectangle. Then you'll also need another fabric--solid, floral or pattered print for the skinny bands. (Stripes would be great here too!)
Finally, you'll need two other fabrics--your choice: solids or prints, for the wonky triangles. You can't have too much color for me!


Cutting:
1 rectangle 6.5" x 8.5"
1 border/edge piece 2" x 7.5"
1 border/edge piece 1.25" x 8.5"
2 different fabrics for triangles 2.5" x ~20"
1 2.5" x 2.5" square from one of the triangle fabrics (not pictured above
Sewing:
1. Sew the 1.25" border piece to a long edge of the rectangle, using 1/4" seam. Press the seam open, please.
2. Placing the strip you just sewed vertically to the right, sew the 2" border piece across the top so that both border pieces form a right angle:

Press the seam open. (Trim the extra 1/4" from my bad math if that piece bothers you!)
3. Making the actual claws or triangles - These will not match! None will or should be the same size; this is to be expected.
* Please don't worry about squaring up your block - especially the claw or triangle sides! *
I have a video to give guidance on cutting and sewing the wonky points. BEFORE you click on the link, please know that the first few minutes are filled with the creator 'thinking out loud'. I got a bit impatient the first time I watched it as I wanted her to just 'get on with it' and show me how she cut and sewed the block! If you're in this camp, skip forward to minute 8:10.
Here is the example video:
NOTE: I recommend you keep the triangles in the same order as you cut them. Also sew them in that same order.

You will make 2 rows of triangles. One for each side of your rectangle that had the border sewn on.

Pressing:

When joining 2 triangles, press that seam OPEN. After joing multiple triangles, press those seams to the side, all in one direction. Take care not to stretch the row due to the bias seams in the triangles.
Note: your triangle rows may not look like your best sewing effort. This is completely ok! I plan to trim the bottom edge (the pink side) and sew that to the border.
* Please DO NOT trim the outside edge of your triangles. EVEN if they are uneven and don't look pretty. See how uneven mine are??

4. Sew one triangle row to the long edge of the rectangle.
Press the seam toward the border/rectangle.
Square off the end above the right angle of borders. (This is the left end in my picture below.)
 |
5. Ensure that your 2nd row of triangles is long enough. Square off the inside end. Sew the 2.5" square to that end.

6. Sew the triangle/square strip to the left side of the rectangle. Press seam toward rectangle.
Your block is DONE!
7. One last small request: I like adding information on my beemates who've made blocks for me, to the back of my quilt. I'd love for you to write your name (first and last) and where you live (city and state) on a smallish piece of fabric. It doesn't have to be any certain shape (in keeping with my improv/wonky theme! Please use a permanent pen or sharpie. Thank you!

Hello!
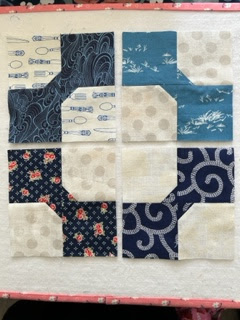
This is my second year doing stash bee. I have had so much fun making blocks for everyone so far! I found a super easy tutorial for this month. They’re magic stars because they only appear when you put 4 blocks together.
The tutorial is here:
https://quirksltd.wordpress.com/2021/01/24/new-weapon/
Fabrics:
I found this amazing batik layer cake, which I am so excited to use. The colors are inspired by the sunset, so I’m looking for dark blues, purples, reds, a little bit of orange or yellow. I’m pairing these with cream colored fabrics.
For both of the fabrics, blenders, batiks, and small to medium scale prints are all great. Please no solids for this block.


Process Pics:
You’ll need 1 10” square of a cream and a darker color.
 |
You’ll make 2 cuts in each of your squares. As per the tutorial, you'll cut a 3.5" section off of the 10" square, then turn the large rectangle and cut a 3.5" section off the side. This pic shows the 2 cuts and the finished sizes of the pieces.

You’ll then swap the center squares and sew them back into a larger square.

Press the seams however you prefer - I’m not picky. Trim the extra off, then cut across both blocks diagonally. You’ll be cutting a corner off of the big square.


Swap the pieces, and sew along the bias. There are no seams to match - just line up the edges. This is the only seam I typically use pins for, to help keep them from stretching.


Open them up and press. Please don't trim; I'll trim them all when they arrive. The tutorial says that these can finish at 9", but my first two aren't the same size, so don't worry if they're not square or not 9”. I’ve also discovered that my layer cake squares aren’t square (!!!!), so I expect I will end up trimming all of them down to 8.5” or so.


