
Welcome to October.
A quilt made from the Hunter's Star block popped into my news feed on Instagram recently, and I fell in love with the possibilities of arrangement of the pattern.
I found an amazing tutorial From the Hopeful Homemaker online and used her quilt as my inspiration.
I decided on a slightly different style than her totally Scrappy version to make cutting easier.

Supplies:
You will use 4 light background fabrics, and 4 color (print) fabrics
Backgrounds should be white, white on white or low volume that reads white (not cream or tan).
For the prints, I like bright vibrant happy colors. No grey, Black or Brown.
They can contain more than one color, Novelty is OK if it is sewing related.
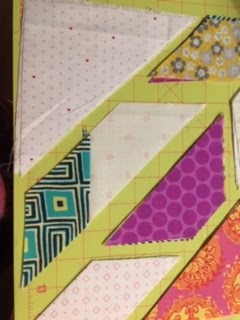
Here are a few pics of my colored fabrics that I pulled to give you an idea of what types I like.
My completed picture above in kind of dark because the weather has been gloomy here.
These pictures below are a better example for colors.
Please use any variety and combo of colors, do not choose the same ones I used in my sample block.


We will be working with many biased edges, so a little starching of the fabrics may help to keep them from getting distorted.
I used a dry iron and a little bit of Unscented Mary Ellen's Best Press.
For each print and background, you will need one 90 degree triangle with the two shorter sides measuring 10”.
I started with a 10” square and cut it into two triangles to get the piece I needed!


Cutting:
Step 1 -
For each triangle, (background and prints)
place your ruler on the long side of the triangle, and cut 2.5 inches from the edge. This will leave you with one triangle and one trapezoid shape.


Step 2 -
From the end of the trapezoid shape you just cut, measure in 2.5 inches and cut to form a diamond.


From the cut you just made, measure in 2.5 inches and cut to make a second diamond.

You will have two diamonds, one trapezoid and one triangle of each color.
Cut each print and each background in this same way!
You should now have 16 diamonds, 8 trapezoids and 8 triangles.
Arrangement:
This block is made up of four quadrants.
Please Arrange the fabrics so that each quadrant has 4 background and 4 print fabrics.
Please try to be sure that each background and each print has only one piece in each quadrant.

Assembly:
Starting with one quadrant. You will sew the diamonds onto the trapezoid first.


Turn a printed diamond onto the background trapezoid.
Carefully line up so the little triangle points extend 1/4' past the other fabric.
To make this easier for myself, I marked the 1/4' sewing line on the white fabrics, then you line this up with the edge of the print, and you have the perfect amount of points sticking out.
This will allow the edges of the fabric to fall into a perfect line once sewn and pressed.
Sew with a 1/4' seam allowance. Press to the dark print.


Repeat with the other printed diamond.
For this entire block, please Press the seams to the print to allow for nesting.


You should now have a strip of fabric for the center of that quadrant
Repeat the process, this time sewing the background diamonds onto the print trapezoid.
Press toward the print.

Next, Sew each triangle corner piece onto their corresponding strip that you just made.
The white background triangle should be sewn to the strip with the white background trapezoid..
The print triangle should be sewn to the strip with the print trapezoid.
On this step, the points that stick out will likely be larger than 1/4".
To center, I folded the triangle and the strip in half and marked the centers of each piece, then lined up the centers before sewing for accurate alignment.
Press to the print.

Sew the two larger halves of this quadrant together.
This is the most important part of the assembly, nest the seams between the diamonds and trapezoids together. See where I have pinned in the photos below.


Repeat for the remaining 3 quadrants.
Do not trim!
Each quadrant should measure approx 8.5". All of my quadrants were off a little on measurement, so I put the 45 degree ruler line on the center seam of the block and trimmed to 8.5".
YOU DO NOT NEED TO TRIM!
As many of you have done this year, I am going to ask that you keep the 4 quadrants seperate.
This will give me more layout options, if I can mix and mingle all of them with the other hive mates colors if I decide to once they all arrive.


(When assembling the whole block, I chain pieced the diamonds onto the trapezoids and again chain pieced the triangles onto the strips to save time.)
If you are running out of time, and cannot finish all 4 quadrants, please do as many as you can.
Thank you, and I look forward to seeing all your beauties.
Thank you for your patience in this posting. I was having problems getting pictures to post via ipad and iphone, and I had to meet up with my son at college to use the laptop to the tutorial.
Message me with any questions.
Heather
1 comment:
I love the Hunters Star. Great choice for a wonderful modern take on a classic traditional block.
Post a Comment