Sunday, August 1, 2021

Hive 3 - August Tutorial - Maple Leaf Block

Hello Hivemates! I'm so excited to provide the August tutorial because it's the perfect opportunity to celebrate my favorite upcoming season in the Midwest - FALL! Summer is great after the rough winters, but you really can't beat the gorgeous colors and festive spirit of autumn. 

This block is designed to be a "choose your own adventure." I've provided measurements for three different size blocks (6", 9", 12") and feel free to choose whichever sizing fits your stash availability, schedule, piecing desires, etc. This tutorial's images will show the 12" block.

Three sizes for the block


For fabric selection, choose a leaf fabric that fits any leaf color variety you've ever spotted (reds, pinks, purples, greens, browns, yellows, oranges, etc.). Prints or solids are welcome! The background fabric can be an off-white to cream solid or low volume. 

Examples of Leaf Colors

Cutting


6" Block

  • Leaf: 2 squares 3x3", 3 squares 2 1/2 x 2 1/2", one strip 1 1/4 x 4"
  • Background: 3 squares 3x3", 1 square 2 1/2 x 2 1/2"

9" Block

  • Leaf: 2 squares 4x4", 3 squares 3 1/2 x 3 1/2", one strip 1 1/4 x 5"
  • Background: 3 squares 4x4", 1 square 3 1/2 x 3 1/2"

12" Block

  • Leaf: 2 squares 5x5", 3 squares 4 1/2 x 4 1/2", one strip 1 1/2 x 7"
  • Background: 3 squares 5x5", 1 square 4 1/2 x 4 1/2"
Assembly
This block uses 1/4" seams and feel free to press as desired. 

Make 4 half square triangles by pairing up two of the larger leaf and background squares (3x3", 4x4", 5x5"). 
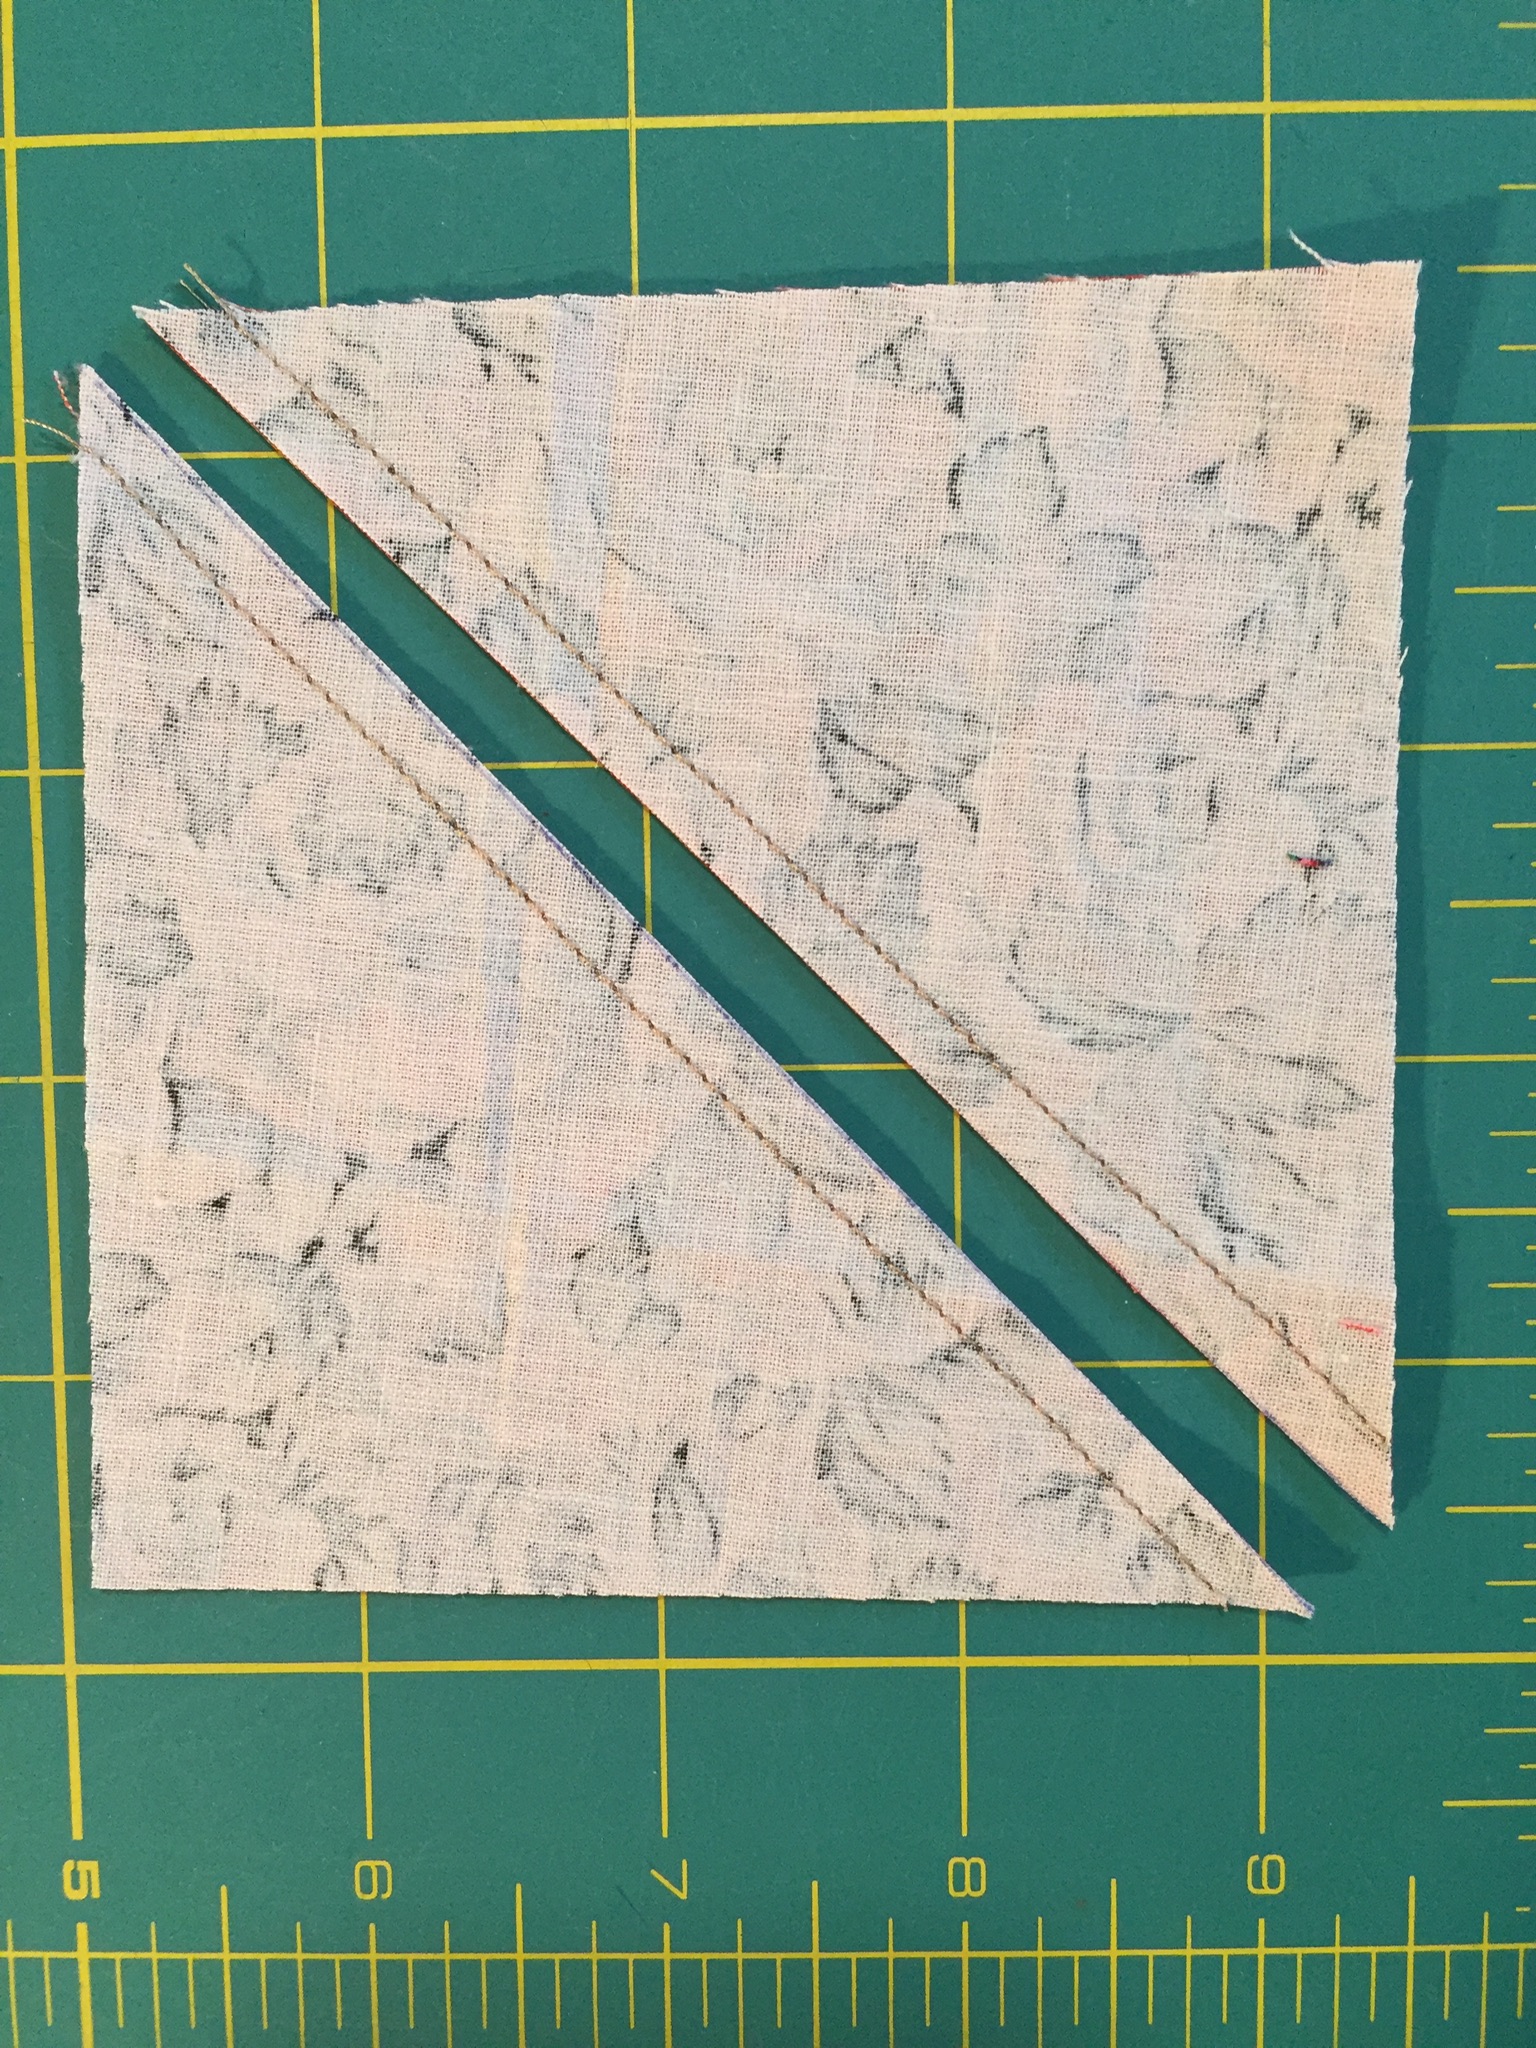
Draw a diagonal line across the paired squares. I like my Frixion pen for this step. Sew a line a 1/4" on either side of the drawn line.
Cut along the drawn line and square up the blocks to 2 1/2", 3 1/2", or 4 1/2". I like my Quilt in a Day HST ruler for this, but use whatever method is comfortable and available. 

Press your 4 HSTs open.

For the stem, cut the remaining larger background block (3x3, 4x4, 5x5) across the diagonal. 


Fold the resulting triangles across the longest edge to find the middle point. Fold the steam strip of the leaf in half vertically to find its middle as well. Match a triangle long edge's middle to the stem's middle and pin. Sew along this edge and press open. Repeat on the other side


Square up this resulting stem block (2 1/2", 3 1/2", 4 1/2") using a ruler or another leaf piece as a guide with your ruler. 


Using another leaf piece as a guide


Assemble the components as follows taking care that all the HSTs are facing the right way. 

Sew squares together in the three rows. Then sew the rows together. 

The resulting block will be 6 1/2", 9 1/2", or 12 1/2" untrimmed, but if you are slightly off don't worry and send it along! Also, don't worry about trimming. Variety (and scrappiness) will be highlighted in this future quilt, so slight sizing discrepancies are no big deal. Here is the finished 12" block.

Thanks so much everyone and I hope this is a fun and stress-free make as summer wraps up! 

-Alexa

Hive 1 August Tutorial - Scrappy Jacobs Ladder Variation

This looked like a good scrap busting pattern so I thought I'd give it a go.  I decided on this block several months ago because I knew July would be very busy.  Who knew my block choice would be so similar to the block Julia just requested!  I hope you enjoy making this variation and I hope your scrap pile decreases a little as a result.


Fabric Selection & Cutting


Please choose a variety of lights, mediums, and darks.  Anything goes!  Solids, prints, old, new, whatever.  I like bold and bright and saturated most of all, but really, I like everything!  I’m open to whatever you have.  My only request is that you please avoid solid black.  


This block requires:


12  2” squares - 6 from a variety of lights  +  6 from a variety of mediums / darks


12  4” squares - 6 from a variety of lights  +  6 from a variety of mediums / darks 


If you don’t have 12 different lights / mediums / darks, please just use whatever you have.  Repeating fabrics is really okay.   


What’s more important to me is that you please follow the placement of lights and mediums / darks when constructing the block.  


To save time cutting, my habit is to pull pieces from my scrap bag, stack and align them on top of each other, press them flat all together, then cut the desired square from all the pieces at once.  I usually stack, press, and cut 4 - 6 fabrics at one time.  I find it's easiest to manipulate scraps in this way rather than starting with bigger pieces.  Cutting multiple squares like this all at once produces the number of needed scrappy pieces very quickly.   


Piecing


Make 3 four-patch squares using the 2” pieces.

  • Use 2 light squares and 2 med / dark squares for each four-patch.
  • Press to the dark side when possible.


Make 6 Half Square Triangle squares using the 4” pieces.


These are super simple to make and if you set yourself up, chain piecing makes them super fast.

  • Use one light 4" square and one med / dark 4" square for each of the HSTs
  • Draw a line diagonally on the wrong side of the six light squares

  • Layer a light square on top of a med/dark square, right sides together
  • Sew a scant 1/4” on both sides of the drawn line

  • Cut apart on the drawn line
  • Press to the dark side


Square Up
  • Square up the four-patches to 3-1/2" aligning the 1-3/4" lines with the center seams
  • Square up the HSTs to 3-1/2” aligning the 45 degree mark on your ruler with the seam line  


Construct the Block


Arrange the four-patches and HSTs into the final layout as shown paying attention to the light and med / dark placement and then sew together.


I pressed the final two seams open due to the number of overlapping seams.


The unfinished block should measure close to 9-1/2”. 


If you want to send along any leftover HSTs I will use them in the border, but of course you can keep them and use them yourself!  


Thank you so much for contributing your time and fabrics.  I look forward to perusing the scrappy blocks that come from your sewing space to mine. 


  ❤️ Karen 


Hive 5 August Tutorial: Modified Moonlit Tent


Hello fellow quilters!

I went camping for the first time recently, and marveled at how just one day spent in nature could invigorate my spirit so deeply. I'm hoping to go again soon, but the summers in L.A. are so hot that the next time I'll go will likely be in September. To help make the wait for cooler weather seem shorter, I decided that I would work on a camping quilt, made with this fabric my mom gave me from her own stash.

The photo came out darker than the fabric really is. I love all the little details!

The block I've chosen for August is based on the Moonlit Tent by Carolina Moore. I've modified her directions because we'll only be making the tent portion of this block. If you'd like a copy of the full pattern, you have to sign up for her newsletter here.

Moonlit Tent

My test block, tent only :)

For the colors, the tent will be two colors (one light and one dark) that can be pulled from the color palette from the hiking fabric. The colors don't have to be an exact match, just in the family is fine. The darker fabric will be on the left and also be part of the tent flap. The background can be light to medium gray. For the opening in the tent, as most quilters, I'd love a fussy cut. If you can manage a fussy cut, it can be any color, but if you don't have anything you like, black or brown work too.

I'd prefer all the fabrics to be tone-on-tone, but white and black on the color is fine as long as it reads as the main color. I prefer more modern prints and patterns. Please don't use batiks or novelty fabrics.

Some color palettes I generated from my fabric!
Try to stay in these families for the tent colors

I didn't have anything great in my stash,
but these are the ones I pulled that would work

I did have some perfect choices for the gray background though
Your fabrics can even go a bit darker than this

This block uses half-rectangle triangles for the tent. The block designer has a great YouTube video on making half-rectangle triangles.

Cutting Instructions

Tent color 1 (light): 9" x 5"

Tent color 2 (dark): 9" x 5" and 3" x 4"

Inner tent (fussy cut or black/brown): 3" x 3"

Background: 2 - 9" x 5"


Piecing Instructions

  • Draw diagonal lines on the backs of all the tent pieces. For the 9" by 5" pieces, the lines don’t go corner to corner. They start ¼” in from the corner and end ¼” in from the corner.
  • Lay out the rectangles as shown. They will be offset by ¼” on the background piece. Stitch on the line. Trim ¼” away from the stitching line. Open and press toward the dark.

  • Square up the pieces to 8 ½” by 4 ½”. As you square up, you want the seam line at the corner to hit ¼” away from both the top (or bottom) and side edges. You may need to have your ruler at an angle to get these seam allowances.
  • Place the 3” x 4” flap piece as shown. Stitch on the line. Trim ¼” away from the line, open, and press.
  • Place the 3” by 3” flap piece as shown. Stitch on the line. Trim ¼” away from the line, open and press.
I personally had some issues with these last two steps.
The 3x4 rectangle doesn't necessarily hit the midline 3" up,
but if yours doesn't, you can just line up the upper left corner
of your 3x3 square with wherever the rectangle hits the midline
  • Now just sew the two sides together and you're done!

I can't wait to see all your blocks! Thank you!


Saturday, July 31, 2021

Hive 1 July block for Julia


Sorry for my tardiness to the party Julia! My toddler got a really bad case of RSV and was very sick (and therefore home from daycare….) for a week! Who gets RSV in July? Apparently there’s a really bad outbreak in the Southeast! 


Anyway, this will go in the mail ASAP, but it won’t arrive by the first! Sorry! 

Wednesday, July 28, 2021

Thursday, July 22, 2021

Hive 1 - Jacob's Ladder Block for Julia

 I had this 90% complete by the 3rd of the month and haven't been in my sewing room until today to finish it. Summer is always so busy in our house, I'd be lying if I said I wish the kids didn't have to go back to school. Just 3 more weeks and I can't wait! 

I hope this block works well with the others that you already have.


~ Diana @ Red Delicious Life

Tuesday, July 20, 2021

Hive 1 Block for Julia

What a great block! I had way more autumn colors in my stash than I realized, I had trouble narrowing it down. Can't wait to see how they all look together!

Enjoy!

- Julia D.

Saturday, July 17, 2021

Wednesday, July 7, 2021

Hive 1 July Jacob’s Ladder for Julia

Hi Julia,

Here are a couple of autumn blocks for you.  I love your idea to set them on point. I couldn’t get a good picture of them that way but they looked good that way on my wall!  This is a really versatile block.  Heads up, you’ll see a variation of it next month!   Karen 


Tuesday, July 6, 2021

Hive 1 Jacob's Ladder for Julia C.

Hi Julia,

Thank you for this great tutorial! The nine 4.5" blocks fitted nicely together...which is good because I was obsessed to make the corners meet:) I love the ladder. You will have a fantastic quilt! Take care, Marie