Monday, September 4, 2017

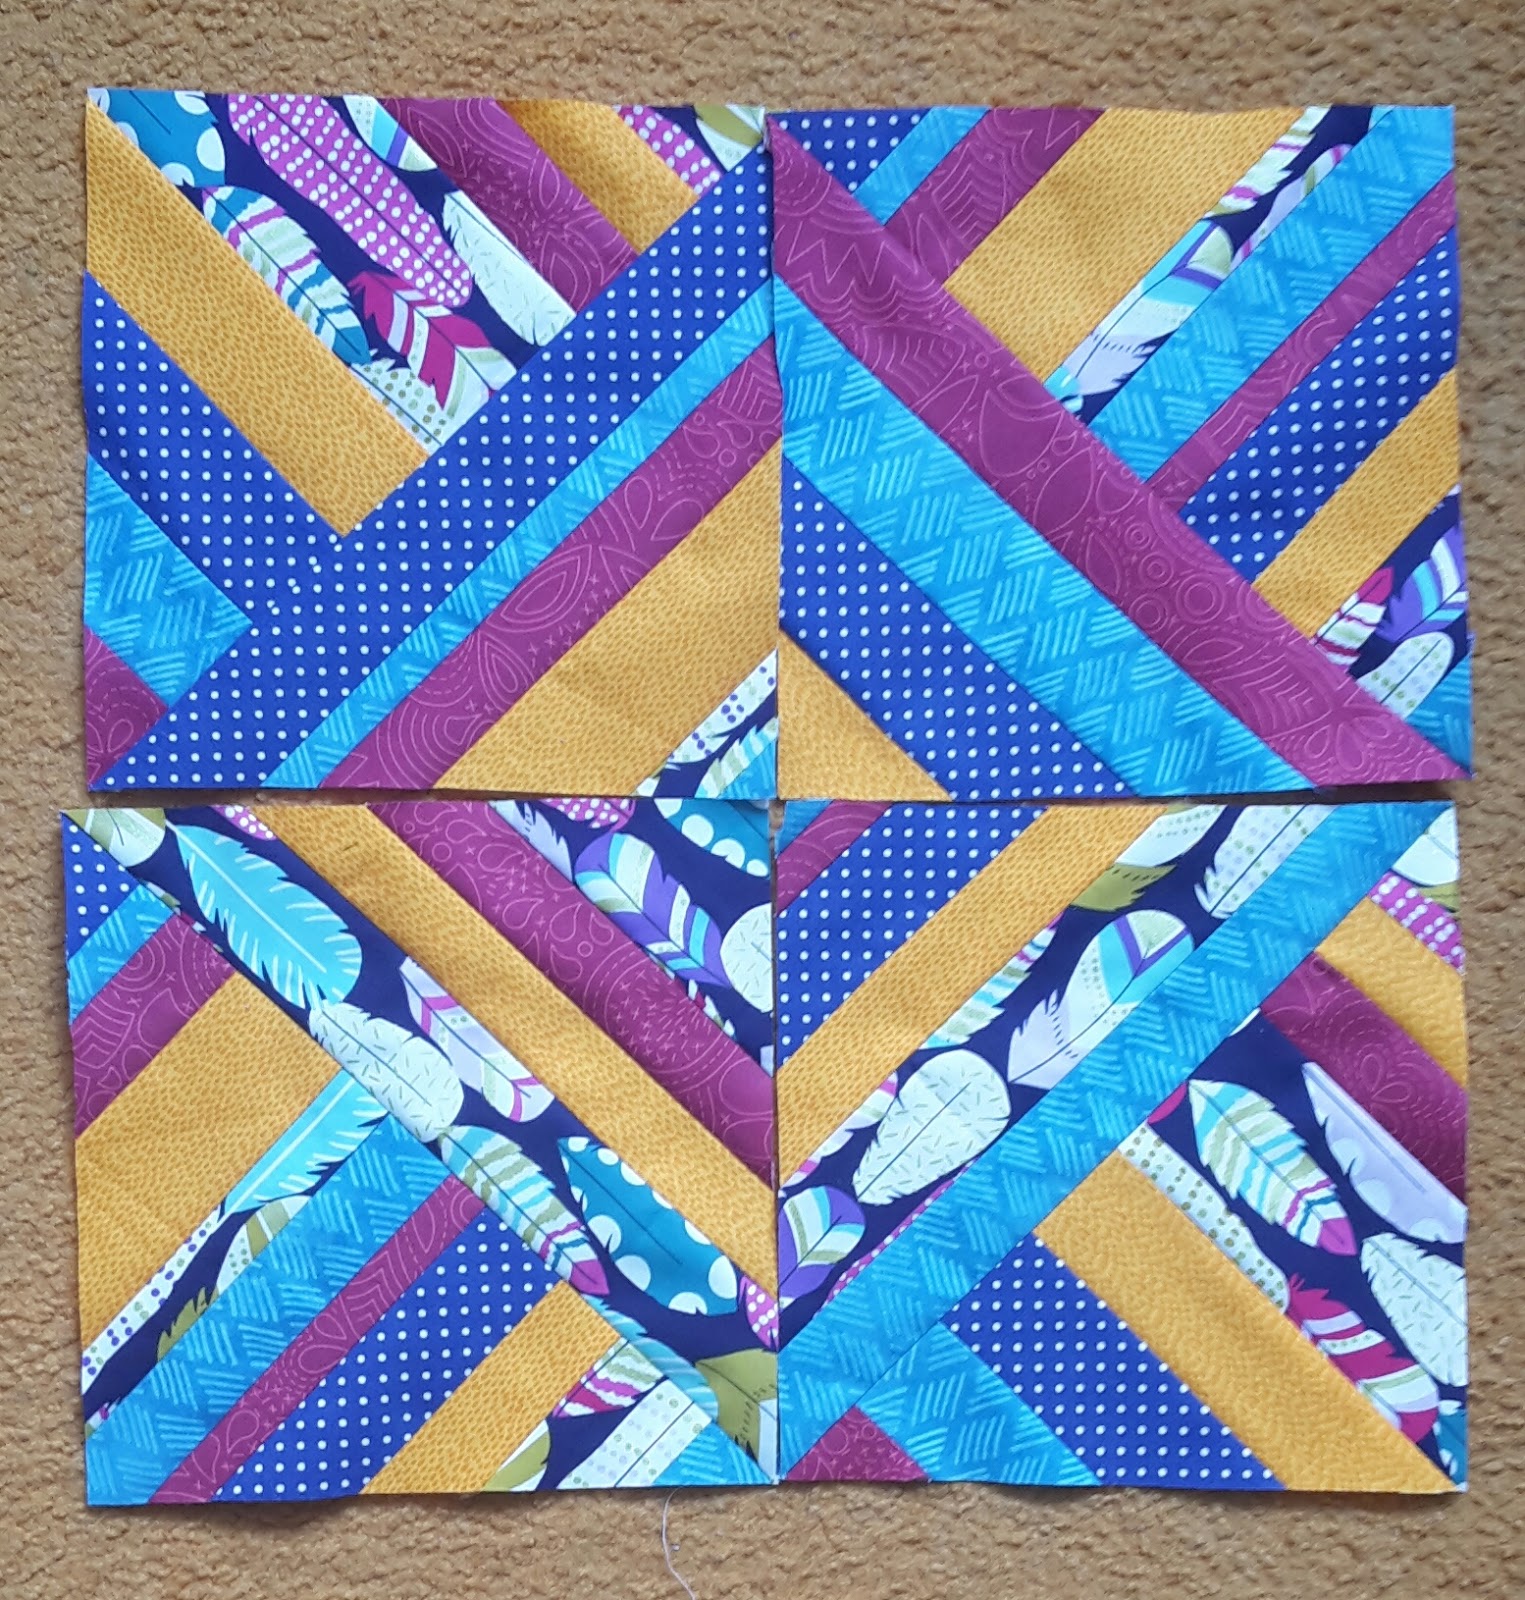
September blocks for Jacqueline


Hi Jacqueline,

I have your September blocks. I am thrilled to have them done already.  Loved the colors and I hope you like what I picked out.  I had more fun making four different ones than four of the same. Super easy and a quick block to make.  


Well now I can sit back and wait for October's block.

Cyndi

Sunday, September 3, 2017

September Blocks for Michelle - Hive 8

Here are my blocks for Michelle....three different palettes to choose from...but that was the tough part.  This was a fun and easy block.


This should be a fun quilt.  Enjoy!

September Tulips for Debbie

Queen Debbie asked for bright tulips blocks.  Most of the time I was working on these, I could hear the rain outside my window so it was easy to believe it was spring and there were tulips blooming.


Debbie, I hope you like them!  I have all the cut-off triangles and the extra HSTs in a baggie for you as well and will sent them along.

Emily, Hive 6

Saturday, September 2, 2017

Hive 8 September blocks for Michelle

As I have a very busy month ahead I thought it best to make 
the blocks for Michelle right away :-)
These two string blocks are so simple to make but the endresult is great!


Hive 4 - September Block


Dear Queen Amanda,

Having taken a sneaky peek at your scheduled post, I took the liberty to whiz up your block ahead of time. I hope it suits. If not, just cut it up and rearrange it to your liking. I sent another spare piece as well. The pieces are already in the mail to you. I think your design idea for the quilt is a very creative one and I am looking forward to seeing how it will pan out.


All the best

The August Queen AD
=)

Friday, September 1, 2017

Hive 5 - September Blocks

I noticed mid-way through August that Anna was super prepared and already had her September tutorial post scheduled to the blog.  Since today is my due date and baby boy will be disrupting my sewing time at any moment, I figured I'd see if she minded if I sewed her blocks early.  It actually worked out perfectly because I was able to pattern test her Hugs/"O" pattern for her since she'd designed it herself.

Here are my finished Hugs/"O" blocks!


And I'm also mailing her a couple of strips of my feature fabrics so that she can sew coordinated Kisses/"X" blocks to use in the quilt too!


Hopefully it doesn't take too long for these to make it all the way over to New Zealand, Anna!

September Tutorial for Hive 9

Happy September everyone!
I’m very excited to have you all help me make a quilt for my niece and her wife! I had made them an Ohio Star quilt before I knew they planned to get married. When I make a wedding quilt, I try to make one with intertwining circles. I told them I would make another quilt with circles.
I’ve been following Sharon Holland and Maureen Cracknell’s Sewcial Bee Samplers sew-along and when I saw Sharon’s block #19, I thought it would be a great block for Anne and Kristen’s quilt. I have contacted Sharon Holland and she has graciously given me permission to use her block!
Here’s the link to the sew-along https://www.sharonhollanddesigns.com/sew-along/
If you scroll through and click on block 19, you’ll open the pdf for Circle of Friends.
I would like to make the block bigger-15x15 finished, so all HSTs and center square should be cut to 3” so they finish at 2 ½” in the block.
For my block, I would like the following colors – Fabric A-pale green, Fabric B-grey, and Fabric C-pale yellow. The colors were Anne and Kristen’s request, placement was my idea!
These are my two sample blocks:


For the one the top block, I decided to make HST the traditional way-cut 16 squares each of grey and green to 3 ¾”, marked diagonal from corner to corner, right sides together and sew ¼” on either side of line. Trim to 3” squares.
For the bottom block, I decided to use Sharon’s method—this was my first time doing HSTs this way. Cut 4 squares each of grey and green at 6 ¾” and follow her directions. I did trim these to 3” after cutting although they were very very close to 3”. There’s much less waste with Sharon’s method as you from this picture! You decide which method you want to use.

For this block, please don’t use a scant 1/4”-I did on the top block and it ended up at 16” rather than at 15½”. Also, please press the seams open. On the top, I pressed to the dark and some of the seams were very bulky—came out much better on the bottom! I’ll end up taking the right block apart and re-sewing. No need to trim your blocks-I’ll take care of that when I get them all.
Please contact me if you have any questions.

I look forward to putting all the blocks together and gifting it to Anne and Kristen! Thank you so much in advance!
Liz

Hive 8-September Block Tutorial

Hi Hive 8!!

I've picked a block that I saw on Pinterest, though I didn't waste time looking for a tutorial-I just made mine own up. So bear with me please! I am going to use these blocks for a quilt for my daughter Jacklynn. I was able to make one for my son from a pinwheel block swap on Instagram earlier this summer, so now it's her turn. I have three examples of the color palette that I want to use. They are all slightly different but I love them all and I think a quilt of all palates used will make a beautiful quilt--so choose one and go with it, just try to choose one and not mix them together, and I do not want any white, black or grey as filler. Thank you guys so much!!!


I used the last palate for my block and I love it!! To start I cut 12.5" strips of varying widths from 1.5"-3". Piece them together to make a 12.5" by 12.5" square.

 I then rotated one of the blocks to start the sewing. As you can see the strips are going in opposite directions.
 

After pining my blocks together I sewed in the directions of the arrows above, along all 4 sides of the blocks. Be careful when doing this my blocks were shifting, but I was able to keep at it and get them sewn up correctly.

Next we have to cut one block into four blocks


After cutting the block cross wise both ways, I trimmed my blocks to 4- 8.5" blocks. You don't have to worry about sewing them back together, I will do that. I want to be able to mix them up. Here are some different examples on how I will be able to arrange them. 
Thank you so much for your help!!!
Michelle Hargenrader Sigmon

Hive 1 September Tutorial - Mediterranean Tiles

Hi all!  Alicia here, with September greetings from lovely Vermont.  I’m very excited for my turn as queen—it’s safe to say I’ve been agonizing about my block choice since January, and I’ve probably had about 20 different ideas between then and now.  I kept coming back to tile-inspired designs, and drew the color palette and general shape ideas for this block tutorial from this image.

I don’t believe I’ve seen this exact block anywhere before, so I hope this will be something fun, new, and not too complicated for everyone to tackle this month.  Thanks so much in advance for your blocks; I’m excited for all the happy mail to come my way!

Happy sewing!
-Alicia (@qvilt)


Fabric Pull & Cutting Instructions:
Lots of blues, with some yellow, teal, and white in the mix.  Prints, blenders, batiks, and solids are all fine; if possible, please avoid licensed and kid-oriented fabrics. 


You’ll need 6 different fabrics (A-E):

Fabric A:  yellow blender, print, or solid (ideally something that reads bright yellow or gold; preferably not pastel or mustard) 
  • 1 - 2.5”x2.5” square

Fabric B:  light blue blender, print, or solid (ideally something that reads sky blue or a bit deeper; preferably not pastel), or white background with blue print
  • 2 - 2.5”x2.5” squares
  • 2 - 2.5”x6.5” rectangles

Fabric C:  medium blue blender, print, or solid (ideally something that reads cobalt)
  • 4 - 2.5”x6.5” rectangles

      Fabric D:  navy blue blender, print, or solid
  •       4 - 2.5”x6.5” rectangles

Fabric E:  solid white, or white-on-white print (ideally a true white; preferably not off-white or cream)
  • 4 - 4.5”x4.5” squares
  • 8 - 2.5”x2.5” squares

Fabric F:  teal blender, print, or solid
  • 4 - 2.5”x2.5” squares


Block Instructions:
      1. Draw diagonal lines from corner to corner on the wrong side of the 8 Fabric E 2.5”x2.5” squares and the 4 Fabric F 2.5”x2.5” squares.


      2. Stitch the two Fabric B squares on either side of the Fabric A square and press seams.  Stitch the two Fabric B rectangles on the top and bottom and press seams.  You should now have a central square unit measuring 6.5”x6.5”.


      3. Line up a 2.5”x2.5” Fabric E square with each end of a Fabric D rectangle, right sides together, and diagonal lines pointing opposite directions.  Stitch along the lines, trim the corners leaving ¼”, and press the snowballed corners open.  Repeat with remaining Fabric D rectangles and 2.5”x2.5” Fabric E squares.  You should now have four Fabric D rectangles with snowballed corners.


      4. Stitch a Fabric C rectangle to a snowballed Fabric D rectangle and press seam.  Repeat with other Fabric C and D rectangles.  You should now have 4 rectangular units measuring 4.5”x6.5”.

5. Line up a 2.5”x2.5” Fabric F square with each one corner of a 4.5”x4.5” Fabric E square, right sides together.  Stitch along the line, trim the corner leaving ¼”, and press the snowballed corner open.  Repeat with remaining 4.5”x4.5” Fabric E and remaining Fabric F squares.  You should now have four square corner units with one snowballed corner each, measuring 4.5”x4.5”.

    
      6. Arrange the units according to the photo below and stitch into three rows, pressing seams.  Stitch rows together into single block, and press seams.  You should now have a single square measuring 14.5”x14.5”.


General Notes:
  • You may press seams either open or to the side (whichever you prefer for accuracy).
  • No need to trim blocks; I’m happy to do that once I start putting them together.
  • The block should measure 14.5” square when you’re done (and will be 14” square when stitched together in the finished quilt).
  • Tackle the snowballed corners in any order you like best (12 in all); chain piecing all of them at once is efficient, which means doing steps 1, 3, and 5 (above) followed by steps 2, 4, and 6.
  • If you don’t mind, please also send along a 5”x5” signature block 😊 


Hive 2 Block for September -Let's make tracks!!

Happy Fall Y'all! Hi, I'm Jacqueline also known as @bignuttyquilter. It sure is starting to feel like Autumn here in Wisconsin and I'm even seeing some trees starting to change color already.

This is my 3rd year in Stash Bee and I just love it!! I love making blocks for others and trying blocks I never thought to do myself and finding myself falling in love with them.

I have to admit I fell in love with Tracey's blocks from hive 3 that were done in January and knew in an instant this was the quilt I wanted to make as well, but with a few different colors. So I am asking you lovely ladies to make some bear paws!!

 Here on the farm, we see all kinds of tracks: bears, deer, coyotes and mountian lions as well as the little ones like raccoons, bunnies and skunks to name a few as well as the wild Tom cat!

              So I went and worked the dimensions for this quilt and made up my sample!


I am asking you ladies to make 4 quadrants to this block and when they come home I will mix up all the paws before I put the individual blocks together so I can have an awesomely scrappy looking quilt. Here are some other blocks that I made as well.


I did a fabric pull and these are the colors I am looking for:

For the background, please use a low volume fabric (preferably with a pattern on it, it can also be a solid or a white on white. (sorry cloudy day today)


 below are the colors for the bear paw quadrants, but I have 4 color ways I'm looking for, you can choose which two work best for you. I am requesting: 


                                    brown, on the warm side.              Blues, medium to dark,


                                                     Yellow, warm, rich, deep yellows, cheddar yellow...


                                    And Deep pinks, bubble gum pinks, think of raspberries.

Please make sure there isn't a lot of white in the fabrics you select. I want it to be rich in colors with good contrast. Novelty prints, florals, and whimsy are more then welcome. have fun with this. I just ask for NO BATIKS please.

I am going to have you make 4 quadrants in the same fabrics just like I did, but ask you NOT to sew them together. (If you prefer you can also make them scrappy, I just figured the same fabrics would save time.)

 The following cutting directions will make the 4 bear paw quadrants. 

From the main center fabric cut: - cut (4) 5 1/2 inch square blocks
From the paw fabric cut: (8) 3 1/2 inch square blocks
From the background (light) fabric cut:  (8) 3 1/2 inch square blocks and (4) 3 inch square blocks. 


Take the light background set of 3 1/2 inch blocks and draw a diagonal line on the back of each.


.Take a light background 3.5 inch square and the darker paw colored 3.5 inch square, place right sides together  and sew a scant 1/4 of an inch on each side of the center diagonal line you drew.

Here are the blocks sewn on each side of the diagonal line.  


Cut on the drawn lines and press to the darker side.  You should have 16 HSTs. 


Square up your half square triangles,  Trim to 3 inches square.


Lay out the blocks and begin to sew them together. The background corner square should be pressed towards the square and the large center square should be pressed toward the large square and then they will nest nicely together for sewing to decrease bulk. When sewing half square triangles press toward the dark fabric.When your done sewing these together,  Tada!! You're done! 

 Each bear paw quadrant should measure 8 inches square when done. I will also be glad to square them up.  

When you are done you will have 4 bear paw quadrants. Again, send them as they are and I will mix them up and place the sashing to finish it. 


If you have any questions, please ask!   I want to Thank you so much!! I can't wait to see your creations!! 
Hugs, 
Jacqueline