Tuesday, May 1, 2018

Hive 2 May Tutorial – 10-inch Toadstools


Hello Hive 2

I’m Sue I’m a fabriholic and happy about it! I live in Perth, Western Australia and you can find me blogging at SevenoaksStreet Quilts and on Instagram @sevenoaksstreetquilts. This is my second year in Stash Bee. I’m thoroughly enjoying myself again this year and I’m inspired by what I’m seeing on your Instagram feeds as well.


This month we’re making a toadstool quilt for my great-niece Tilly, a term that makes me sound like I’m 150  😊

The block has been tweaked – up scaled, turned into a square, simplified slightly, and the tiny HST units have been removed (you’re welcome) – from this block by Iam LunaSol. It turns out that it now looks very similar to this block by Patty Sloniger. When I couldn’t find the pattern in her shop I checked with her and she has given her consent to me using it so long as I acknowledge that she came up with it first. I’m more than happy with that!


FOR FABRIC CHOICES  I would prefer a red and white print for the toadstool tops if you have it or black and white if you don’t, low volume prints (not pictured) on a white or off white background for the background fabric, a mid to dark grey print, blender or solid for the stem and a pale grey print, blender or solid for the gills. Since Tilly is coming up to her third birthday feel free to add prints with some novelty value.


CUTTING INSTRUCTIONS

From the red print
          Cut one rectangle 5 ½” x 10 ½”
          Cut two 1 ½” squares

From the pale grey
Cut one 1 ½” x 10 ½” rectangle

From the darker grey
          Cut one rectangle 4 ½” x 3”

From the low volume
Cut two rectangles 4 ½” x 4 ¼”
Cut two  3 ½” squares

SEWING IT TOGETHER


Mark the diagonals on the two low volume squares and the two red print squares
Line the low volume squares up in the corner of the red print rectangle so the line cuts across the corner, and the same for the red print squares on the pale grey print rectangle. Stitch along the marked line. Trim and press.


Stitch the two low volume rectangles to either side of the darker grey rectangle.
Stitch the three sections together to form a toadstool.

And we’re done!

POSTING TIPS
Please read the postage tutorials on the Stash Bee blog to avoid ridiculous costs.

Please also add an airmail sticker or write it on the envelope. Without that it runs the risk of coming by boat which will take about two months!

I know you guys will do a stunning job and I can’t wait to see them!

Monday, April 30, 2018

Tutorial: Garden Fence block for Hive 4


Garden fence
Debbie Huber

I am excited to be the Queen for a month. I am a former teacher turned learning assistant at a middle/high school. So I still get to enjoy interactions and keep my math and reading skills sharp without all the lesson planning and grading. I live in Wisconsin and am ssoooooo done with April. We had 10 inches of snow.  Bring on spring!. It is finally warm this week and we are due for some rain!

It was hard to decide what to pick as a block and what I wanted to do.  So I found this easy block, but decided to change the colorway. 


 Link here:

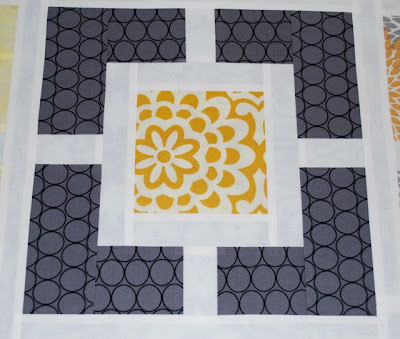
Here is the block I am choosing: it is called Garden Fence and I got the idea and part of the tutorial from Hyacinth Quilt Designs.  Link here.

My color pallet is medium to light grays,
White solid or tone-on-tone white
Bright crayon colors: reds, oranges, yellows, greens, blues, and purples.  I would like tone-on-tone fabrics that read as a solid. 


Choose one color for your block along with a white and gray.
Your color placement can be with the gray in the middle or the gray on the outside.

Here are the cutting dimensions for one block that finishes at 10" (10 1/2" unfinished):
Center square: 4 1/2" x 4 1/2". Again pick one or the other.

\
Outer rectangles: 4 - 2 1/2" x 3" and 4 - 2 1/2" x 5"  ( Both colorations are shown.)


White: 2 - 1 1/2" x 6 1/2"; 2 - 1 1/2" x 4 1/2"; and 4 - 1 1/2" x 2 1/2" rectangles.


Block diagram: 

To piece the block:
  • Sew the white 4 1/2" and 6 1/2" rectangles to opposite sides of the center square.

  • Sew the white 2 1/2" rectangles between 2 outer rectangles; add these to the center pieced square. 

I pressed all seams away from the white to either the color or the gray. 


. Easy! Easy!  I was able to cut and assemble all four blocks in 2 and a half hours.  You only have to make one!  Finished size is 10 and a half inches.

Here is an example of what it looks like with 4; squares:  I am going to add white sashing in between.


This quilt will be for my grandson:    Thanks so much for helping to make it.  I hope you enjoy this easy block. 

  ( He is in front of his grandpa, his favorite person, and he has just graduated to a twin bed. )

Saturday, April 28, 2018

Hive 4 April for Amanda


Happy April!

Although the month started with snow (multiple times), we've had two weekends of lovely weather and I am enjoying playing in my yard!

What a fun block this was to make!  I loved having the opportunity to perfect my ¼" seams.  Can't wait to see the finished quilt!  It went in the mail today.

Thursday, April 26, 2018

April Block for Amanda in Hive 4

This block will be in the mail tomorrow and on it's way to Amanda.

You can find Amanda's pattern directions here.

I've only made three traditional log cabin blocks before so this was a fun one to do. It was also very quick and easy.

Thanks Amanda for letting me be a part of your beautiful modern quilt.

What I Learned Today:
  1. I'd like to make more of these blocks.
  2. I see another quilt added to my "must make" list.
  3. Being in a Bee group is supposed to help quench my thirst for making new blocks and reduce my need to make new quilts with every pattern I see.
  4. Obviously #3 is not working.

Question: Have you made a log cabin block?

If you enjoyed reading this and would like to read more, you may find me over on my blog Tu-Na Quilts, Travels, and Eats.

Thanks for stopping by and do come again.

Karen, Tu-Na Quilts

April Block for Amanda

Here's the finished block - it went together easy, even though I had to double check my orientation a couple times :)


Sorry, the picture's a little dark. It's in the mail first thing on tomorrow morning

Monday, April 23, 2018

April Block for Heather

I had a lot of fun working on this block. . . . my biggest problem was picking what colors to use!


I can just imagine how fun and colorful this quilt will be when it is finished!


Thank you, Heather, for the opportunity to make this block for you.  It is in the mail today so you should be seeing it shortly.


In peace & pieces,


Sherry V.

Saturday, April 21, 2018

April Scraps for Heather

This block seemed to get easier and easier as I went along. Loved the choice of all scraps. They are in the mail already.


Tuesday, April 17, 2018

Hive 1 Block for Heather

Hi Heather!
I had your block finished and ready to mail in the first week of April, but it was fun and I wanted to use more scraps, so I made you a second one! I'm going to keep that one a surprise!
I should get them in the mail to you this week.
I hope you like them!
Liz

Sunday, April 15, 2018

Quarter Log Cabin blocks for Amanda

I've got this fun happy block all made, and it has arrived safely at its destination. Thanks for a fun set, Amanda.


Meredith

Friday, April 13, 2018

Heather’s Pretty Spring Block


Such pretty blocks! Looking forward to seeing your finished quilt.