Thursday, February 1, 2018

Hive 6 February Tutorial - Scrappy Sister's Choice

Hello, Hive 6. My name is Lori, and I live in beautiful Prince Edward Island, Canada. In addition to quilting, I also love to knit, crochet, and cross stitch. There are never enough hours in the day. I work at a resort from May until October, and the rest of the year I am free to pursue my hobbies. This year I am determined to work on UFO's and not start any new projects, so I dug deep into my tote of unfinished projects and found my sister's choice blocks.
Here is what you need to make one block:
1. 2 1/2" squares for 9 patch - 5 of one color and 4 of another color. Your 9 patch can be any colors you like.
2. Neutrals - you will need 4 - 2 1/2" squares and 4 - 2 1/2 x6 1/2" rectangles. For my blocks I used a different neutral for each piece, but if you don't have that much variety, maybe you could use one neutral for the rectangles and another for the squares. As you can see, I use a very broad definition of neutrals.
3. Star Points - 8 - 2 1/2" squares of brown. Any brown, light or dark or patterned, it doesn't matter, as long as it reads brown overall.


Make your 9 patch first.

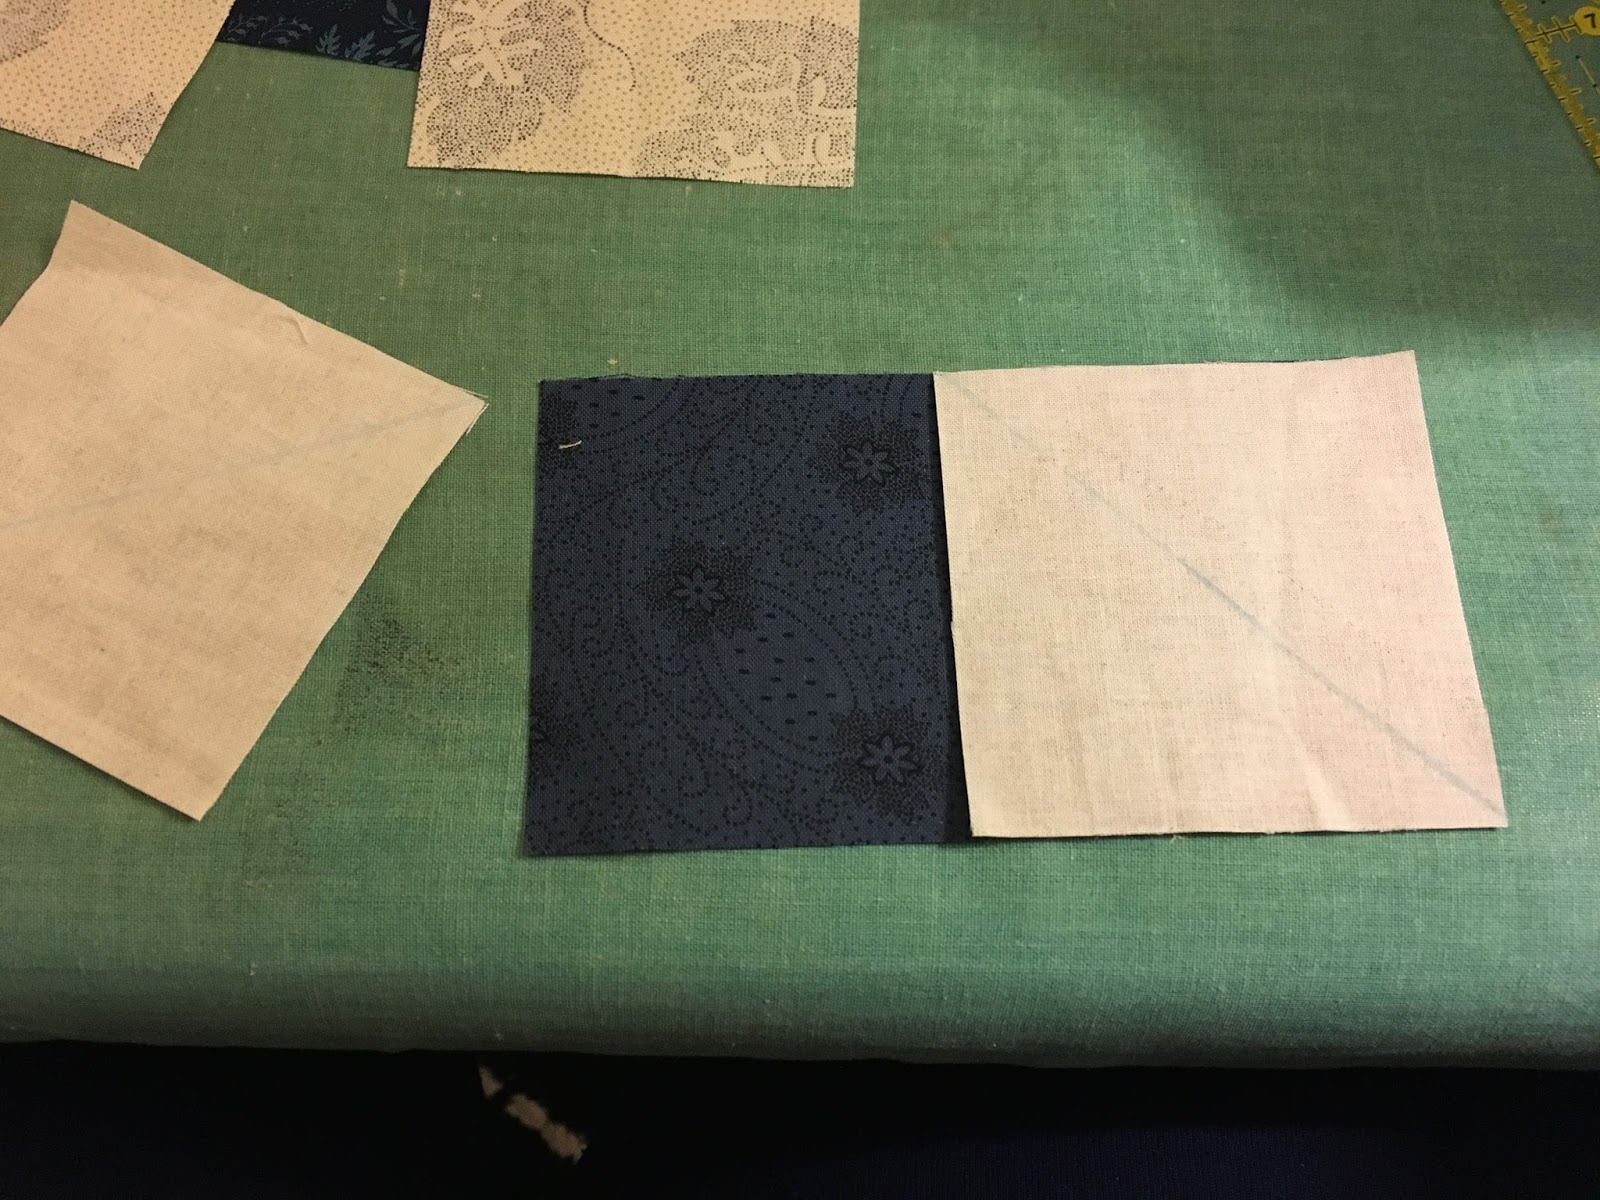
Once you have your 9 patch made, take your brown 2 1/2" squares and draw a line on wrong side to mark your stitching line.
We are going to use the stitch and flip method to make our star points. Place 1 brown square on top of one of the neutral rectangles, right sides together. Sew on the drawn line, trim your seam, and press. Repeat on the other side of the rectangle. Pay close attention to the direction of your lines.
 Make star points on all four rectangle.
Now it is time to put your block together. Lay your block with the 9 patch in the center and the rectangles on each side, filling in the corners with the 2 1/2" neutral squares. Assemble into rows, then stitch the rows together to finish your block.
Your finished block should measure 10 1/2".


February Tutorial for Hive 4


Happy February Fellow Bees!


My name is Katie, and this is my fourth year in the Bee.  I came to quilting right after I finished my undergraduate degree.  I was a band kid in high school and had all the t-shirts to show.  I didn't want to wear (read - couldn't fit into) the shirts any longer but still wanted the memories.  Enter the t-shirt quilt!

Middle quilt is the first one I ever made;
other two are my brother's and sister's quilts (held by them)

Yep, I made double sided quilts.  I'm a little nuts.


I've made a number of t-shirt quilts since and have used two different machines.  My favorite thing about quilting is the look on people's face when you pull out the finished product.  The satisfaction from taking something simple (fabric) and turning it into a long lasting item is pretty awesome.


This month, I was looking through old bee posts and found such a cute block designed by Carolyn over at the blog Sweet Boater Chick (http://sweetboaterchick.blogspot.com).  She graciously allowed me to use her block (designed by her) so here we go!  She calls it the Every Which Way Pinwheel.  It is an easy pieced block incorporating flying geese.


(For another excellently written tutorial, here is the link to her original post: http://stashbee.blogspot.com/2017/11/hive-8-tutorial-november.html)


Fabric inspirations:  I am copying Carolyn's color picks - I would like low volume neutrals for the background and a mix of dark gray, dark blue/navy, and mustardy yellows for the flying geese bodies.


Be as scrappy as you can, except for the "wings" of the flying geese - please use matching triangles for a single flying geese block.


Cutting instructions:

5.5" x 3" (12) for the geese bodies (grey, blue, and yellow)
3" x 3" (12 sets of 2) for geese wings (background)
5.5" x 3" (4) background
3" x 3" (4) background


Sewing instructions:

I followed Carolyn's instructions and used the flip, flip, and finish method to make my flying geese.

Start by drawing a diagonal line on each of the geese wings.  Line up one of the wings with one of the geese body sides and stitch on the diagonal line.  (Chain piecing is your friend!!) I find that sewing just to the outside of the line will make it so that, when folded out, everything lines up appropriately.


Trim ¼" from the sewn line, then press the wing out.  Repeat with the other side and you will have flying geese!  If you would like, please feel free to send me the triangles leftover from trimming.  I sew these together as half square triangle units and will use them for a border (or something :).


For each quadrant of the block you will need three of the geese blocks, one of the 3"x3" squares, and one of the 5.5"x3"rectangles.  Sew these together as below (picture borrowed from Carolyn):


Feel free to press whichever way you would like. Once you have all four quadrants done, sew them together to make the pinwheel.  Press the large seams (quadrants together) open to reduce the bulk.  You are done!  The final block should measure approximately 15 ½" by 15 ½".


I look forward to seeing the creations!


February Hive 1 Tutorial

Hello Hive #1.   I'm Rose Braun, I am so happy to be Queen Bee. This is my 3rd year in stash bee and it has been great every year.  Wow! I can't believe it is already February. This year is flying by so fast. I am glad I won't have to make a block this month because it is going to be crazy busy for us. 
We are in the process of selling our home in Florida and will be packing up and moving out. We are also buying a new home here in New Jersey. We are cleaning up the clutter and packing a home we have lived in for over 30 years. Lots of work in store. Two houses to pack! Help!

So, my block. I have a fun, fantastic, scrappy block from A Bright Corner. 
It is called Scrappy Susannah.  


This link is perfect. She shows you step by step. (Link to A Bright Corner).
I just love the scrappy look of this block.  

 For one (12.5") block you’ll need:

  • 8 (3.5”) print squares
  • 4 (3.5”) white on white
  • 2 (4.25”) print squares
  • 2 (4.25”) white on white


The colors to use should be dark blue prints or turquoise prints, I like most all , batiks are OK with me. I don't mind repeats. 
This is a few of the fabrics a pulled. I would like the white to be a white on white. You can mix the white on whites just no beige, white please.


Place each 4.25” white square right sides together with a 4.25” print square.  

Sew about 1/4” on both sides of the drawn line.

Cut down the center line, now you have two.

Trim to 3 1/2" square.


Lay them out and sew together. 


These are a few that I made up. I think it will be great. 
Looking forward to seeing what you all make. 


Hive 7 February 2018 Block for Darrel - Disappearing 9 Patch

Hi Hive 7,

This month I'm asking you all to make a disappearing 9 patch block, using charm squares (5 inch squares) as the building blocks. It will finish at 13.5 inches and should be a quick sew.

The real challenge for this block lies in fabric selection. I'm planning on turning my blocks into quilts for a charity here in Australia that is always in need of quilts for teenage boys.

To that end, I'm asking you to dive into your stash and extract all your geometric / stars / stripes / spots / gaming / sport / action / nerdy / science / text / architectural / character prints.  (Now I know I'm playing into stereotypes here and boys can love pink too but humor me and stay away from the florals and pinks in your stash.)

Here's five finished blocks that I made with fabrics from my stash, which hopefully provide some inspiration / guidance.


Fabric Selection:


You will need a total of nine (9) charm squares in three different prints / colours.

Colour 1 - Four 5 inch squares of  blue. 


Any blue (light, mid, dark, royal, navy etc) is fine.  Solid blues preferred, but tone on tone prints work too as long as they read as a solid blue.


I've pulled some fabrics from my own stash to demonstrate.

In the picture on the left, I've selected some examples that don't work. As you can see the patterns overwhelm the blue background and should be avoided for this block.


In the picture on the right you can see a range of blues (seriously, if it's blue, it's good!) but also that some prints - like the gum nuts - truly do read as blue.

Anything like this in your stash will be great! The idea is that the blue fabric will act as a unifier amongst all the colourful prints and that is why it's so important that it be a 'solid' blue.


Colour 2 - 4 squares of 'teenage boy' print

These four squares should all be from the same fabric but that fabric can be any colour or print that you think would suit a teenage boy (say 13 years to 18 years old) . Some examples include geometric / stars / stripes / spots / gaming / sport / action / nerdy / science / text / architectural / character prints. Black and white, brights, and pastels are all fine.  Here's some examples from my stash.


Colour 3 - 1 square in a colour / print that accents the teenage boy print.  

This square is the one that will be sliced and diced into the four smaller squares. So while it can be any colour that accents the other print you selected, smaller patterns work best.


You can see in my finished block examples at the start, that I chose my fabrics for this square by picking one colour that was used in the teenage boy print. But once again, as long as it accents the teenage boy print and creates visual interest, anything goes for this block.

'Tutorial':


Now I know that the disappearing 9 patch is a pretty simple block that no doubt many, if perhaps all of you have already made before. 

I've put together a step by step process below, because that's what we do, and sometimes it's nice to sew without having to think. But there's nothing fancy below: if you start with nine charm squares and slice it down the center twice you can't go wrong! 

I have only one request out of the ordinary - PLEASE DO NOT TRIM YOUR BLOCKS. I will trim them all to match, so please just sew and post!

Step 1: Cut your nine 5 x 5 inch blocks from the three fabric choices as set out above, and in the picture below. 


Step 2: Layout your blocks in a 3 x 3 grid, with the teenage boy blocks on the outer corners, the accent colour in the centre, and the blue squares as a +. 


Step 3: Sew the blocks together in 3 rows. Press seams towards the blue blocks. 


Step 4: Sew your 3 rows together. Because you pressed the seams in the previous step towards the blue blocks, you will be able to nest the seams which makes getting the squares to align well much easier, in my opinion.  


Step 5: At this point you have a complete 9 patch block. You now need to slice it up. Firstly cut it in half. I find the best way to do this is to measure 2.25 inches in from one of the centre seams, that way any distortion that may have arise from a less then perfect quarter inch seam won't affect the next step so much. 


Step 6: Without moving the blocks, lift your ruler and make the same cut but horizontally. 


Step 7: You now have 4 blocks. Rotate two opposite blocks 180 degrees so that the bigger squares end up in the centre and the smaller accent colours are on the outside.


Like this:


Step 8: Sew the four blocks together by first sewing the top to squares together and the bottom two. Press the middle seam opposite directions, and then sew the two rectangles together.


And that's it!


A final note - PLEASE DON'T TRIM your blocks. If all has gone according to plan you should have a block that is 13.5 inches square. In all likelihood, there will be an edge or two that's a little out. You can see that in my demonstration block in the picture above, the bottom left square is a off by about an eighth of an inch. I will trim all the blocks when I receive them so they match each other perfectly. I know its hard to send off a block without trimming, but PLEASE RESIST!

Thanks so much, and if you have any questions or concerns, or just want to chat about your fabric pull, tag me on Instagram (@darrel2585).


February Tutorial for Hive 2

Hello Bee Mates!

My name is Tracy and this is my third year participating in Stash Bee.  I LOOOOVE the 2 quilts I've made from the previous years and look forward to another fun quilt made with friends.

One of the things I most enjoy about Stash Bee is getting to share what is in my stash and to see what is in everybody else's.  So, I try to find a block that will allow you to share some of your personality through your fabric.  This year I've chosen a freebie from Lori Holt, her Vintage TV block.  If you are unfamiliar with Lori Holt, go check out her website beeinmybonnetco.blogspot.com , it is full of cute stuff.

You can find her original tutorial here for both a 6" and 12" block.  We will be doing the 12" block with a few small changes and borders.

Lori uses some of her pieced blocks as the center of her TVs, you are welcome to do the same thing if you would like, but I am giving you directions for showcasing a print that represents you, where you live, something you love or just one of your favorite fabrics.

Here is what it looks like:


You will need 4 different fabrics:
* a focus or novelty print for the TV screen (or a pieced block if you would prefer)
* TV fabric - this should be a tone on tone or read as a solid
* TV accents - this should also be tone on tone or read as a solid and be a little darker than the TV, so that it stands out
* background fabric, this should be low volume or light so that it contrasts nicely with the TV (Notice that my background here looks like little marching penguin footprints? That is no accident, those kinds of detail make me smile)

Now let's get started!

First up, chose your focus fabric and cut it at 6.5" x 7.5".


Next, cut your TV fabric.
You will need:

(2) 1.5" x 10.5"
(1) 1.5" x 6.5"
(1) 2.5" x 6.5"
(4) 1" squares


First, sew the 4 1" squares to the corners of the focus print. Trim and press.


Then sew the remaining TV pieces to the sides and top and bottom.


Next, you will need to cut your TV accent pieces.

Cut (3) 1.5" x 2.5" pieces.


From your background fabric cut:

(2) 2.5" x 16.5"
(2) 2.5" x 12.5"
(2) 3.5" x 5.5"
(1) 2.5" square
(2) 1.5" x 8.5"
(1) 1.5" x 4.5"
(2) 1.5" x 2.5"
(2) 1.5" squares
(4) 1" squares


Start by adding the 1" and 1.5" squares to the corners of the TV accent pieces as shown in the photo.


Keep sewing...


Now add the borders and Voila!  A TV!

Now for the antennae.  Lori embroidered hers on and you are welcome to do the same.  I don't love to embroider, so I chose to just sew on some ribbon.  I will leave the antennae up to you.  If it makes you really uncomfortable then you can leave it off completely and I will add some to it later.

I will also be adding some buttons as dials later after it has been quilted.


Sew cute right?

Here are a couple more I have put together.


I hope you guys have fun raiding your stash for something fun!
 And I can't wait to see what you come up with!

Thank you for sharing with me,
Tracy Hansen

@tracysbitsnpieces