

12” finished square- 12.5”with seam allowance
This is based on an image of a block I saw once and have no
idea where and cannot find again since I don’t know what it’s actually called.
This isn’t an original idea, and I would happily give attribution to whomever
did think it up if anyone knows who that is.
Color choices: colors
1 and 2 should contrast though they don’t have to be straight color opposite.
Color 3, where colors 1 and 2 intersect, should also be quite different from 1
and 2. Try not to use directional prints or patterns with words as I will be
turning these different directions when assembling the quilt top.
For colors- think “Obnoxious” and go BRIGHT (does
not have to be light- see examples below) and BOLD and BUSY. Please- Not
pastels & not muted. Prints are ok-
but please no children’s patterns or thematic- they should be generic images
not specific ones. Batiks are ok. Neon is ok, but not exactly what I mean by
bright. There are some examples at the bottom of the instructions.
Fabric needs and cutting:
1.
Color 1-
a.
1 of 6.5” square
b.
4 of 2.5” squares
2.
Color 2-
a.
1 of 6.5” square
b.
4 of 2.5” squares
3.
Color 3-
a.
2 of 2.5” squares
4.
Background- plain black or something that reads
very dark black (I used Kona black, but I’m ok with black on black or dark grey
on black)
a.
16 of 2.5” squares
Sewing:
First the snowball blocks
1.
Need to make a 6.5” snowball for each of color 1
and 2 using black in the corners-
a.
start with the 6.5” color square and 4 of the
2.5” black squares for each of color 1 and color 2.
i.
Draw a diagonal line across the wrong-side of
the black fabric from corner to corner.
ii.
Line up the small black square right sides
together on top of the 6.5” color square in a corner. The diagonal line you
drew should look like it cuts off the corner.
2.
Sew along the diagonal and then trim the comer
off ¼” above/outside the seam you just sewed- actually cut off the corner!
3.
Repeat for all 4 black squares putting one on
top of each corner of the colored square.
4.
Open the black triangles so the center becomes
an octagon with black triangles in the 4 corners- press seams out towards the black.
(instructions and based on https://scissortailquilting.com/quilt-block-library/snowball-quilt-block/)


For each nine patch you need:
2 of 2.5” squares of color 1;
2 of 2.5” squares of color 2;
1 of 2.5” square of color 3; and
4 of 2.5” squares of black;
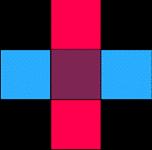
Arrange with the 1 of the color 3 square in the center, the
4 black squares in the outer corners. The squares from colors 1 and 2 should be
on opposite sides of the center block, one going across and one going up and
down. You should have 2 of these nine patches at 6.5” square when you have
finished
Sew: Row 1- Black, Color 1, Black; Row 2-
Color 2, Color 3, Color 2; Row 3- Black, Color 1, Black
For rows 1 and 3 press seams out towards the black, for row
2- press seams in towards middle color 3
Sew the 3 rows together and press seams outwards towards rows
1 & 3.
Assembling the block
Now lay out your snowballs on the top left and bottom right
corners. Put the nine-patches in the other corners- top right and bottom left.
The colors at the edges of the the nine patches should meet the same colors at
the edges of the snowball- if not rotate them until they do. Ideally- it’ll
look like the color is flowing from the pool out through the pipes- see
examples at the end.


Sew them together for final square of 12” finished, 12.5”
with seam allowance

Final note- I will be making a border with “caps” for the open pipe ends- if you have at least 6.5” x 4.5” of any of your 3 colors leftover that you would be willing to send so I can incorporate it into the border- that would be awesome. I’d rather use what’s in the quilt over introducing new fabric in the border.
Here is an image of some of the blocks I made in trying to
create these instructions, for inspiration:

No comments:
Post a Comment