Hello from sunny Southern California! This is my first time participating in Stashbee and it's been such a pleasure sewing for everyone so far this year. This month we are going to be sewing up some wild and crazy cats! I couldn't find exactly the cat I was looking for, so I drafted up my own.
COLORS
For the background, you can pick any color fabric as long as it reads dark. Solids, tone on tone, small patterns, please just no batik. The key here is contrast. I'm not picky (see those lines up there going every which way?). Here's a fabric pull and looking at this photo, I probably wouldn't use the gray unless I was pairing it with something really bright like yellow:
For the cat, I'm looking for bright, saturated, wild. ROYGBIV colors in whatever pattern you like, please just no licensed characters, religious themes, or batik. Anything else goes. Here's a pull:
CUTTING
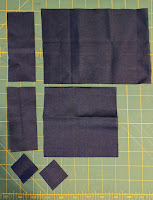
Background color
(1) 5.5" x 8"
(1) 2" x 5"
(1) 2" x 4.5"
(1) 5" x 5"
** optional (2) 1.5" x 1.5"
Cat color
(4) 2" x 2"
(1) 4" x 5"
(2) 5" x 5"
(1) 3" x 9.5"
(1) 2" x 7.5"
SEWING
All of this is done with 1/4" seam. I have no preference on pressing, thread, or pattern matching. Don't worry about squaring up as you go, it'll be fine!
First, take 2 of your 2x2 cat squares and mark them down the center diagonally on the back. This is your sewing line. Place them on either end of your 2x5 background piece with right sides facing. Make sure the lines are going in the correct direction as shown. Sew down your lines and cut off the excess with a 1/4" allowance. Press out as you please.
Should look like this when you're done:
***This next step is optional. If you like a CHONKY cat, you can skip the next step. If you want your cat to have a more defined head/face, keep on.
Take your (2) 1.5x1.5 squares and mark them diagonally on the back as shown. Place them on the bottom of the 4x5 cat face with right sides facing. Sew your line and cut the excess with a 1/4" allowance. Press out as you please.
Should look like this when you're done:
Sew your kitty ears to the top of your kitty face with right sides facing. Press open. Now you've got a completed kitty face!
Next is the back slope. Take your 5x5 squares and match them with right sides facing and sew down the diagonal. Cut excess with 1/4" allowance and press open as you like. Should look like this:
Take your remaining 5x5 cat fabric and place it on top of the piece you just finished with right sides facing. Sew down the right side and press so when you open it up, it looks like this:
Next take the 3x9.5 cat fabric and place it along the bottom of the piece you just completed with right sides facing. Sew along the bottom then press open so it looks like this:
Tail Assembly: take the 2x2 cat pieces and place them at either end of the 2x4.5 background fabric with right sides facing. Sew together and press open so it looks like this:
Take your assembled tail and place on the left hand side of the completed body unit with right sides facing. Sew together and press open so it looks like this:
Sew on the 2x7.5 cat tail to the left hand side of the body unit. Press open.
Place the 5.5x8 background block on the completed kitty face unit with right sides facing so that when you open it, the background flips out to the left. Press as you like.
Place the completed top unit face down on the top of the bottom unit and sew. Press and voila! Completed cat. Should finish up to about 12.5" square.
I hope my directions were easy enough to follow. And I can't wait to see your wild and crazy cats!
Happy sewing,
Nicole P


No comments:
Post a Comment