Hive 4 Fun Friendship Star
 |
| Two color ways, one left spinning and one right spinning |
I’m excited to share this block with you. I had thought how appropriate this block would be.
Donna Jordan has a great video and free pattern on her website, but mine is changed. I asked
permission and they want to see the project when it's completed.
I have learned a lot of technique from watching her. Here's the link to that block and website.
video tutorial https://www.youtube.com/watch?v=cNSr25dAc_A
website https://jordanfabrics.com/
As simple as it is, there are some fun things to do with it.
First of all, what color ? You choose. A favorite of yours or even something you have a lot of
and need to lighten your stash bin. You need four different fabrics of the same color.
Look for a variety of designs, shades or tones. Whatever makes you happy.
Then find a fabric that you might want to cut in a fussy matter (highlighting a certain design), or not.
This will be the center of the block. You can go wild.
Choose one more fabric for the star points or “legs” It can be inspired by your center, or a complete contrast to the first. Just be sure that it will stand out.
Now let’s cut::
Favorite 4 same color fabrics. (If you don’t have 4 of something, you can repeat colors)
A 5.5” x 9.5” rectangle from each of them.
:
2. Fussy cut or center. 4.5 “ square
3. (4) 4.5" squares (star points)
 |
| Here is a second color way, Goldish, blue and red |
Ready, Set, Sew.
Here’s where you have to pay attention. I want my stars to go in both directions.
That means some of you are going to make a stitch and flip corner in the right corner of the rectangle
and some of you will make them on the left corner. This is on the 5.5 edge.
If you do it the wrong way, it’s okay as long as all four of yours are the same.
I pick Helen, Dawn, Joan, Cathleen and Marissa to put these corners on the left vertical top of the rectangle.
I pick Laura, Lisa, Em, Kristen and Samantha to put these corners on the right vertical top edge of the rectangle.
You can draw a diagonal line on the star point if you want. I use diagonal seam tape and that’s easier.
Stitch on the diagonal line. Press away from the rectangle and trim ¼ inch away.
If you want to keep the cut off triangle for yourself, please do so,
but if you were going to throw them in the trash can, send them to me.
I love little small scraps and have a plan for these.
 |
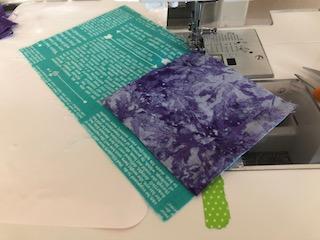
| The diagonal seam tape is actually under the block, but I extended washi tape out further to align my point. |
Notice that these stars have floating points. Which means the background is at least one inch larger than the corner piece. No points will be lost. I especially like this when coordinating with different block makers of various experience levels. I don’t mind sacrificing a point or two along the way, but I'm happier when they maintain their integrity.
Depending if you were a left corner or a right corner, lay out your 4 rectangles around the center square. The right angle goes next to the center.
 |
| Left hand version in order to sew. |
Get the next rectangle and continue to sew working the way around the center.
When you have all the rectangles on, go back and finish the first seam where we only sewed two inches. I recently found out it’s much easier if you sew from the unfinished part of the seam toward the already sewn seam.
 |
| Last seam toward the first seam. If you look closely you can see the first. stitches. |


No comments:
Post a Comment