
Hello Hive-mates!
This month I'd like you to make me a circle block, simple or more complex, using pretty much any technique. I'll list three ways to do it below, with instructions. But first, an overview.
Overall Quilt Design

I've decided to explore basic shapes through my StashBee quilts. Last year was triangles with a flying geese-based design. This year I want to go ROUND, which is the title of this quilt. Actual colours and patterns will vary wildly, of course, but this is my overall plan.
BLOCK DESIGN
I'd like my Hive mates to make me a 12.5" square block, with one contrasting circle on it of any size from 3" to 10". The background of the block should be one fabric, but the circle can be pieced. The circle does not have to be centred on the background piece, but shouldn't be closer than 2 inches to any edge.


COLOURS


FABRIC PULL
Solids, blenders and modern prints that read largely as one colour from the swatches above are perfect for this. Pick at least two colours, with good contrast between them. Below is a selection of blenders I had on hand that fit this palette pretty well (the darker green is a bit off - should have subbed in something more olive)

BLOCK CONSTRUCTION
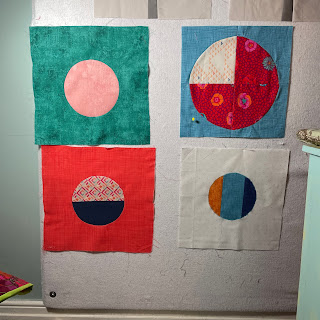
I know sewing curves is not everyone's favourite thing :) So I'm giving options for construction, from simplest to more complicated. The three methods are shown in the photo below: Appliqué (bottom right), Set in Circle (top and bottom left) and quarter circle/Drunkard's Path (top right).
If you have another method you want to use (turned edge appliqué for example) GO AHEAD! I'll love it :)
1. APPLIQUÉ
You can appliqué a simple circle (from 3" to 10" in diameter) to your background fabric using any method you like. Or you can piece together a square of fabric and cut your circle out of that, and then appliqué it to the background.
FUSIBLE WEB : I love fusible web so much! (Here's more info about fusible web.) You can draw your circle on the paper side of the f.w., then roughly cut it out and then iron the non-paper side onto the wrong side of the fabric you're going to make your circle from. Cut out the circle neatly, remove the paper backing and iron the circle onto your background fabric (it doesn't need to be centred). Then you stitch all around the perimeter of the circle with a tightish zig zag stitch (or, if your machine has a special stitch you like for appliqué, go for it!)


If you want to actually be less crazy, here's a nice simple fusible circles tutorial from A Bright Corner.
And if you don't have fusible web on hand, just dab a little washable glue stick or fabric glue on the wrong side of the circle and place it on your background fabric. Let it dry and then zig zag around the perimeter. Or use some fusible interfacing to give some body to the circle: here's a tutorial using fusible interfacing rather than fusible web from Bijou Lovely.
2. SET IN FULL CIRCLE
This is remarkably simple to do with a large enough circle, as long as you take it very, very slowly! If you've done garment sewing it will seem quite familiar - it's like setting in a sleeve.
Basically, you're going to cut a circle out of your 12.5 inch background fabric (I'd cut the background fabric to at least 13" x 13" and trim it afterwards) and then set in a circle of a different fabric (or a self-made pieced fabric) that's one inch larger in diameter than the background circle.
For example: cut a 7" diameter circle from your background piece and then cut out an 8" diameter circle to set into it.
You can download different diameter circle template pdfs here to print out:
9 inch (this is a semi circle template - place the diameter line (the straight one) on fold of fabric)
Tutorials: Colour Girl Quilts tutorial on setting-in a full circle. Ignore all steps before step 6, (She's using a special ruler -- if you have it, that's great! But just print out two adjacent sizes of the circle templates above, cut them out and cut the smaller out of the background and the larger out of the circle fabric. The rest of the tutorial is great.)
If you prefer a video, the same maker made a nice YouTube video showing her set-in circle technique. Go to timestamp 3:45 to skip the use of the special ruler and start at the other steps. She calls the background the concave piece, fyi, which is fair enough :)
Here are my own photos documenting this technique with a 7' pieced circle set into a 6" circle in the block background.
I made the simplest pieced fabric for my circle -- two 8" wide chunks, sewn together:


3. QUARTER CIRCLE TEMPLATES aka DRUNKARD'S PATH
I've left this one to the end because I personally have the most trouble with it because there's more matching of seams to be done to make a full circle block and I suck at piecing. But I know that some quilters are dab hands at this and it is very old traditional block pattern so what the hell.
If you want to try this technique, I can't write a better tutorial than you find on this very attractive free pdf pattern by Leanne Parsons for The Quilters Planner. The pattern includes a 6.5 inch quarter circle template -- four of them make a 12.5" block! I would take her advice and add an extra quarter inch to the outside of that template so you have some room for trimming and also for matching the damned seams :) Keep all the background fabrics the same, and you'll be golden.
Here's another very calming tutorial on the Drunkard's Path block at Lee A. Heinrich's site. Almost Zen.
I did make a block using this technique and hated it because I suck. I liked the idea of being able to do contrasting quarters within the circle, but found it easier to just piece the circle fabric first rather than set them in quarter by quarter. But you do you.
I hope this is okay. The way my brain works I over-explain some things while glossing over others almost entirely. That's why I linked to so many other tutorials. Circle blocks are one of the staples of modern quilting design and I love how they look. However you choose to make a block for me, I'll be so grateful!
Nina
No comments:
Post a Comment