

Hi! I'm Carla from Hive 6 and this is my first Beehive sooo fingers crossed everyone understands this tutorial! =D
This month's block was inspired from the Buzzsaw block found in Quilter's Cache. (Link here!)

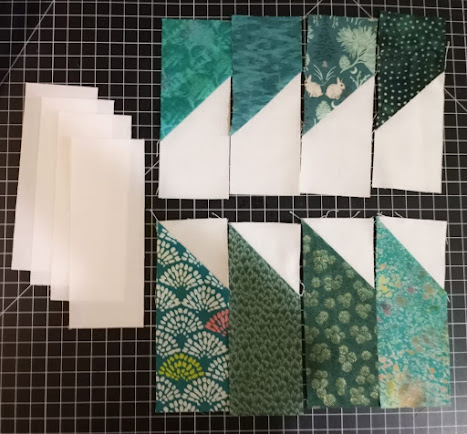
Here are the pieces you will need:

Then we do a similar thing with the colored strip of fabric (6.5 x 2.5) and the 2.5 sq. This one is a little easier to mark the diagonal line since it should go across the white square. After you sew right on the line, you can trim 1/4 inch away. Then repeat 3 more times! Your final strip should be 6.5 x 2.5.


Once you have an arrangement you like, you can sew the strips together with a 1/4 inch seam allowance (I pressed to the darkest fabric, but you can choose your favorite way). Now you will have have (4) 6.5 x 6.5 squares. Arrange them whichever way you like making sure you form the white diamond in the middle. I like the bunnies on the bottom left being "right side up" =P.


It would be best if you used white for the background, I used Kona White, but please don't go out and buy any! Just use whatever you have that is closest to true white (sometimes I use printer paper to check for the undertones in the fabric). This is my first Bee quilt so I will keep it and treasure it forever no matter what!!!!!!!!!
- (4) 6.5 x 2.5 white background rectangles
- (4) 2.5 x 2.5 white background square (for the diamond center)
- (4) 4.5 x 2.5 white background rectangle
- (4) 6.5 x 2.5 colored rectangles
- (4) 4.5 x 2.5 colored rectangles

First we will take a 4.5 x 2.5 white back ground fabric and a 4.5 x 2.5 colored piece place them perpendicular to each other aligned on one side (right sides together, but this only matters for your colored piece). This will result in an overlap that's a 2.5 sq. Then we're going to draw a 45 degree line from one corner of our overlap to the other (see picture 1). We're going to sew directly on that line (picture 2) and then cut of the remainder corner 1/4 inch away from our sew line (picture 3). Finally we open our new rectangle and it should measure 6.5 x 2.5. I pressed to the dark side (buahahahhaa) but I honestly have no preference (picture 4). Then repeat the process 3 more times with your other 4.5 x 2.5 pieces.

*Disclaimer* This one was my first try and I didn't sew right on the line so it ended up being a little crooked. I could finagle it on the final square so it didn't really made a difference but it did drive me insane whenever I looked at it.

*Notice in which direction the diagonal is drawn and the placement of the fabrics. You might end up with the mirror image and they're not interchangeable =(*

Now you should have something that looks like this:

Now we arrange them in groups of 3:


Last step is just sewing the 4 blocks together! I took extra care to make sure my diagonal white lines touched each other so the points on the diamond matched, but it wasn't hard at all!
And we have the final block! =D

Now to talk about COLORS
I'm envisioning something that looks like this at the end (a scrappy version =P).

You can pick whichever color you prefer or a color that you have a lot of scraps of. I used 9 different fabrics, but 3 will be enough if you alternate the pieces. I don't really have exceptions to any fabric! I just made sure that the major color was similar across all fabrics.
Let me know if you have any questions and happy quilting! =D
No comments:
Post a Comment