Tuesday, April 1, 2014

Hive 10--April Block Tutorial


Hello, my name is Nela and I have lived in Eugene, Oregon for the past year and a half.  I teach one class of high school physics and spend the rest of the time sewing.  I am married to a wonderful man, Michael, who puts up with my fabric and quilting obsession.  Our daughter, Madeleine, is five years old and loves kindergarten, ballet, gymnastics and music.  We share our house with two cats (Mister and Jasper), two rabbits (Honey Bunny and Peanut Butter) and a beagle/Queensland healer mix, named Kelvin.  We sometimes find deer and turkeys in the yard as well.  


I have been actively sewing and quilting for just over one year.  I started sewing simple clothes for my daughter, bags and then tried my hand at making baby quilts.  I have done a couple of quilt-alongs and greatly appreciate the timelines and the tutorials.  I continue to improve my piecing techniques and try out different free motion quilting.  


I organize my fabric by color and in tubs.  I also have a separate area for scraps, which are also organized by color.  I have Jeni Baker to thank for this.  


I would have to say that my favorite fabric designers are Jeni Baker, Anna Maria Horner, Tula Pink and so many more… I just LOVE fabric!!!!

The one thing I have learned that I wished I knew when I first started quilting was taking my time and matching seams.  I also have made friends with my seam ripper (favorite tool), when the time comes to stitch again.  My favorite seam ripper is the Seam-Fix.
Seam-Fix by Fabric Hut


A fictional character I enjoy right now is Annie, from the children's series, The Magic Tree House.  She and her brother, Jack, go on many adventures throughout history and I just love how she gets so upset when girls were not allowed to do what the boys did.  I enjoy reading about what girls wore and how Annie reacts to them.  

Now, onto this month's tutorial...

April Block Tutorial

Fussy Cut Rainbow Block 


I just finished up a class on color and am now obsessed with rainbows.  So, our block will have the colors of the rainbow (red, orange, yellow, green, blue purple) in it.  I also love fussy cut "images" and want the finished quilt to represent each person in Hive 10.  When you finish the block it will be 16.5" square.  Please press all seams open.  Use a 1/4" seam allowance.  

Let's begin:

Fussy Cut Rainbow Block #1
Fabric Needed:
(1) Fussy cut piece 5.5" square
White Fabric 
       (2) 1.5" x 5.5" strips
       (2) 7.5" x 1.5" strips
Red fabric
       (1) 7.5" x 2" strip
       (1) 2" x 9" strip
Orange fabric
       (1) 9" x 2" strip
       (1) 2" x 10.5" strip
Yellow fabric
       (1) 10.5" x 2" strip
       (1) 2" x 12" strip
Green fabric
       (1) 12" x 2" strip
       (1) 2" x 13.5" strip
Blue fabric
       (1) 13.5" x 2" strip
       (1) 2" x 15" strip
Purple fabric
       (1) 15" x 2" strip
       (1) 2" x 16.5" strip


A note about the rainbow fabric.  Please use monochromatic print fabrics.  I am fine with white or cream as a secondary color as well.  Also, I personally cut the strips a little longer and then trim as I work my way through the strips.  


1. Start by choosing fabric for the fussy cut piece.  This piece of fabric will be cut to 5.5" square.  
(I have always loved frogs and this piece of fabric was given to me by Heather Ross at my first sewing weekend, which started me on my sewing journey.)


2. Cut out the white border.  You will need two 1.5" x 5.5" strips and two 7.5" x 1.5" strips.  Sew the first two strips rights sides together and then press the seams open.  

3. Sew the other two strips, rights sides together on the top and the bottom.  Press open.

4. Take your first strip of red fabric and place it right side together on the top of the block.  Press and then add the next red strip to the right side of the block.  

5. You will then add the first orange strip to the bottom of your block.  Add your second orange strip on the left side of the block. 


6. Continue adding strips moving around clockwise.


Once you have added all the strips, you are done.  I will square up the blocks once I get them all.   


Fussy Cut Rainbow Block #2


I can't wait to see all your fussy cut rainbow blocks.  


If you have any questions, please ask.  (nela@tifosew.com)
Thanks,
Nela

Hive 6 April Block

Hi Hive Mates!  I've been having a great time getting to know you all and sewing some awesome blocks as well! 

April is my month and I'm going to go ahead and just run through the questions real quick so I can get you to the block tutorial (which I'm sure you're just going to love!)

My name is Kim Thomasson. This is me:


 I live just south of Charlotte, NC in a little town called Monroe.  We used to live closer to Uptown (what we in Charlotte call our downtown area, I know, weird) but we moved out to the country so our five kids could have some space to roam around.  We now have six acres, along with some goats and chickens.  Fun times.  I did say five, I do have five kids, which most people think is a lot, but when they're yours, it doesn't seem like a lot, it's just the size of your family.  They are 16, 14, 12, 10 and almost 8.  I have always homeschooled our kids, but when the oldest reached high school we opted to send him.  So, my oldest is a junior in high school, my second is about to start his freshman year and the other three I still teach at home. 


I started quilting a few years ago and have loved it.  My mom has been quilting for many years and I have always loved her work, but it wasn't until I spent some time in a "real" quilt store that I started to get hooked.  I fell in love with fabric first, and then decided it would be fun to make awesome stuff out of beautiful fabric. So, quilting it was!  I love it so much I started blogging about it at www.windsorandmain.com.

I keep my stash in baskets scattered around my studio.  Most of my fabric is organized by color, however I keep all of my solids together and if I'm working on a project, I keep all of the fabric for that project in it's own basket.


My favorite designers are Lotta Jansdotter,  Allison Glass, Bonnie and Camille, and so many others.  The fabric lines out there lately are just amazing.  Who don't I love?

My favorite tools by far are my quarter inch ruler for paper piecing and my wonder clips, (love them).

The one thing I wish I knew when I started was to just be really patient.  Unsewing is part of the gig.  It really does matter that the seams line up and that it actually measures a quarter inch.  That darn quarter inch is so crucial.  It's easy to learn if you're patient with yourself and don't expect perfection.

Okay, last question:  Who is my favorite fictional character?  I wish I could tell you it was someone noble and respectable like Elinor Dashwood (who is wonderful)  but alas, I cannot.  I would be faking it and trying to impress you, no my favorite fictional character is hands down, Severus Snape.   I know.  I can't help it.

Now, the good stuff.  This is the block for April.  Please don't hate me.  I know a lot of people don't love flying geese, but I just adore them and I'm not that picky about perfect points!  Take a close look at my block and you'll see some blunt points scattered here and there!  No problem at all!


Before we get started I guess we should talk about fabric selection.  You can see by my choices that I'm going for a super scrappy look.  I love scrappiness and I love vintage/modern prints.  However, all that being said, I want you to be able to pull from your stash and I know we don't all have the same stuff floating around in our stashes, that would just be crazy, so use what you have.  I don't mind darker prints either.  Now, the background.  I've been wondering what to do about that.  At first I thought I would just go ahead and send you all some white fabric, so it would be all matchy-matchy.  But, whatever, I decided not to be that uptight.   So, white would be great.  The white I used is more optic white than creamy white.  If you don't have a solid white-white, then I would prefer a white on white print rather than a creamy white solid.  And if you don't have that, then how about a low volume white background?  I'm really just going for as white as possible. 

If you have the book, Modern Blocks: 99 Quilt Blocks from your Favorite Designers by Susanne Woods, then you're all set, because this block is in there!  This block is called Follow the Leader and is designed by Sherri McConnell.  You can find the block and instructions on pages 66-67.  If not just follow the directions below and you'll be just fine!  Okay, so here are the cutting instructions:

White (Background) Fabric:  Cut 4 rectangles 3 1/2" X 6 1/2"
                                                      Cut 32 squares 2" X 2"

Feature Fabric for Flying Geese:  Cut 4 rectangles in each of the four fabrics:  2" X 3 1/2"


Flying Geese:  Love 'em or hate 'em; this is quick review on how to make 'em!
1.  Lightly draw a diagonal line from one corner to the opposite corner on the wrong sides of two squares.
2.  With right sides together, place a square on one end of the rectangle.  Sew directly on the line trim the seam allowance to 1/4" and press open.


3.  Sew directly on the line trim the seam allowance to 1/4".


4.  Press open.

5.  With right sides together, place the other square on the other end of the rectangle. 


6.  Sew directly on the line, trim the seam allowance to 1/4".


7.   Press open.


You have made the flying geese units using 2 white (background) 2" x 2" squares and 1 feature fabric 2' x 3 1/2" rectangle.  Repeat the process until you have 4 units in each color you have chosen.  For me it was 4 green, 4 blue, 4 pink and 4 yellow. 

Next join 2 Flying Geese units of the same color together as shown below.  Press.  Make 8 pairs of geese.


Join the pairs together with a different color pair as shown below.  Join two pairs of flying geese side by side into a 3 1/2" X 6 1/2" unit. 


Add the 3 1/2" X 6 1/2" white (background) rectangle to the 4 flying geese units to create 1 quadrant.  Make four quadrant units.  I attached the following pictures to show you how the Flying Geese are laid out.  When the quadrants are laid out it's easier to see how the flying geese pairs are really opposite each other.

When you are putting the pairs together the opposite color needs to be on the top.  In the above picture the pink is on top and below the green is on top.  This is a crucial step in the process.  You need to make sure they both face the same direction and have different colors on the top of each pairing.  Make sense?


Again with the opposite pairs.  The piecing is done exactly the same way expect the yellow is on top in the first pair and the blue is on top in the second pair.


This diagram is from the book, but it does such a great job putting it all together so you can really visualize the whole thing.


Okay, and here's my version.  I'm just trying to inundate you with as many pictures as possible so you have no doubts whatsoever on how to put this block together! 


One last thing, just so you can see that my points aren't always points!  You know what they say....."that'll quilt out"  No big deal, so please don't stress. 


Of course, if you have any questions or need any help at all, please don't hesitate to ask!  I will be happy to help in any way possible!

Have fun!   
Kim :)


Hive #3 - April Tutorial

I'm Afton Warrick, and I blog at quiltingmod.blogspot.com. I live in Albuquerque, NM with husband of eight years, Rob. We met in  high school, but didn't official date until after graduating from different colleges. He's an engineer, and I'm a stay-at-home mother of two. Before then, I taught elementary school. 


I have have two children; Bryce is 4 and Linnea is 1.


Tell us about how you got interested in quilting.
My grandmother was a wonderful woman, a dear friend, and a talented seamstress. Though by my time, she tended toward department store bargain hunting. She created a tied quilt as a graduation present for me that featured all my letter jacket letters. Inspired by this, I set about making my first quilt. Many years later, I discovered a local quilt shop where I learned the quilt-making process. Soon one quilt led to another, which led to more classes, guild membership, quilting friendships, working at a quilt shop, and teaching quilting classes. More recently, I have discovered Bloglovin', Craftsy, and Pinterest. I've joined the Albuquerque Modern Quilt Guild, a couple online bees and a round robin group. I love the positive impact being part of the online quilting community has had on my quilting.

How do you organize your fabric stash? 
If truth be told, it's gotten the best of me. I'm afraid someone is going to recommend me for one of those hoarder shows if I don't do something soon. I began my fabric accumulation before I discovered modern fabrics, so I'm trying to reorganize so I can spend more time sewing and less looking around my sewing space for the fabrics that inspire my newly-derived preferences. I have buckets that contain works in progress and fabrics organized by type (holiday, batik, children's novelty, etc.). I am admittedly jealous of those who have bountiful blenders wrapped on comic book boards and organized by color. Maybe I can do that too. I just need to find my shovel and dig out first.

Who is/are your favorite fabric designers?
Some of my favorites include Tula Pink, Lizzy House, Carolyn Friedlander, Lotta Jansdotter, Sarah Jane, Heather Ross, Kate and Birdie, Violet Craft, Patty Sloniger, and Lisa Congdon. My fabric loves tend to be equal parts modern and childhood whimsy.

What is one thing you have learned that you wish you knew when you first started quilting?
I've learned so much that I wouldn't even know where to start in describing the many things I wish I knew back then.

What is your favorite sewing/quilting tool and why should we all go out and buy it?
My favorite tool is probably the Add-A-Quarter Ruler. It's essential for paper-piecing, which I love to do. Also, I keep finding new ways to use it such as making straight lines when free-motion quilting, checking my 1/4" seam allowance,  cutting off the extra if I'm making stitch and flip triangles, keeping my binding 1/4" from the edge of a quilt when attaching it so there's some batting inside the binding...


Who is your favorite fictional character and why? (Could be from a book, movie, TV show, etc.)
I like Dorcas from Lark Rise to Candleford. She's a strong, independent businesswoman and wonderful mother who always speaks her mind, and somehow gets away with it.


I'm going to call my 15" block Focal Star, as it has wonderful potential for highlighting favorite prints such as this "Tree of Life" print from Tula Pink's Birds and Bees collection.


Design

I even have a plan in mind for the blocks I receive.


Color Scheme

My color palette includes turquoise/teal, coral, orchid, and chartreuse. Some of the collections that feature the colors I speak of include Mormor by Lotta Jansdotter, Wee Wander by Sarah Jane, Pearl Bracelets by Lizzy House, Acacia and FoxField by Tula Pink, Waterfront Park by Violet Craft, Mirabelle by Joanna Figueroa, True Colors by Joel Dewberry, and Road 15 by Sweetwater. These specific fabrics are not required, but I figure it's easier to get an accurate idea of a color if you can compare it to something you can see in person.


I have Kona equivalents too, thanks to the Palette Builder on Play Crafts. If you haven't played with this, oh boy, I think I can fairly say you're going to want to.


It became very evident that I have an affection for these colors during my stash pull.

As for the background, I'm going with low volume fabrics. I adore the way these make such an interesting option for a scrappy background. My love for these fabrics has resulted in an entire Pinterest board.

Cutting

Now, on to the cutting. You are going to need at least four different fabrics. 
Fabric A should be primarily turquoise/teal, coral, orchid, or chartreuse. Pick one. If you want to use a focal fabric, now's the time. Fabric B will surround Fabric A. Pick primarily turquoise/teal, coral, orchid, or chartreuse, so long as it's not the color you used for Fabric A (unless it is a very different value). Fabric C should be turquoise/teal, coral, orchid, or chartreuse. It doesn't matter if you have used the fabric or color for A or B, as it's going to be part of the quilt's secondary design. Fabric D is a low-volume print that has a much lighter value than A, B & C. It should read as a solid white or cream. This can be scrappy.

Fabric A (turquoise/teal, coral, orchid, or chartreuse--bonus points for a focal print):
Cut a 6 1/2" square. This will be the center of the block. I fussy cut my to look most beauteous. 
Cut a 4 1/4" square. Don't get attached to how intact this square looks.

Fabric B (turquoise/teal, coral, orchid, or chartreuse): 
Cut one 3 1/2" x 8 1/2" rectangle. If you have a directional fabric, make the height 8 1/2" and the width 3 1/2".
Cut four squares of each: 3 7/8", 2 3/8" and 2". 

Fabric C (turquoise/teal, coral, orchid, or chartreuse):
Cut four 3 1/2" squares. These can be from the same fabric or different fabrics (scrappy).

Fabric D (low volume with a white or cream background, can be an assortment of fabrics or all the same print):
Cut a 7 1/4" square, an 8 1/2" x 3 1/2" rectangle (If you have a directional fabric, make the height 8 1/2" and the width 3 1/2".), and four 5" x 3 1/2" rectangles (If you have a directional fabric, make the height 3 1/2" and the width 5".).


Piecing

Enough cutting already. Let's break out the sewing machine and get to the piecing.

Sew one 8 1/2" side of the 8 1/2" x 3 1/2" Fabric B and Fabric D rectangles together with a 1/4" seam.


Yep, just like this.


Now press toward Fabric B (the darker one).


Ok, I lied. There's actually a little more cutting involved. Using the center seam as a guide, square up one 6 1/2" end. Now, flip the whole thing over so the fabric that was on top is now on bottom and the nice, straight edge is on the left (unless you're a lefty). Slide the ruler over to the 8" mark and slice. You should have chopped off a 1/2" or smaller sliver that you can dispose of or throw to the children playing on the floor (maybe that's just me). Without getting carried away and moving the fabric around, slide the ruler over to the 6" mark, whack, slide to the 4" mark, chop, slide to the 2" mark, snip, and NOW STOP! Tah-dah! You should now have four 2" x 6 1/2" rectangles.


Get out your Frixion pen or handy, dandy pencil and draw a diagonal line from one corner to the other on your 2 3/8" and 3 7/8" squares of Fabric B and the 3 1/2" squares of Fabric C.

It's Flying Geese-making time. Grab your 7 1/4" square of Fabric D and place the 3 7/8" squares of Fabric B as shown. Grab the 4 1/4" square of Fabric A and the 2 3/8" squares of Fabric B and do likewise. There should be an overlap in the middle. Your drawn line should go from corner to corner. Two sides of the smaller squares should match up with the corners of the larger squares.


To the sewing machine! Sew 1/4" on either side of the drawn lines. Press the triangles without cutting.


Thanks for being patient. Now you may chop from corner to corner.


Place the remaining 2 3/8" and 3 7/8" squares and place them as shown. Stitch 1/4" on either side of the line you drew. Press.


Then cut.


Viola! (Are you impressed with how many appropriate explicatives I can muster?) Now you have Flying Geese. Chop off those dog ears (the tiny triangles that poke out and make the geese un-rectangularish).


Ahhh! That's better.


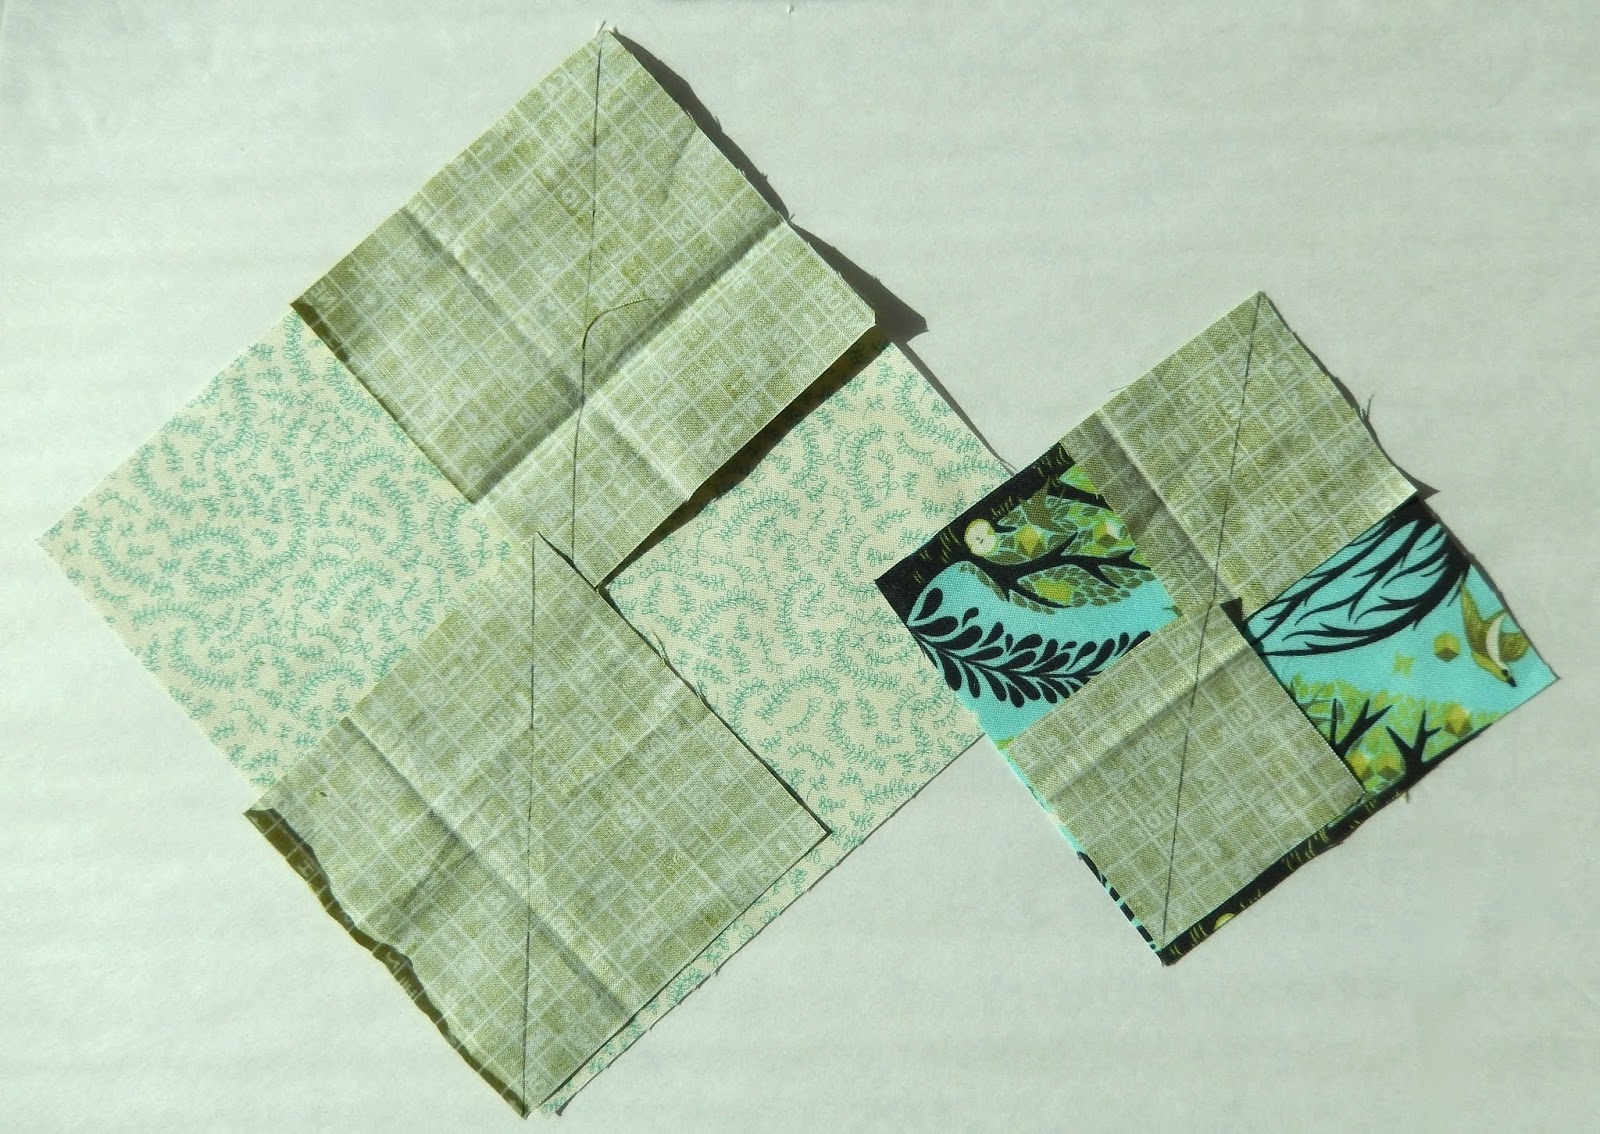
Lay a 3 1/2" square of Fabric C on each 5" x 3 1/2" rectangle of Fabric D. These are going to make stitch and flip triangles in the corners. Be mindful of directional fabrics. This time stitch on the line! Sorry, I know we were on a roll with the 1/4" away thing.


Press matching one corner of the triangle with the corner of the rectangle.


Fold back over and cut a 1/4" seam. Oh how I love my Add-A-Quarter Ruler.


Chop-chop.


It's time to lay out the pieces. Start by adding a 2" square to either side of two of the smaller Flying Geese. Add a 5" x 3 1/2" rectangle with a triangle in the corner to either side of two of the larger flying geese. Stitch a 2" x 6 1/2" rectangle to either side of the remaining two smaller flying geese.


That's the way! Next, attach the flying geese with 2" squares to the large flying geese. Stitch the two 3 1/2" x 15 1/2" rectangular units to the 2" x 15 1/2" rectangles.


Now we have something that looks like this. Sew the flying geese units to the right and left sides of the 6 1/2" center square.


Attach the top and bottom portions, and you're done. Yeah for your beautiful block!