Sunday, May 5, 2013

Hive #4 May Blocks for Candace...

Hi Candace,

I'll get these out tomorrow. Hope you like them, I left them a little big so your can trim them down.

Hive #2 May Blocks for Bri


Hi Bri, 

These blocks were fun to make. 


Stash bee Hive #2 by K&S Design Girls (Lynn)

Saturday, May 4, 2013

Hive 4 May Blocks

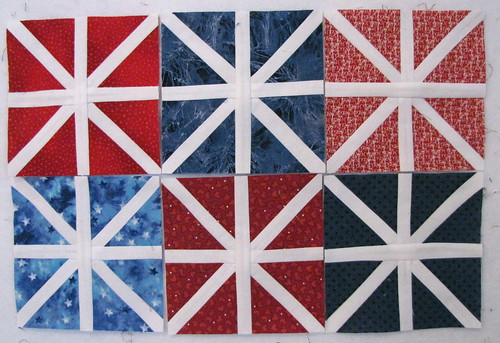
I had too much fun making these blocks, Candace, and clearly my scrappy stash is much bigger than I would like to admit, so I made 6 for you for fun. I definitely forgot my signature block, but I will send that in a card once I find a fabric pen!


Hope you like them!

May block for Beky - Hive 1

Beky, I wasn't sure how you'd feel about the pigs but I thought they were cute and fun.  I will not be offended if you don't use it and I made a second block for you if you don't want to use the pigs.  One is 9.5 square and the other is 9.5 x 6.5.  Hope you like them!

-Sara


Friday, May 3, 2013

Hive #4 May block for Candace

I had to get these done today - we're leaving Sunday morning for my summer job in Yellowstone National Park, and all my sewing stuff has to go to the trailer tomorrow!  Thanks, Candace, for an easy block this month! It's in the mail.

STASH #3....

....... the best thing I can say about this block... is that it is finished and I dont have to rip out any more seams!!


Diane x

STASH #4.....

...2 blocks on their way for Candace..


hope she like them

Diane xx

Thursday, May 2, 2013

May Block for Hive #4

Hello, I am Candace and SaltwaterQuilts.com is my blog.  I recently moved to central Oklahoma, but lived north of Houston for a little over 20 years.  I grew up in Florida, then moved to Louisiana, then Texas and now Oklahoma.  The adventure continues.  

While visiting my grandmother in Florida at age 16, I first saw her making a quilt and I started asking questions.  She explained how the whole process worked and I talked her into teaching me how to quilt.  Once I started using needle and thread, I was hooked.  The first quilt I made was a king size quilt called Road to Oklahoma... what a coincidence.  Yes, you are probably thinking a king size quilt is crazy for a first time project, but the specific pattern I found was for a king and I loved it.  I wanted it to be the biggest size I could make it.


I love this quilt.  I hand quilted it in great detail, because I was so excited to get to make such a big project.  I played with so many different quilting designs in each of the different sections.  This quilt is getting pretty tattered and worn, but it is super soft and I cherish it.

The hardest quilt I have ever made is one I am still currently working on for my husband.  Piecing the quilt top was very tricky and my skills were not that great at the time.  I am hand quilting it, which is why I am not finished.  It keeps taking a back seat to all my other projects.


Here is a picture of the quilt.  Sorry it is not a closer shot of the pattern.  These are the ladies from my grandmother's quilting group (she is the third one from the left in lavender).  When I visited her in January, I went with her to quilting and I took along my quilt to work on.  Little did I know that we were going to have show and tell.

My favorite dessert food would probably be brownie a la mode.  It is the perfect dessert.  Warm brownie, vanilla ice cream, hot fudge, and whipped cream!  Makes me hungry just thinking about it.

May Block: Log Cabin

The block I picked is the log cabin block and am using Rita's Tutorial from Red Pepper Quilts.  You can find her tutorial here:  Log Cabin Block Tutorial


In her tutorial the finished size of the block is 8.5".  I would like you to add one more row of rectangles around each side to make the finished size 11.5".

I would like you to make 2 blocks that are 11.5" squares and one signature block.  The signature block does not have to be fancy.  Just sign your name and where you are from on a scrap of fabric.  I love that the blocks are coming from so many different places and I want the signature blocks to help me remember where they all come from.  I am going to sew them all on the back of the quilt.

As for the colors, I would like you to use bright colors and if you have any florals, please use a floral for the center block as I did in my two blocks.  If you don't have a floral, don't sweat it.  You can always put a bird in the center too.  I love birds and flowers.

The tutorial is very simple and makes the process easier.  I would just like to add some tips...
  • When you are finished putting on the first round of rectangles and it is time to trim to 5.5 inches, be sure to center the block before you start trimming.  The rectangles should be 1.75" in width on each side of the center block.  I almost made this mistake when I first started.
  • Lay out the block the way you want it before you start sewing.  It just makes the process a whole lot easier.  
Please let me know if you have any questions!  Thank you!
Candace


Wednesday, May 1, 2013

Hive #1: Wonky Cross or X Block for Beky


Hi All,

First of all, I would like to thank all of you for of the wonderful opportunities I've had in this bee to try new skills and new blocks that would have otherwise never crossed my path.  I'm having a blast!

A little about myself. My name is Beky Branagan and I live with my grown niece and my dog in the middle of the state of North Carolina with the Great Smokey Mountains to the west of me and the Atlantic ocean to the east. In addition to quilting, I am an avid outdoor enthusiast. I love hiking and camping, and all things playing outside.  This year I am the treasurer of our local Modern Quilt Guild (shameless promotion) and I love to see the fabulous and imaginative quilts that our members make.

I started quilting in the early 2000s when my grandmother gave me her Featherweight 221 Singer sewing machine. I took it to the shop to get the 200+ yards of thread unwound from underneath the needle plate and the mechanic read me the riot act for sitting on the case. (Gasp! Clutch Pearls!)  During this lecture, he told me all about how quilters loved the 221, etcetera, etcetera, ad nauseam, and so I though I had better try this quilting thing since I had such a favored machine. I've been hooked ever since and the machine still runs smoothly at 65 yeas of age! (She now has an electronic younger sister that I use most of the time, but she is still used for "special" projects.)
A friend of mine has just moved into her first home and I though I would make her a quilt. Her favorite color is pink, and I have to admit, that I don't have very much pink in my stash at all!  This block is a very simple block and should be a zip to make. 

Wonky Cross or X Block

Please use a bright pink, fuchsia or magenta print fabric for the background and either Kona white or the brightest white you have in your stash for the cross or X.

I would like the blocks to be sized so that they are multiples of 3" with a 1/4 inch seam allowance with 6.5" as the smallest size. You can make 6.5", 9.5", 12.5" inch squares or even rectangles that are 6.5" X 9.5" or any other variable. I'm looking for variations in size in order to add visual interest since this is a relatively plain block.  If you make a 6.5", please make 2.

Start with a piece of pink fabric that is 1" or more larger than the size you intend your finished block to be. Somehow, fabric always seems to disappear and you want to have a little extra so that you can square it up at the end.  Cut two strips of white fabric that are at least 2 - 3 inches longer than the length/width of your block. You can vary the width of the strips as you wish. I cut these 1.5" wide.


Cut across your pink fabric on the diagonal and sew a white strip to one edge.


Press the seam to the white.

Line up the other half of the pink fabric so that the top corner (or bottom depending on the cut) overlaps the straight edge of the block by about .25 inch.  This should make the top edge mostly straight once you've sewn it together and pressed it.


Sew and press to the white.


Cut the block again.  I've chosen to cut from the same edge again (top to bottom) so this block will end up more of an X than a cross.  If you cut across from left to right, it will be more of a cross than an X.


Sew and press again.  If you are working with a rectangle shaped fabric, you can add a third or 4th white strip. Whatever floats your boat!

Trim to size


Et voila! You are finished.  

Wonky cross or Wonky X Block


As you can see, the white lines are not perfectly matched, but don't worry about it. 

Thank you and I can't wait to see your blocks!


http://stashbee.blogspot.com/p/hive-1.html

April Hive 2 Block

As usual, I'm bringing up the rear and just getting my block done on the last day of the month:

Linh, I'll get this in the mail tomorrow.