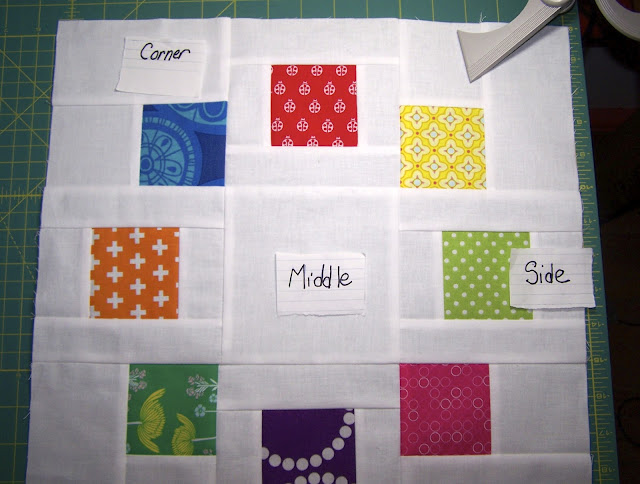
So here is my sample block and tutorial for a 15 1/2 inch Circle of Friends block.
For my blocks I would like you to use bright rainbow colours for the feature fabrics. Please use lots of different scraps in your block and try to have some warm and some cool colours in your block. Here is a sample of fabrics you might use.
For the background fabric please use a white solid if you have it. I used Kona White but I'm not fussy about what you use.
Cutting directions:
Feature fabrics: cut 8 squares 3 inches by 3 inches.

Background fabric:
Four squares 3 inches by 3 inches
Four rectangles 3 inches by
5 1/2 inches
Eight rectangles 1 3/4 inches by 5 1/2 inches
Eight rectangles 1 3/4 inches by 3 inches
You also will need to cut a 5 1/2 inch by 5 1/2 inch square for the middle of the block.
Constructing the Block"
The block is made up of two different types of sub units : the corner units and the side units.
To make the four corner units sew a 3 inch square of feature fabric to a 3 inch square of background fabric Press away from the feature fabric.
Then sew a 3 inch by 5 12 inch rectangle to the side of the unit , again pressing away from the feature fabric. These units should finish at 5 1/2 inches.
For the 4 side units sew a 1 3/4 inch by 3 inch rectangle on each of two opposite sides of 4 squares , pressing away from the feature fabric.
Then sew a 1 3/4 inch by 5 1/2 inch rectangle to the remaining two sides. You guessed it: press away from the feature fabric. These units also finish at 5 1/2 inches.
Arrange the sub units into the final orientation. Sew the subunits into rows pressing the seams towards the corner units for rows one and three and towards the centre unit in the middle row.
Sew the rows together and you are done!
It took me less than an hour to sew the block and less than 1/2 hour to cut the fabrics. I hope you enjoy making this block.


3 comments:
Very nice. Looking forward to making the block.
Awesome block
Such a cute Block - thanks!
Post a Comment