Friday, March 1, 2024

HIve 2 - March Tutorial - Quarter Square of Log Cabin Variation for Gayle

For this month, I am requesting a super easy block. It is one quarter of a variation of a log cabin. I have seen this made as a full block and then divided in half and half again. I want the block slightly larger so you will just make a quarter of a block. I made my own dimensions for the surrounding strips. Strips are either 1  3/4 inches or 3 inches wide. (Hope you don't mind the 1/4 and 3/4 inch measurements.)


You will need 5 different fabrics. I like scrappy, so pretty much anything goes. I am okay with most prints and fabrics. I am happy with florals, dots, textures, geometrics, batiks, and solids, etc. I am even okay with some small novelty prints, as long as they are not too juvenile (for example no teddy bears or Disney).  I just don't want seasonal/holiday, anything too dull, super large prints, browns or blacks. I do want a contrast between each set of surrounding strips, so try not to put two super busy prints next to each other. Also for the contrast, go with different values. So either start with a lighter or darker fabric for the square and then alternate the rounds. Medium values are fine as long as they contrast. See my finished examples below.

Cutting Instructions, cut one of each:

  • Starting square 1 - 4  1/2 inches
  • Round 2 - 1  3/4 by 4  1/2 and 1  3/4 by 5  3/4 inches
  • Round 3 - 3 by 5  3/4 and 3 by 8  1/4 inches
  • Round 4 - 1  3/4 by 8  1/4 and 1  3/4 by 9 1/2
  • Round 5 - 3 by 9  1/2 and 3 by 12 inches


 Start with the square, sew the Round 2 shorter strip to the top. Press and then sew longer strip to the right side. Unit should measure 5  3/4 inch square.


 Repeat for Round 3, using the 3 inch wide strips, again adding the shorter strip to top and longer to right. Unit should measure 8  1/4 inch square. Repeat the same for Round 4, (will be 9  1/2 square) and Round 5. Block should now measure 12 inches square and will be 11  1/2 finished when sewn into the quilt top.

Here are 4 that I have completed. So have fun and happy to see your blocks.

Note: This block is inspired by a free tutorial of Modified Bento Box by Film In The Fridge.


Hive 3 - Tutorial for March - Color Wash Block for Laurie

Hello, my name is Laurie and I am happy to be a part of this group and have my turn as Queen bee!  Like most of you, I love color and all things fabric and fell in love with this idea as soon as I came across it.  It's Color Wash time! 
 
I created my block in shades of blues with the center squares having contrasting colors of pinks, purple, yellows, orange, and lime green.


Terry Rowland has a great video to explain the color wash technique and to help get you started on this month's block:


You can choose the math or no math/improv method.  I'm fine with either option as I really want to focus on the variety of scrap fabrics we all have collected.

You will select a color family to work with first - red, pink, blue, purple, green, yellow, orange - and then start cutting and sewing your 3 1/2 inch blocks.  Your center squares can be selected to contrast with each block fabric or you can use one color to contrast with all center squares.

Make 9 blocks, sew 3 blocks into 3 rows, then sew the rows together.  I'm not worried about how you press seams and you don't have to trim your finished block.

Fabric Selection:

Here is my fabric pull from my stash to give color inspiration.


Let's get started

If you want to do the math, here are the measurements to make 3 1/2" block.

Border fabric

  • Cut 2 - 1 1/2" X 3 1/2"
  • Cut 2 - 1 1/2 x 1 1/2"

Center square

  • Cut 1 - 1 1/2" x 1 1/2" 


The improv way is to cut larger pieces of scraps and then trim the block to size, in this case 3 1/2" blocks.  You can offset the center square to get "wonky" blocks for your color wash block.  Also, with this method you do not have to worry about accurate 1/4 seams as you trim to your block size in the final step.


Sewing Instructions

Here is the fabric layout for your square.  Make sure to sew with an accurate 1/4 inch seam to end up with 3 1/2 inch block.

Step1

Sew the center block to the top square, then sew that section to the bottom square.

Step 2

Sew the center section to the right border piece.

Step 3

Sew that section to the left border piece to complete the square.


Make 9 different blocks in your color family!


Sew 3 blocks into 3 rows.


Sew the 3 rows together to make your block.

Here is my color wash block in the blue color family with contrasting center squares of bright pink, light pinks, shades of yellow, orange and lime green. 


Hope everyone has fun with these blocks!

Laurie


Hive 4 - March Tutorial- Scrappy Pixel Block for Sara

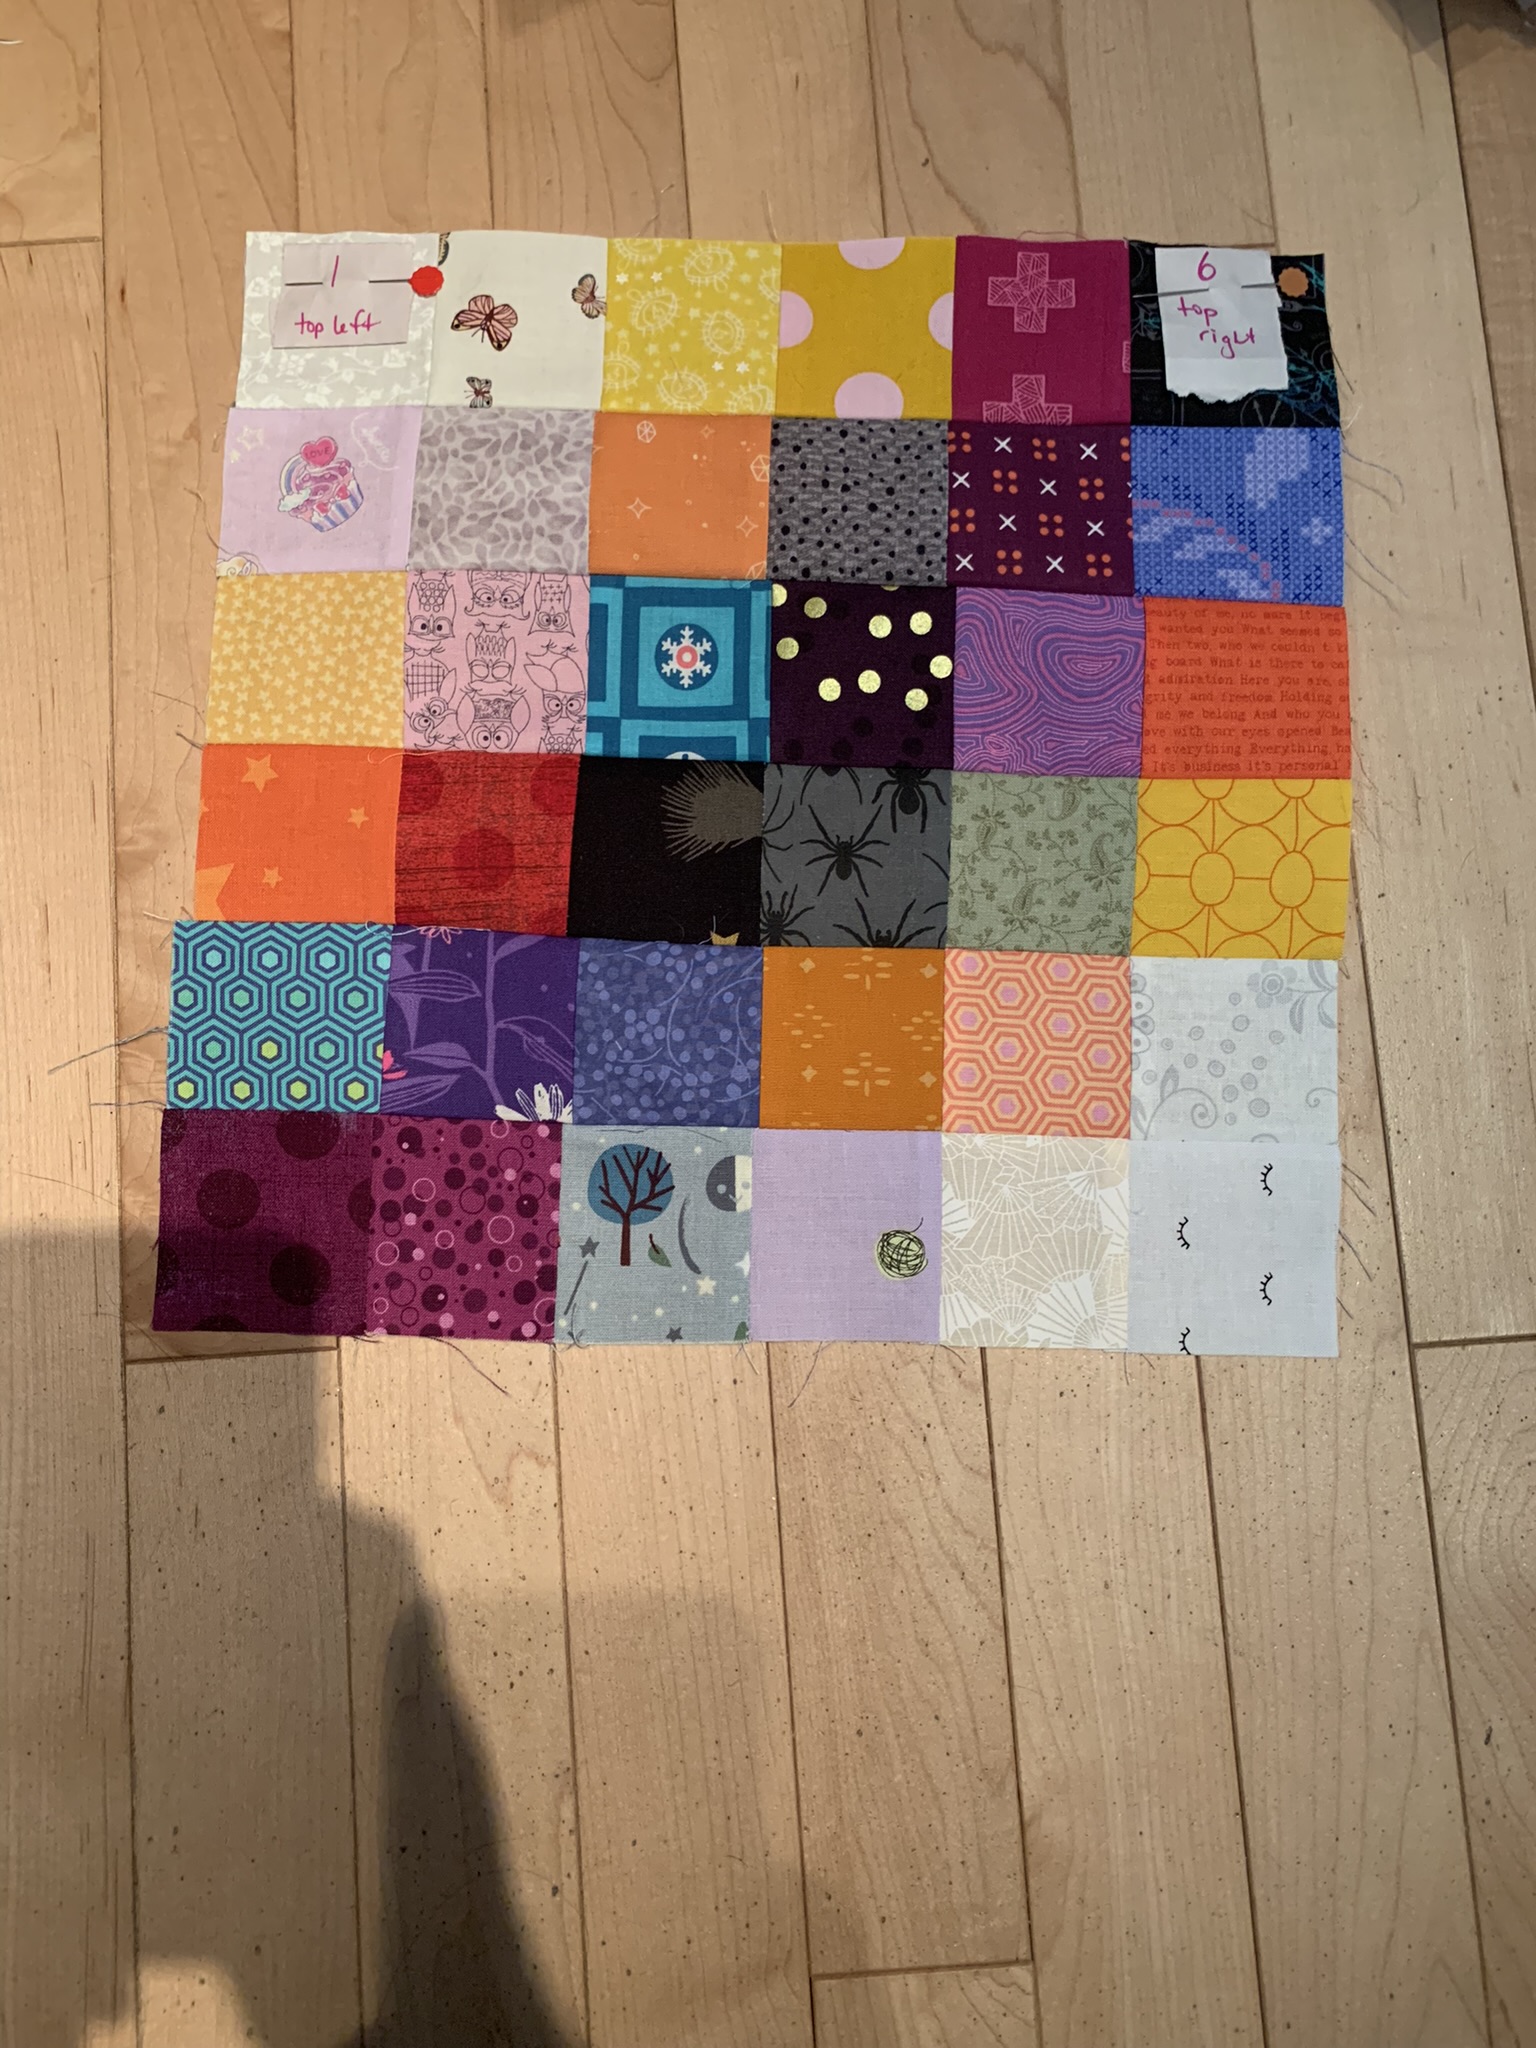
This block is an exercise in value - go find the option on your phone to change photos to black and white. It will be super-helpful. I find the mono setting on my iPhone works best for me in this process.  This is also an opportunity to raid your stash of 2 1/2" squares - you'll need 36 of them across a full range of values to make this 12" finished block.  

I first saw the scrappy pixel block on @sushi.farmer's Instagram account.  The hashtag #scrappypixelquilts will provide lots of inspiration!  This post is a brief tutorial on making the block.  My 2023 hive made a set of these blocks for me - I like them so much I want to make the quilt bigger so I've chosen this block for 2024 as well. This image is the blocks made by 2023 Hive 5. 


This tutorial documents my process for making a block.  I find it's easier to build the block on a design wall (or floor!) over several brief sessions than doing the arranging all in one go.  Sewing is the easy part here.  

I'm looking for full-on scrappy here - all colors allowed as long as the value gradation is good and the hue is pure. Please do avoid muddy colors (e.g., beiges and browns). In general, I  prefer some texture or print over solid fabrics and I'd like as much variety in your blocks as your stash and time allow.  My choices include a bit of metallic (the ombre confetti near the center and some glitter on the cupcake square at top left); that's fine in a few squares. You can also see a few squares which lean towards the novelty realm (the cupcake, the butterfly, the snowflake, and the trees).  Again, this is fine as long as the overall feel is generally smooth. 


To make the block, you'll need 36  squares (2 1/2 inches per side) distributed across 6 values:

Very Dark - 6 squares

Dark - 10 squares

Medium - 8 squares

Medium Light - 6 squares

Light - 4 squares

Very Light - 2 squares

I'm not asking for 36 unique fabric squares - we have an upper limit of 10 fabrics in our StashBee rules. Use your stash and duplicate where you need to.  I'd most appreciate variety along the Very Dark diagonal axis.  The more variety, the better, from my perspective.  If you want/need to stick to 10 fabrics, that's fine.  If you have more, that's fine. 

I start by pulling squares and creating 4 groups ranging dark to light.  Then I take a photo and convert it to black and white.  Busy, high-contrast prints don't work as well because they often read as multiple values. One of those is evident in this sample, at the center of the second column from the left. I've marked it, along with a couple of others which are out of place, in the black and white image below. 


Then I move squares around based on the photo working towards the 6 values I need. Here's an example of a sort into 6 value groups.  There's still work to be done but I'm ready to start organizing my block. Groups 2 and 3 (from left) are too similar in value and I'm not happy with the orange stars - there's too much contrast with the white. 


Once I have rough value groups, I build the block and start filling in gaps and rearranging squares.  Notice that the dark diagonal is running bottom left to top right.  Please use this orientation as you build your blocks.  This will help with nesting seams in the end.  

I take lots of photos and swap a few blocks each time, gradually refining my value gradient. I found this work easier to do a few minutes at a time.  I spend about 30 minutes sorting and planning across several 3 - 5 minute sessions.  Keep this part intuitive - I could obsess for days on this and that isn't the point.  


In these first two photos, I started with half the block and need a smoother value gradient along the red line in the B&W photo.  There's too big a jump as the first run of fabrics is laid down. 


This is getting better, after many adjustments.  The blocks circled in red are still not providing the value gradient I'm looking for.  More swapping to do.  


This looks good. 

Once your 6 x 6 block is designed, it's time to sew it together.  Use your favorite method.  I like to use the "web method" to assemble blocks like this.  I chain piece columns 1 and 2, 3 and 4, 5 and 6 together top to bottom without cutting the threads. 

Then I sew columns 2 and 3 together and finally columns 4 and 5.  At this point, all the vertical seams are sewn and I can press each row in an opposite direction so seams nest.  


Please press your odd rows to the right (towards the dark end in row 1 as I'm showing the photos) and even rows to the left.  This will help all the blocks nest together in the end.  Once the vertical seams are pressed, you can sew the horizontal seams.  


In this image (below), you see the piece folded on seams 2 and 5.  I can sew along both top and bottom to sew two horizontal seams.  Then I refold for seams 1 and 4.  Finally, I fold in half and sew seam 3. 


Please press your horizontal seams open.  To do that, you'll need to cut the threads from sewing the vertical seams.  Here's a picture of one of those on my block. 


Your block should be about 12.5 inches square.  You may have intersections that are not perfect.  That's OK!  I know I'm fussier about blocks I'm sending to someone else than I am about blocks I'm keeping for myself.  Here's a close-up of a couple of messy intersections I decided to keep.  Let this be your guide for re-sewing.  Perfection is not the goal here and I'd rather you spend time on the value gradient than perfect corners. 


Don't worry about trimming your final block.  I'll do that as I put the blocks together. 


Thank you!


Hive 6 - March Tutorial - Quilty Ghost for Amber

I hope you don't mind a few ghosts this Spring! I've been wanting a quilt for spooky season, so I've chosen a cute little ghost quilt block. 


For my fabrics, think very light/low volume for the ghost, black or dark (solid or print) for the border, and solid black or dark for the eyes and mouth. I've used black and white here, but you can also use other lights and darks, but try to keep them very light and very dark so there is plenty of contrast. I also love a scrappy block, so feel free to mix lights and darks to use what you have! Spooky prints appreciated but not required. Here's more of what I found in my stash: 


This is just what I have and other colors are still in play. For example, if you have super light or super dark purples, those would be great!

Credit where credit is due: this tutorial is available from Riley Blake Designs and previous Stashbee tutorial by @sami.sew.what.

Riley Blake Designs (note the cutting instructions are for multiple blocks at once--don't do that unless you're just feeling extra generous!):

https://www.rileyblakedesigns.com/assets/images/freepatterns/quiltpatterns/CelebrateWithHersheyFreePattern.pdf

@sami.sew.what: 

https://stashbee.blogspot.com/2023/10/hive-6-october-ghostie-for-samantha.html


Cutting guide for one ghost:

Dark

J -1 (1½" × 8½")

C -2 (2½" × 2½" )

A -3 (1½" × 1½") -- solid if possible for eyes and mouth

K -4 ( 1½" × 2½")


Light

Gb -1 (3½ x 8½)

Ge -3 (1½" × 2½")

Gc -1 (1½" × 8½")

Gd -2 (1½" × 4")

Ga -1 (5½ x 8½)

Gf -8 (1½" × 1½")


This block uses stitch and flip corners. Draw a line from corner to corner on the wrong side of your square, stitch on the line, trim the extra off the corner leaving 1/4" for the seam allowance and press. 

Using the stitch and flip technique, replace the 2 top corners of Light rectangle Gb with Dark C squares. Make sure you're putting right sides together first. 


Using the stitch and flip technique again, replace the top 2 corners of Dark rectangle K with Light Gf squares. Make 4 for the bottom row. You'll want to add one side, trim and press before adding the other side. Of course make sure you're sewing them right sides together. 

(These are flying geese, which some of you probably have shortcuts for, but I still struggle with them even after all these years!)


Lay out the pieces of the block. Sew pieces together to complete rows first.

Ge - A - Ge - A - Ge

Gd - A - Gd 

KGfK - KGfK - KGfK - KGfK 


Sew rows together, and add Dark strip J to the top.


That's it! The Ghost Block now measures 8½" × 13½".

So excited to see what you all create! Happy Sewing!

Amber Culpepper, @StitchLegit