Hi June Bug Stash Bee quilters!
I am excited to take a turn as the Queen Bee. If you are like me it has been a busy few weeks with end of school programs for kids & grandkids, out of town visitors, or you may be busy with
upcoming preparations for family reunions, swimming parties, camping, or maybe getting ready to attend a quilt retreat! In all the flurry of summertime I hope you can find time to make this June quilt block called Double Wrench and then pop it in the mail to let it wing its way to Layton, Utah.
This block has traditionally been called Churn Dash. I have had my eye on this block for some time. It reminds me of my pioneer heritage where women worked hard but enjoyed gathering together at quilting bees to help each other finish up a quilt together while catching up on local happenings. This variation of the Churn Dash is called Double Wrench and it was published in a book called 101 Fabulous Rotary-Cut Quilts by Judy Hopkins & Nancy Martin, published by That Patchwork Place. The blocks will eventually be set on point with a neutral block separating the Double Wrench blocks. I snagged this fabulous pattern book at a local thrift shop called Deseret Industries for a mere $2.00. This will be the first of many patterns I use from this book. I hope you enjoy creating this block and the rest your summer!
My requested block consists of four 8" blocks that will not be sewn together since they will be arranged with a block between each one and set on point. Please make four 8" blocks but do not sew them together!
1. Fabric Selection
Colored Fabric: Think of a crisp fall day with all the colors of fall. Please choose warm toned calico or small print cotton fabric. Colors may include orange, golden yellows, browns, reds/burgundy, green/evergreen.
b. Please avoid plaids, batiks, directional fabric, solids, pinks, blues, licensed/character, neon, or very bright colors.
Background Fabric:
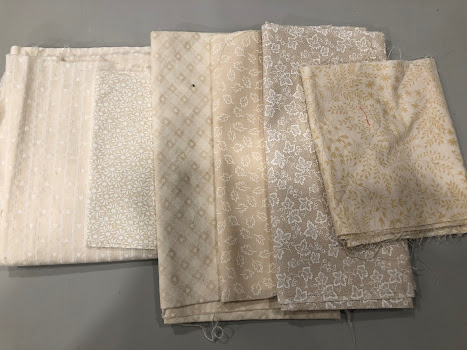
a. Please choose cream, off-white, beige, tone on tone cotton.
b. Please avoid muslin or solids.
I would prefer if you would choose either 2, 3, or 4 different fabrics rather than choosing one colored fabric for all four blocks. In other words I would prefer having only two of any one fabric pattern type between the four blocks. I have been rotating through my beige scraps so the block backgrounds vary from block to block. Each individual block should consist of one colored fabric and one background fabric. Please don't mix & match either the colored fabric or the background fabric within a block.
Block instructions are for 1 of 4-8" blocks. If you plan to chain stitch pieces together and work assembly line fashion then the instructions for total number of blocks are in parenthesis.
a. Colored fabric: Cut two 4" blocks (8-4" blocks total)
Cut four 2" blocks (16-2" blocks total)
b. Background/cream fabric: Cut two 4" blocks (8-4" blocks total)
Cut five 2" blocks (20-2" blocks total)
3. Sewing Instructions
a. Beginning with a 4" background block use a ruler to draw a diagonal pencil line on the wrong side of the fabric from the upper left corner to the lower right side corner. Next draw a 1/4" line on each side of the diagonal line. These 1/4" lines are the sewing lines which will create four half square triangles. Repeat with second 4"background square.
Once the lines are drawn on the background square, match it with a 4" colored square. Then with right sides together sew on both of the 1/4" lines.
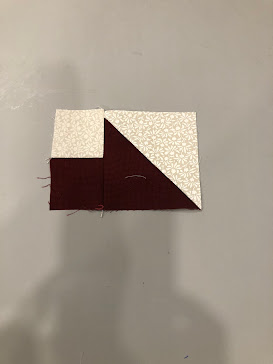
Press the sewn block to set the stiches then cut along the center diagonal line. Press each triangle open with seam pressed to the dark side. Trim each half square triangle using a half square triangle ruler or the lines on a 6" ruler to create 3 1/2" blocks. You will end up with 4 (16) half square triangles.
b. Next match the four colored 2" squares with four of the beige 2" squares. Line them up with right sides together and sew one edge. This will create four 2" square units consisting of a colored block and a background block. Set two of these aside and attach the other two of these blocks together to make a row of blocks with alternating light/dark/light/dark in a row. Lastly, attach the last 2" background square to the strip. Press all 2" square units to the dark side.
c. Step 1: Next sew a half square triangle to a small block unit with the light background block next to the tip of the dark triangle. I repeat this with two of the half square triangles to make the top and bottom strips. If you are sewing assembly line fashion then chain sew eight of these units. After sewing, press these seam towards the 2" unit.
Step 2: Next sew another half square triangle on the other side of each of the 2" unit. This will create the top and bottom strips. Again, press the seam towards the 2" unit. Now you should have three strips completed to finish a block.
Step 3: Join the top strip to the five block 2" strip, with a light background square in the middle. Nest the seams where possible. Press seams towards the middle 2" strip. Join the bottom strip to the bottom of the 2" strip unit. Press the seam towards the center of the block.
This completes one 8" block or if you worked as an assembly line all four blocks are completed.
Please feel free to contact me at admin@rockwellpm.com during working hours M-F if you have any questions. I check that email consistently throughout the day. Nights and weekends a text to 602-432-5844 is the best way to get my attention. I didn't run into any problems making these blocks, especially since there are only a couple of corners to match. Thanks for your help. The finished quilt contains 83 blocks. I have been cutting and sewing them when I have a few minutes and my stack is growing. Your help will help me reach my goal. I hope to have it completed and quilted by September.


No comments:
Post a Comment