Tuesday, May 31, 2022

Hive 1 Block for Rita


 I almost forgot to post here! I finished the block last week and its already been sent and might have already gotten to you!

The block was nice and easy to sew, just had to go and get some plain white and black since apparently thats the only fabric I didnt have. 

I hope the block is what you were looking for, and your quilt turns out great!

Monday, May 30, 2022

Hive 1 Block for Rita

 Late to the party again! Here's your block, Rita--this was such a fun and fast one to put together. Can't wait to see the finished product. -Julia C.


Sunday, May 29, 2022

What's black and white and headed for the mail

 This block! Coming your way Rita, I hope you're couch knows how lucky it is. 


Hive 1 Block for Rita


This block looks so stylish and modern in black and white. I cannot wait to see how the finished quilt looks in your beautiful living room! 

Friday, May 27, 2022

Hive 1 Block for Rita

Cutting it super close this month, but I finished your block, Rita! I love solid colored quilts and this one is going to be stunning in classic black and white.


~ Diana @ Red Delicious Life

Wednesday, May 25, 2022

Hive 1 Block for Rita


Hi Rita - 

What a fun square! What a fantastic idea - it's going to look great on your lovely sofa. 

Enjoy!

- Julia H.

Sunday, May 15, 2022

Saturday, May 7, 2022

Hive 1 - Morrocan Tile Block for Rita

 Hi Rita!


Thanks for the fun block this month! I think the quilt will be a great addition to the chaise. I agree with Marie about the XX album. Great music to piece together all the blocks :)  xoxo, Nicole

Crashing Hive 5 for Alanna


Hi Alanna, Congratulations on your baby girl!👧 I could not resist sending you this flower for the occasion. Your pattern reminded me of the good old days when we lived in Ottawa. At this time of year, the tulips are beautiful for the Canadian Tulip Festival:). Have fun working on this quilt! Marie (crashing from Hive 1)

Moroccan Block for Rita


Hello my friend! Here are my identical blocks for you, in plain black and white fabric. They are now deconstructed because I am still thinking on how to best send them to you so it feels like a B'day card and not a package. This quilt will be spectacular in your living room. For more of a lounge ambiance, you may want to play  Intro by The xx , it has the similar white on black symbol. Take care, Marie

Sunday, May 1, 2022

Hive 5 - May Tutorial - Tulip Block for Alanna

As you may know, I just had a baby girl! 

On principle, I don't believe in gendered colours or imagery (my son can wear clothes that are pink and have flowers too), but the reality is I am so excited by all the "girlie" stuff, especially all things floral!

My sister is also due with a baby girl in May. And apparently it's also spring time (though it is hard to tell up here in Northern British Columbia- we had fresh snow this week!). So I was inspired to make a bright, girlie, spring-time, floral quilt.

So for this month's block, I am requesting a Pink or Yellow Tulip block!

Pattern Credits:

I have written up the tutorial for 1 tulip block, based on a combination of two very similar free patterns:

  1. Missouri star quilt co’s “Totally Tulip” quilt pattern. 

    • Here is their video tutorial - she makes 1 block but the cutting information is based on making the whole quilt so I adjusted the cutting instructions for 1 block.


https://www.missouriquiltco.com/pages/totally-tulips-quilt-tutorial?epik=dj0yJnU9QlpUOFIzQmZIQXE4V2VaZjdXWDJtSkZOcWVGbFJ2Rk8mcD0wJm49UUE0VHJlOWJKSzVNSzRRY19wbGVsZyZ0PUFBQUFBR0pyQUdj


2) Cloud 9’s “Amsterdam” quilt pattern.

https://cloud9fabrics.com/wp-content/uploads/2013/12/AmsterdamQuilt.pdf


Fabric:


For this block you will need 6 different fabrics- 3 for the tulip "petals"; 2 for the stem and leaves; and a background. See the table for the colours needed.


Please choose modern, bright fabrics. No muted tones


Background 


(please use the same fabric for the whole block)

1 White fabric

  • Solid; or white on white print; or low volume grey or black print on white


Please no creams or prints with other colours


Tulip Petals


(3 different fabrics)

3 different fabrics in light to medium Pink or Yellow, or a combination 

  • For yellow, think more sunshine than mustard

  • For pink, avoid dark/magenta pink, or pinks that lean purplish

  • Solids, tone on tone prints, or other prints as long as the predominant colour reads as pink or yellow


Whimsical or novelty prints are okay as long as it is not licensed characters (ie pink dinosaurs are okay, but Minnie Mouse is not)

Leaves


(please use the same fabric for both leaves)

1 Light to medium Green fabric

  • Solids, tone on tone prints, or other prints as long as the predominant colour reads as green


Stem

Gray

  • solids, tone on tone prints


Here are some photos of my fabric pull from my own stash:


Cutting:


Note, I have provided cutting instructions for the leaves based on the 2 at a time HST method.  You will have to adjust the cutting dimensions if you want to do the 4 at a time method (if you make two blocks, you could also do the 8 at a time method).


Tulip Petal portion

Petal fabric (Pink or Yellow or Combination)

2 x 5” squares (each is a different fabric)

1 x 5” x 9.5” rectangle

Background Fabric (White)

4 x 2.5” squares

Stem & Leaf portion

Background Fabric (White) 


Please use same background as tulip portion

2 x 5” squares (same fabric as background in tulip portion)

Leaf Fabric (Green)


Please use same fabric for both leaves

2 x 5” squares (same fabric for both squares)


Stem (Gray)

1.5” x 8.5” 


Sewing:


Tulip petal portion:


  1. Sew a “snowball” corner to each of the two 5” pink/yellow squares:

    • Finger press your 2.5” background squares on the diagonal.

    • Place the 2.5” background square right sides together in the corner of the pink/yellow square

    • Sew along the finger-pressed diagonal line going

    • Trim ¼” from the sewn line

    • Press towards the pink/yellow

Note: If you are using directional fabric, pay attention to which corner you are “snow-balling”, based on the arrangement in which you intend to sew two yellow/pink squares together


  1. Sew two “snowball” corners to the bottom of the pink/yellow rectangle

    • Finger press your 2.5” background squares on the diagonal.

    • Place the 2.5” background square right sides together on each of the bottom corners of the pink/yellow rectangle

    • Sew along the finger-pressed diagonal line going

    • Trim ¼” from the sewn line

    • Press towards the pink/yellow


  1. Assemble the tulip, and sew together

    • Sew together the top two squares so the snowball corners touch together on the inside; press open

    • Sew the top unit to the bottom rectangle

    • Press the last seam open, or towards the rectangle


Lead & Stem portion:


  1. Make 4 HSTs using the Traditional (2 HSTs at a time) method:


  • Draw a diagonal line on the wrong side of each of the 5” background squares

  • Place one 5” background square on top of one 5” green square, right sides together

  • Sew ¼” away from either side of the diagonal line

  • Cut along the drawn diagonal line

  • Open up the HST units and press towards the green

  • Trim the HSTs to 4.5” square

  • Repeat with the other set to make four green/white HSTs total


  1. Assemble and sew the leaves together

    • Sew two HSTs together so the leaf points to the left, and sew two HSTs together so the leaf points to the right

    • Press open


  1. Add the stem between the leaves

    • Sew the gray stem in between the two leaf units

    • Press towards the stem


Combine tulip petals with stem and leaves

  1. Line up the center of the gray stem with the center of the tulip unit, and sew together

  2. Press open


The finished block will be rectangular, and measure 17.5” x 9.5”


Thank you!


~Alanna


Hive 3 - May Tutorial - Bridges and Flyovers.


Hello everyone in all the on-line Bees I participate in.  Holy heck it’s already my turn to be the Queen Bee. 2022 is flying by! 

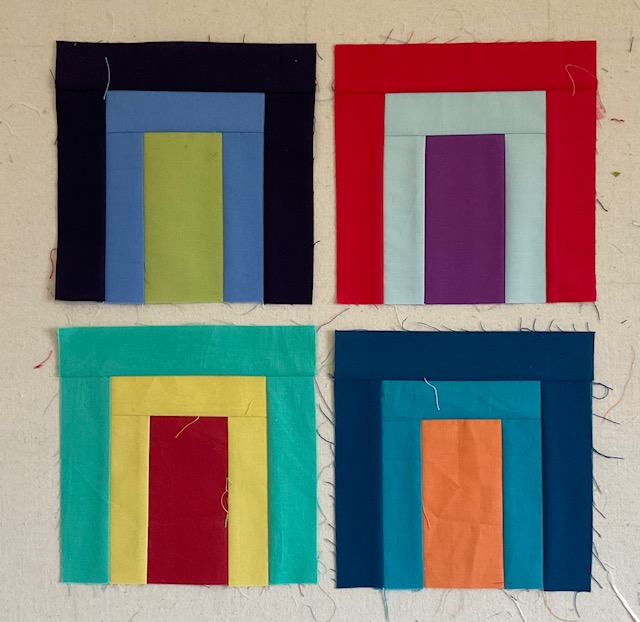
This Queen Bee block packs a dramatic punch while being super simple to construct and it’s oh so adaptable so everyone to put their own unique spin on it.  I've named it  "Bridges and Flyovers" because it is similar to the partial log cabin block called "Tunnels" but IMHO this one is so much more!!  Take a look at a few of the units I've sewn together.  This sample below  is the equivalent of eight 12.5” blocks.  Awesome right?


There are two units in the quilt block. One is called "Bridges" and the other is called "Flyovers".  

BRIDGES

Each bridge unit is a partial log cabin block.  You can choose to make it in any of the following sizes.

4.5" x 6.5" Bridge 

For this Bridge, you will need 

1) one 2.5” square of any solid fabric, 

2) two 1.5 x 2.5" rectangles and one 1.5 x 4.5" rectangle of the same contrasting fabric; 

3) two 1.5 x 3.5" rectangles and one 1.5 x 6.5" rectangle of a third contrasting colour.

You all know how to construct a partial log cabin block, but here is how I did it.   First, sew a 1.5” x 2.5” rectangle to either side of the 2.5” square .  Then sew the 1.5 x 4.5” rectangle to the top.Then sew the remaining rectangles to the sides and top to make the finished unit. 


6.5" x 6.5" Bridge 

You will need 

1) 2.5" x 4.5" rectangle of any solid fabric

2) three 1.5" x 4.5" rectangles of a contrasting fabric

3) two 1.5" x 5.5”  rectangles and one 1.5” x 6.5” rectangle of a third contrasting colour.  

See above method for sewing everything together to make the 6.5” bridge.


FLYOVERS

Each Flyover unit  is also a partial log cabin block.  The thing that differentiates it from the Bridge unit is the strip(s) of black/white feature fabric that I've added somewhere.

It can be constructed in the following sizes.

6 1/2" x 6 1/2" Flyover 

This unit requires

1) a 2.5" square of any solid fabric

2) a 1.5 x 2.5" rectangle of black/white feature fabric

3) two 1.5" x 3.5" rectangles and one 1.5" x 4.5" rectangle of the same contrasting fabric

4) a 1.5" x 4.5" rectangle of black/white feature fabric 

5) two 1.5" x 5.5" rectangles and one 1.5" x 6.5" rectangles of a third contrasting fabric.

Alternate 6.5" x 6.5" Flyover 

1) a solid 1.5" x 4.5" rectangle and a 1.5" x 4.5" black/white feature fabric. 

2) three  1.5" x 4.5" rectangles of a second contrasting fabric.

3) two 1.5" x 5.5" rectangles and one 1.5" x 6.5" rectangle of a third contrasting fabric.

The construction method is the same as before.  Start with the Center square or rectangle and sew the strips around it.  


6.5” x 8.5” Flyover

I’ve made two versions of this unit also. 

Version 1 

1) a 2.5” x 5.5” rectangle of any bright solid

2) two 1.5” x 5.5” rectangles and one 1.5” x 4.5” rectangle of a second solid

3) a 1.5” x 4.5” rectangle of the back/white feature fabric

4) two 1.5” x 7.5” rectangles and a 1.5” x 6.5” rectangle of a third bright solid 

Sew the 1.5  x 5.5” rectangles to both sides of the 2.5” x 5.5” center rectangle,  and the 1.5” x 4.5” rectangle to the top.  Then sew the 1.5” x 4.5” black black/white rectangle to the top of the first round.  Finally sew the 1.5” x 7.5” rectangles to the sides and add the 1.5” x 6.5” rectangle to the top to complete this Flyover unit.  

Alternate 6.5” x 8.5” Flyover 

1)  a 2.5” x 4.5” rectangle of any bright solid

2) three 1.5” x 4.5” rectangles of a second solid

3) two 1.5” x 4.5” rectangles of different back/white feature fabric

4) two 1.5” x 7.5” rectangles and a 1.5” x 6.5” rectangle of a third bright solid 

Sew the 1.5  x 4.5” rectangles to both sides of the 2.5” x 4.5” center rectangle,  and the last  1.5” x 4.5” rectangle to the top.  Then sew the 1.5” x 4.5” black black/white rectangle together and then sew to the top of the first round.  Finally sew the 1.5” x 7.5” rectangles to the sides and add the 1.5” x 6.5” rectangle to the top to complete this Flyover unit. 

8.5” x 12.5” unfinished Flyover


4.5” x 7.5” Unfinished Flyover


4.5” x 5.5”  unfinished Flyover 


12.5” x 12.5” unfinished Flyover 


All  you have to do is decide which units you want to build and make sure that the math adds up to 12 1/2" unfinished. I’ve made a few examples to get your creative mojo going and I hope you will each make units that suit your fancy and sew them together into two 12.5" blocks.  I would really appreciate if one of your blocks featured darker fabrics, (think navy blue, purple, red, mulberry  — some grey is okay but no blacks please). The other can be whatever you choose, but no blacks please.). Also solids only please…no prints except for the black/white feature fabric.  

a) one 6.5” Bridge unit; one 6.5” Flyover unit; one 6.5”x 8.5” Flyover unit and one 4.5” x 6.5”  Bridge Unit 


b) four 6.5” Bridge units 


c) Three 6.5” Bridge units and one 6.5” Flyover unit  


e) one 8.5” x 12.5” Flyover unit; one 7.5” x 4.5” Flyover unit and one  5.5” x 4.5” Flyover unit


f) one 12.5” x 12.5” Flyover unit.


As you can see, there are multiple combinations (many more than I’ve made samples of) that will end up in a 12.5” unfinished quilt block.  Choose one of these, or make up your own. Feel free to mix and match Bridges and Flyovers. Its all good. 

As far as colours go....solid fabrics only please.

Please use your stash of bright solids to build the Bridges and Flyovers  - white and  grey can make an occasional appearance too. Please don't use any solid blacks; otherwise the sky's the limit.  Just make sure that there is lots of contrast so the bridges and flyovers really pop.

When building your Flyovers, please make sure the feature strip (black/white) reads as black and white or black with white. Steer clear of fabrics that read mostly white for these inserts. Here are some example feature fabrics that I chose for my test blocks. 


All of the blocks are built using 1.5” or 2.5” strips of fabric.  The centre is a 2.5” strip or square.  For ease of construction I cut one 1.5” x WOF strip and one 2.5” x WOF strip of lotsa different colours and sub-cut into the correct sizes as I went along.  

This is such a fun and simple block to sew.  I am very eager to see what the finished blocks look like.


Hive 4 - May Tutorial - GEESE MIGRATION

 Hi Everyone-

This is my 2nd year with Stash Bee.  Last year's scrappy quilt was donated to a hospice,  but this year I may keep the quilt for myself.  

I love scrappy quilts and using my stash.  I sort my scraps by color and really like to pull fabrics from one color bin and make a scrappy block.   This  month's block "Geese Migration" was designed by Cynthia Brunz and she has graciously given her permission for me to share it.  

The block is a combination a 15-patch rectangle, combined with 5 flying geese units.  Lot of opportunity to use up some scraps.  If you  dislike sewing  flying geese, I will be more than happy with a 15 block patchwork rectangle

Color Scheme:  Choose one color (teal, green, red, yellow, navy, pink, blue, purple, red,  or orange).  I'm looking for bright, rainbow colors  No batiks or neon please.  As long as the colors coordinate, it will be fine.  I chose gray for the tutorial.  It's fine to use more than one print within the block.   For the solid color, please use a solid or as close to a solid as you can get.


Fabric Requirements:


Assembling the block

Chain piece the 2.5" print squares in three rows.   


Sew the three rows together to form block.  This block should measure 10.5" x 6.5".  Set aside.  If you dislike flying geese, you can stop here and and just send me the patchwork block.  


Next, we move on the Flying Geese Blocks.   There are a number of ways to make a flying geese block, so you can use the one you are most comfortable with.  I've included two options for the Flying Geese, a more traditional method or paper piecing.


TRADITIONAL METHOD:    

Take the solid 2.5" square blocks and draw a diagonal through each block.  Place marked block on 2.5" x 4.5" rectangle.   Sew on marked line.

Cut 1/4" from the sewn line.   Press.


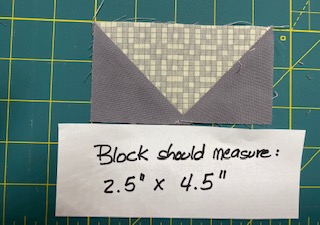
  Repeat with opposite side.  Press.   Finished block should measure 2.5" x 4.5". Repeat for 4 additional blocks.


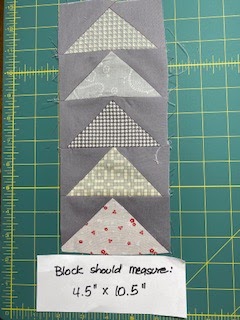
Sew the five flying geese together.  Block should measure 4.5" by 10.5"


Sew this unit to the 15 patch unit.  Block is complete!


PAPER PIECING OPTION (for flying geese):  
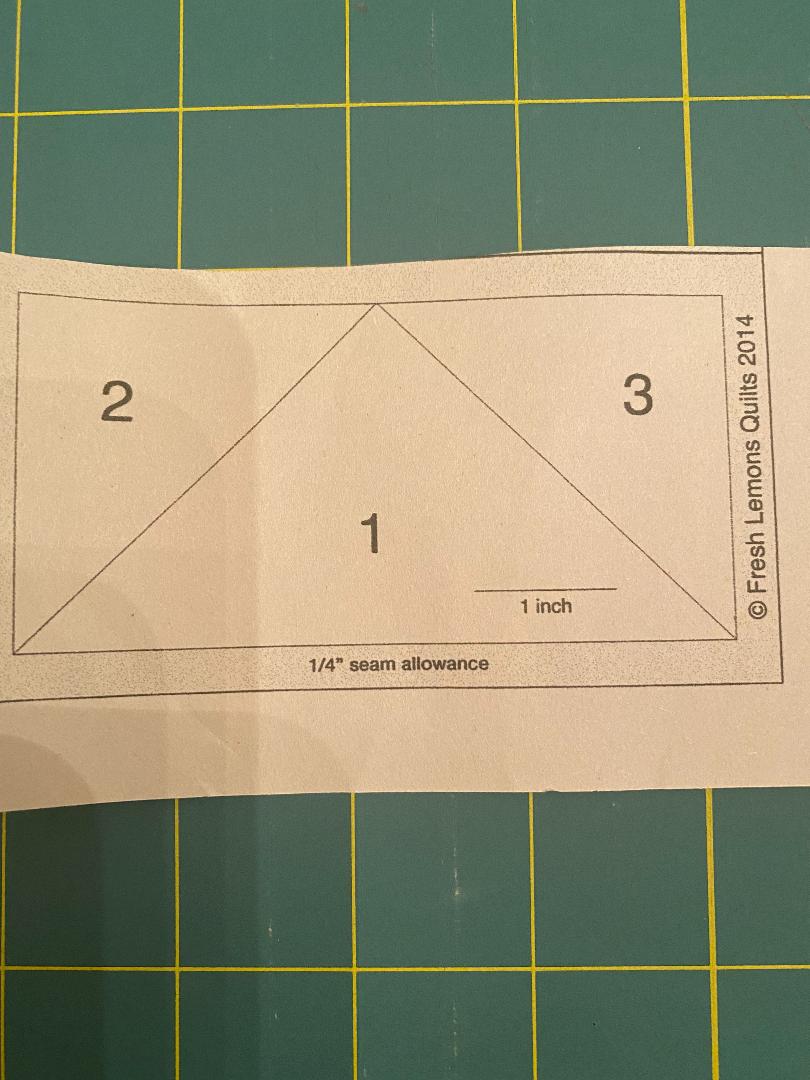
I prefer to paper piece them as you get the greatest accuracy, but you don't need to.   Here is a link by Fresh Lemon Quilts which will give you a perfect 2" x 4" (finished) flying geese unit.  http://static1.squarespace.com/static/5beb7cf40dbda38a9f77c30c/5bee0bfcae1f690159b60394/5bee2a66ae1f690159ba2db0/1542335078349/4-x-2-finished.pdf?format=original.
I used paper piecing for this red block.  I thought it was much easier and definitely more accurate!
If you do opt for paper piecing, I used a 3" x 5" block for piece 1 (refer to link noted).   I cut a 3.5" square diagonally for pieces 2 and 3.  Easy peasy!


Here are a few more that I've sewn.  Bright and happy rainbow colors.   Blocks are going to be set on point with a sashing.   


I hope you have fun with this block!