Hi, Grace,
Here's the checkerboard I made. I had so much fun, now I have to make a checkers set for my nieces for Christmas. And teach them how to play checkers. XD


Hi, Grace,
Here's the checkerboard I made. I had so much fun, now I have to make a checkers set for my nieces for Christmas. And teach them how to play checkers. XD


Hi, fellow Stash Bee Queens
This is my third year participating in Stash Bee and I thoroughly enjoyed seeing and making all the different blocks. Due to starting a full-time job in the first half of the year I am a little challenged to select a block that I would like you to make for me and write a proper tutorial.
Therefore, I pulled out a project I started during COVID and never really went back to, let alone finish. It's a village quilt I will call 'Fortune Village'.
You can find the tutorial by Material Girl Quilts here:
my-town-quilt-blocks-free-tutorial
I would like the background fabric to be white, off-white or a low volume white print. Otherwise, please go through your scrap bin and use whatever you can find (the only exceptions here are batiks, novelty prints, licensed prints).


Once I’d dug up good fabric for this block, I couldn’t pick just one color! I can’t wait to see what you do with your checkerboards.

For once I was actually ahead of the game and had this block done by October 2nd. But then we had these pesky hurricanes whip through Florida and it sat in my sewing room until now. Getting it to the post office in the next few days. Hope you like it!
~ Diana


I went for gold!
Thanks for that fun block, can't wait to see the final quilt,
Best,
Marie


Hello!
Here you go! I am really hoping these fit the vibe you're going for... eek! Can't wait to see what you do with all the blocks! In the mail ASAP!
-Molli.


Sorry for the late post! I thought I'd posted when I put it in the mail and it just plain slipped my mind!


I am planning a snuggly winter mug quilt in reds, greens,
and off white. I don’t usually do a seasonal
decoration in my house as I live with just me and my lovely pup Roxie, so I would
like something I can swap into my home easily to give a winter wonderland
feel.

I loved the look of these Andy Warhol- inspired quilts, and would like blocks with a variety of color
combos with the mug floating in the middle—so I added a strip of fabric to each
side of the pattern to create that look.


Fabrics

I am looking for fabrics that read as warm orangey reds, natural greens that lean away from blue tones, and off-white. Novelty or holiday is fine, but no licensed characters or anything that reads young. The colors can be any combination for the background/mug/saucer/handle, but I am looking for either off-white for the steam (or light grey for the steam if the background is off-white). I would like the background to be all the same fabric. Low volume is fine too! Prefer limited batik.
**** For the background/cup handle: if you chose a directional print for either of these, please make sure to cut & sew your pieces so all the pieces have the pattern in the same direction. I noted in the cuts below if the piece will be horizontal (hor.) or vertical (ver.) in the block. For square pieces, you may have to just fold the fabric back at the seam line before sewing & peek to check if the square is laying the right way to end up the right direction!
Here is my pull. (My camera always seems to photograph colors darker than they really are)


Cup Pieces
- A (top of cup) 6.5x2.5 (hor.)
-
B (middle of cup) 6.5x4.5 (hor.)
-
C (bottom of cup) 6.5x2.5 (hor.)
-
D (saucer) 8.5x1.5 (hor.)
-
E (handle)
o
E1:
1.5x2.5 (2x) (hor.)
o
E2: 1.5x3.5 (ver.)
Background
-
Handle background
o
F1: 1.5x2.5 (hor.)
o
F2: 1.5x3.5 (ver.)
o
F3: 1.5 square (2x)
o
F4: 2.5 square
-
Above cup
o
F5: 5x5.5 (ver.)
o
F6: 5.5x7 (hor.)
-
Right of cup- F7: 9.5x2.5 (ver.)
-
Left of cup- F8: 2.4x8.5 (ver.)
-
Saucer - F9: 1.5 square (4x)
-
Bottom edge of cup - F10: 1.5 square (2x)
-
Below cup - F11: 2.5x13 (hor.)
-
Steam background *see note
o
2” square (3x)
Steam (off-white or light grey if background is off-white)
-
G: 2” square (3x)
1.
Make the handle
a.
Middle of handle: Join E2: 1.5x3.5 (ver.) and F2: 1.5x3.5
(ver.)
b.
Top and bottom of handle:
i.
Layer the F3 pieces on the E1: 1.5x2.5 pieces to
the right of the rectangle
ii.
Draw a diagonal line from corner to corner on
the wrong side of both F3: 1.5 squares, as shown, angling up in one, and down
in the other (mindful of directional fabrics)
c.

d.
Join the remaining pieces (F1: 1.5x2.5 (hor.)
& F4: 2.5 square as shown:
e.

a.
Join A (top of cup) 6.5x2.5 (hor.) to B (middle
of cup) 6.5x4.5 (hor.)
b.
Bottom of cup:
draw diagonal lines on both F10:
1.5 squares (mindful of directional fabrics) place them on the bottom two
corners of C (bottom of cup) 6.5x4.5 (hor.).
Sew on the diagonal lines and trim & press as shown below:

3.
Make the saucer
a.
Draw diagonal lines on two of the F9: 1.5 squares
(mindful of directional fabrics) place on two ends of D (saucer) 8.5x1.5 (hor.)
and sew, trim and press as shown:
b.

4. Assemble cup pieces, including Left of cup F8: 2.4x8.5 (ver.), the other two F9: 1.5 squares, and F7, right of cup 9.5x2.5 (ver.) (not pictured in image below)

5.
Make the steam
a. Make 6 half square triangle units**

d.
Square off the blocks with a 45 degree ruler to
1.5” squares.
e. Combine 5 units to make the steam. (One is extra). Then combine the steam with F5: 5x5.5 (ver.) and F6: 5.5x7 (hor.) as shown to make the Steam block.
NOTE: total size of block listed in image below will not be correct as ours is bigger!!
6.

7.
Join blocks.
a. Join steam block, cup block, and saucer block. Add F11: 2.5x13 (hor.). to base of block (not pictured, and previously added F7 not pictured still!)
8.

Hello everyone and welcome to another tutorial! I am super excited to be queen bee this month and I am looking forward to all the quilty mail!
For my block, I am requesting a 12 inch finished checkerboard block with two colors. One of these colors should be a bright solid, and the other should be a white solid or blender.
This quilt top shows the high contrast color plate that I'm looking for! I finished this quilt top over the summer and I love the bright colors. ( Please ignore the black and white for the color palette.)

Please avoid any cream toned fabric. I'm really wanting white solids or blenders.
Cut six 2 1/2 strips of the white blender and six 2 1/2 strips of the solid color. The length of these strips should be at least 15 inches (maybe 16 inches to be safe) if you want to do this in as few steps as possible.

I am working with jelly roll scraps so I will be piecing smaller units together.
Sew your strips long sides together

Again, I am working with scraps, but if yours are twelve and a half inches long, you will only need three units at this point.
Sew these units together with the solid color and the white blender alternating.

Press this striped block. Please press the white blender towards the solid.
Then you're going to cut this striped block into 2 1/2 strips like so.


The more you press, the better this block will come out. I did not press it before the final photo because it was late when I was making this tutorial!
Thank you very much.
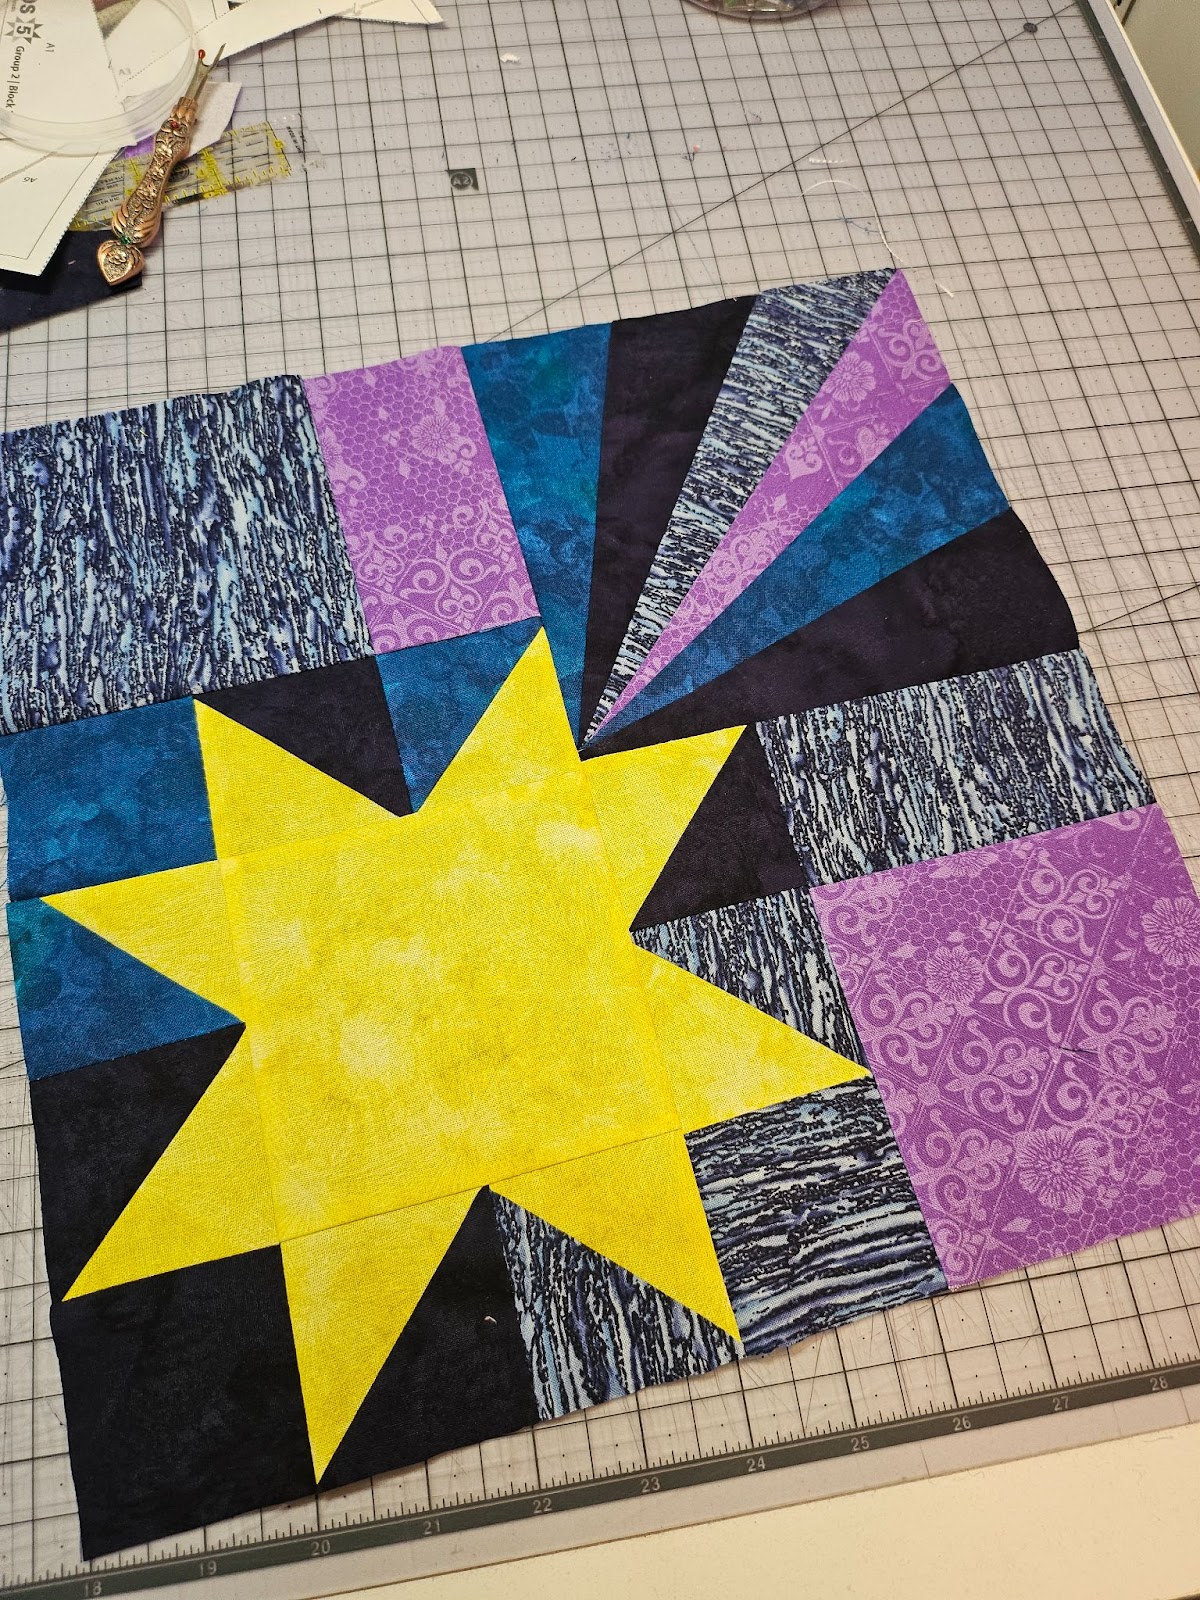
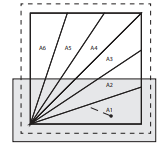
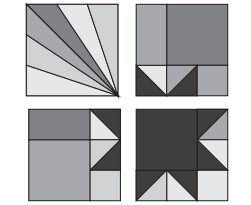
HIVE 2 TUTORIAL FOR OCTOBER 2024 – FALLING STAR
12” finished block
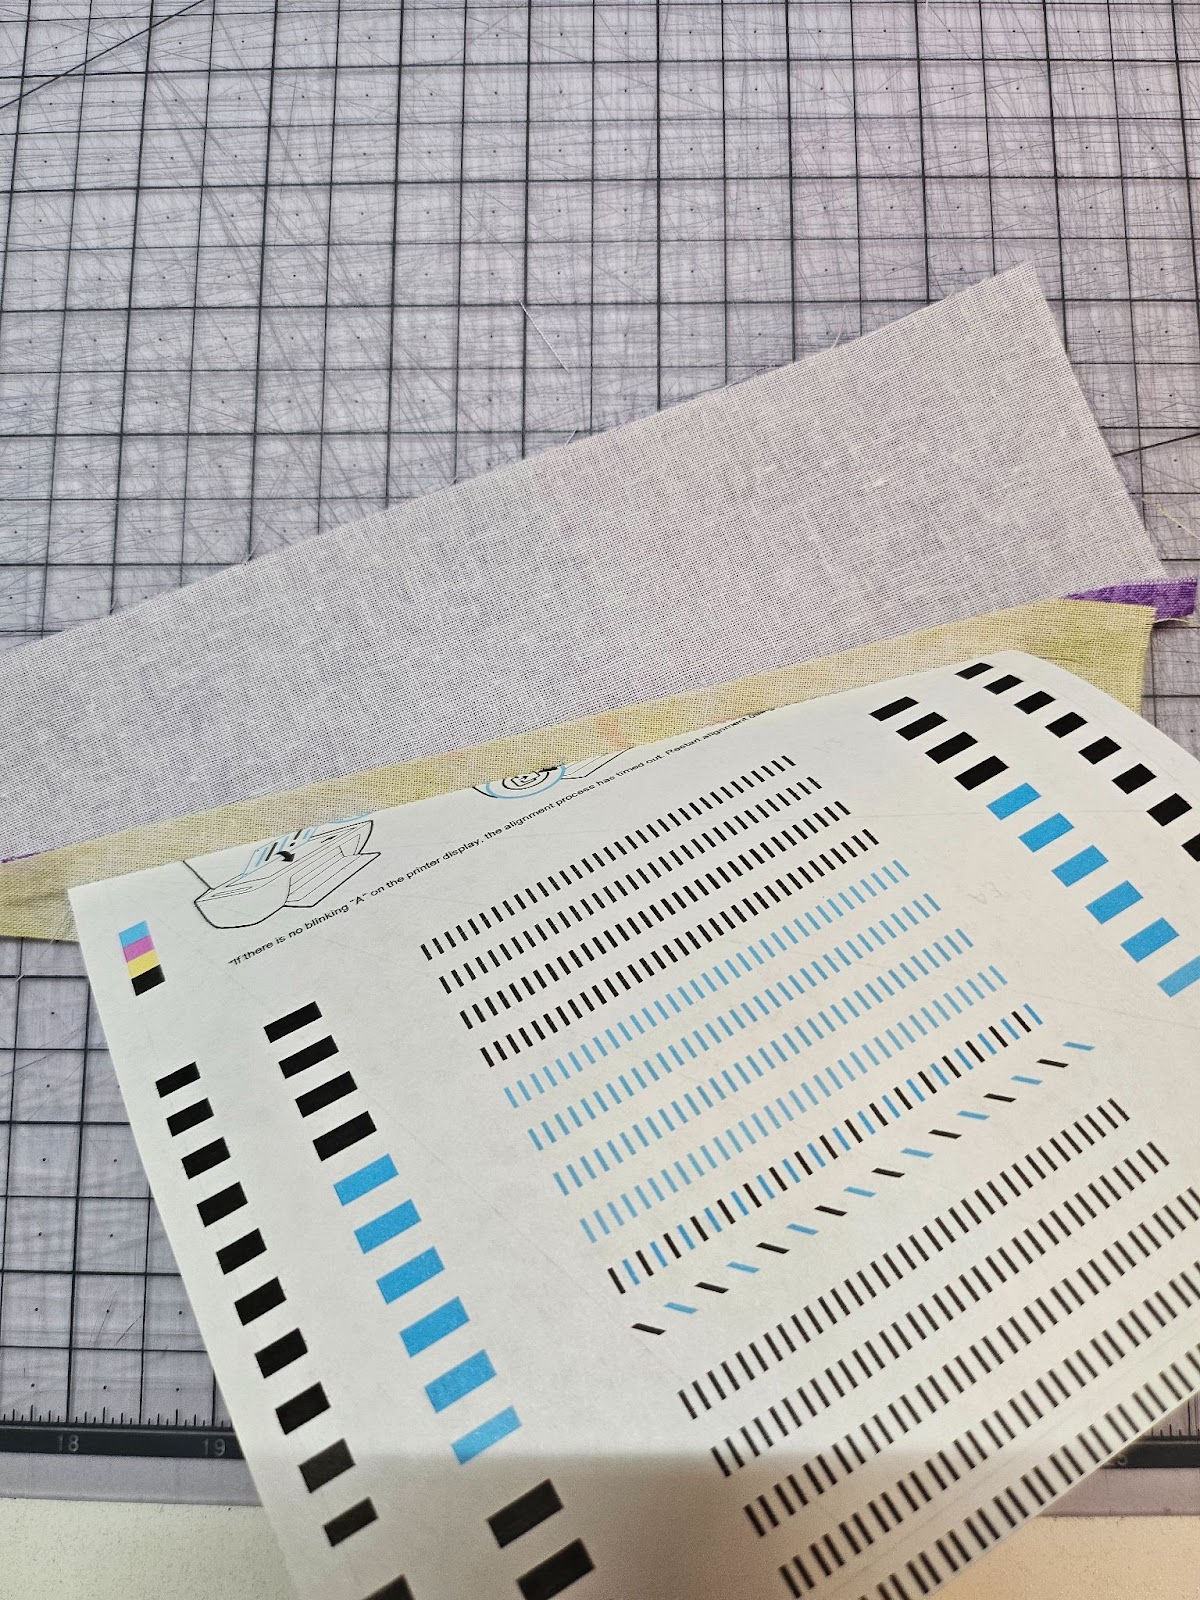
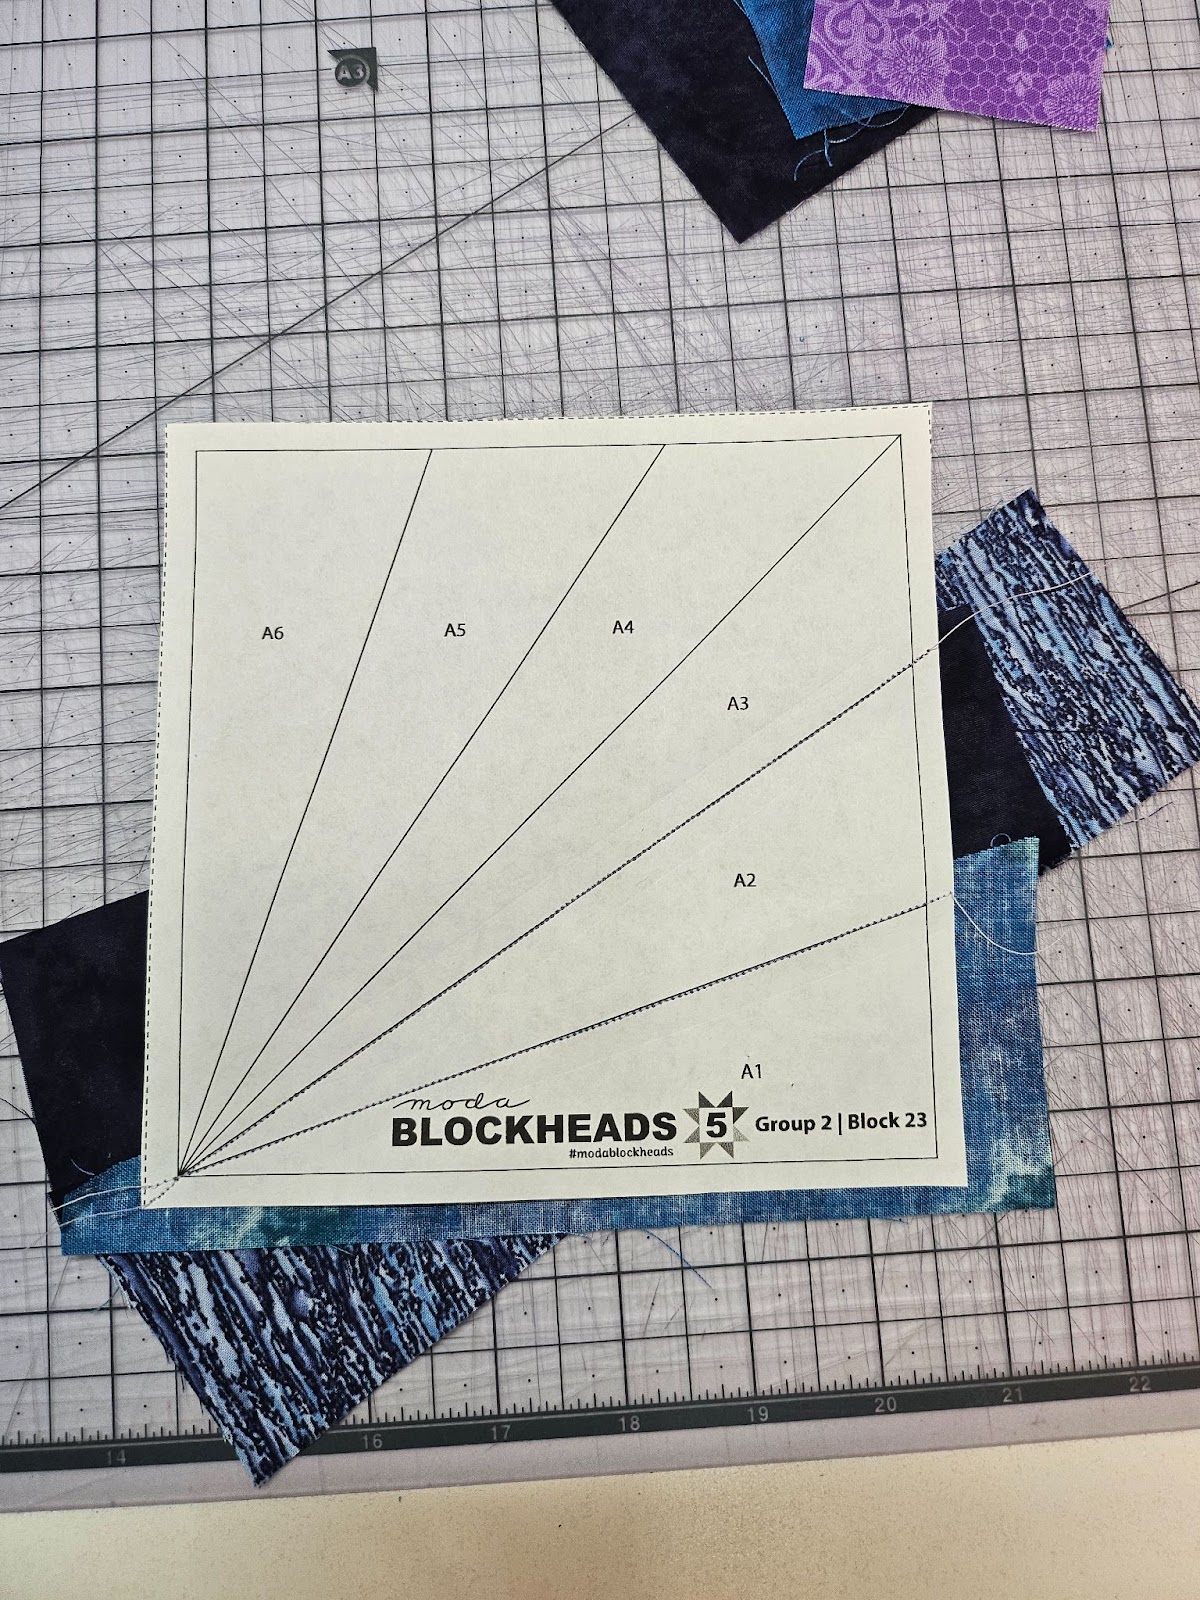
This is from Moda Blockheads 5 by Sarah Watts of Ruby Star Society. Group 2 Block 23.
https://modafabrics.com/inspiration-resources/bh5-group-2-block-23-sarah-watts
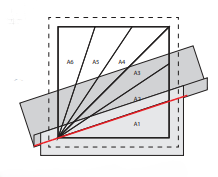
TEMPLATE FOR PAPER PIECING:
The PDF link has the right print sizing - Make sure you print using ‘actual size’ and measure the 1” square on page when you print it. Don’t print to fit or anything.
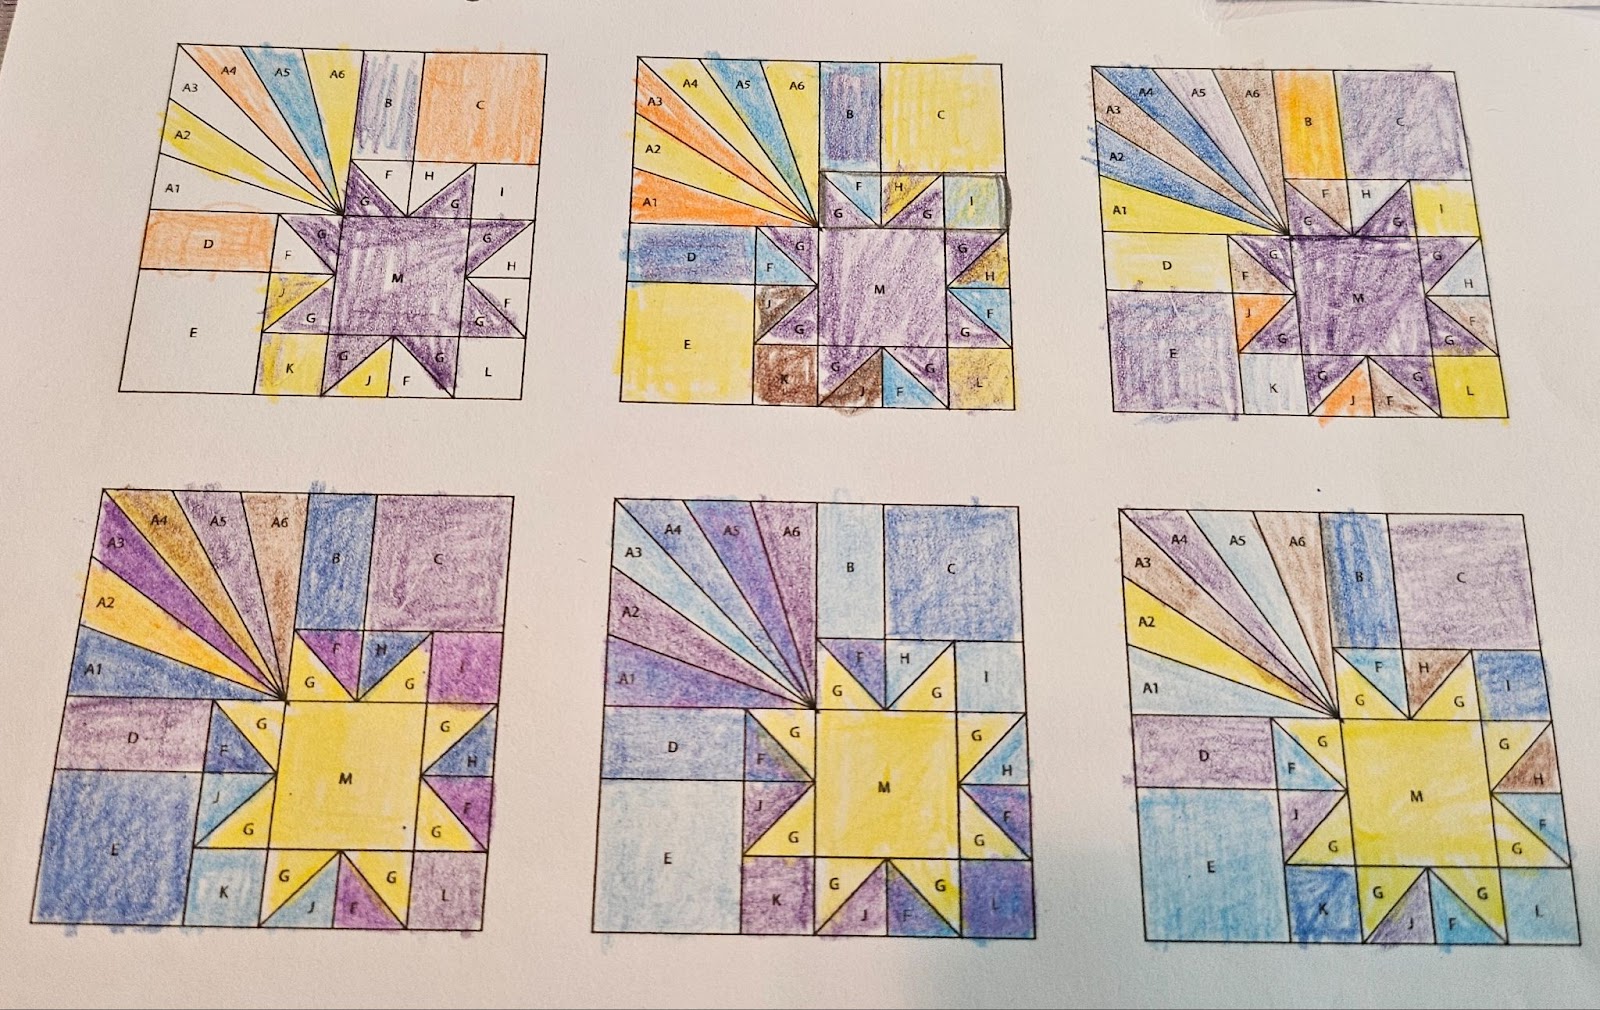
If you want a coloring page for planning there is one on the PDF, and also a swatch key that I found helpful.
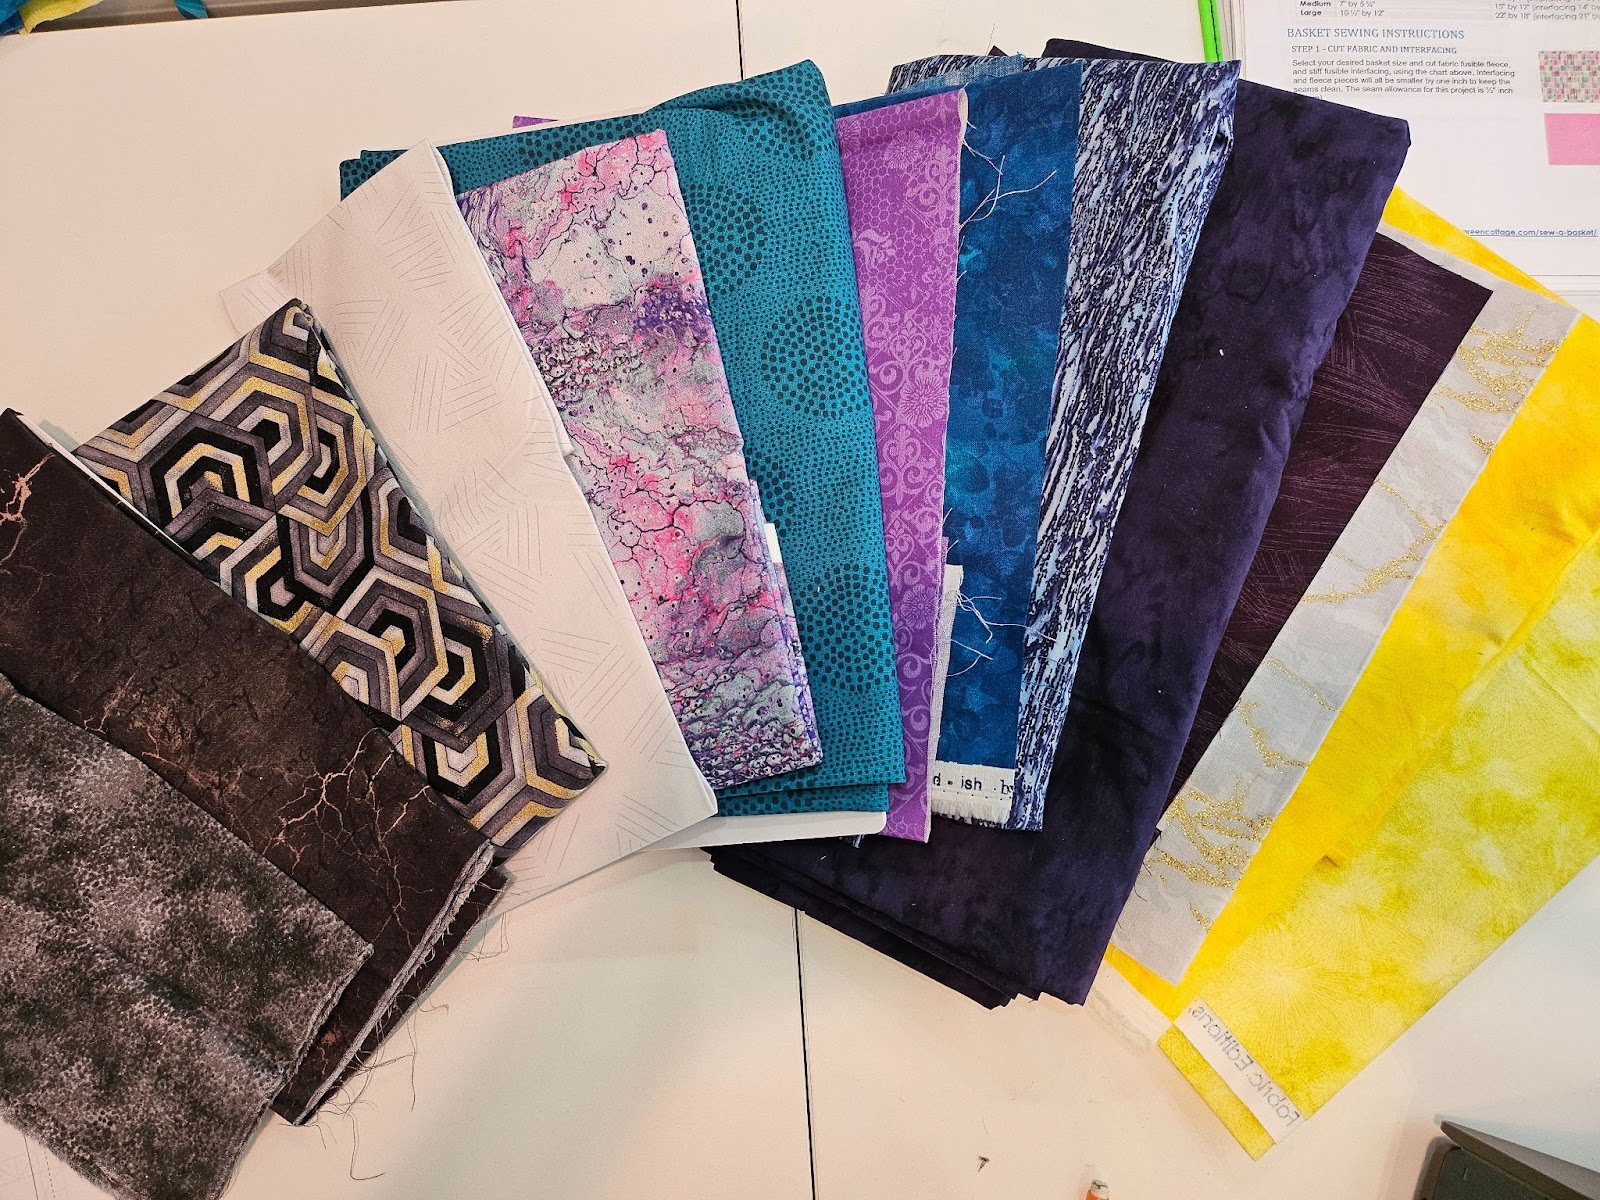
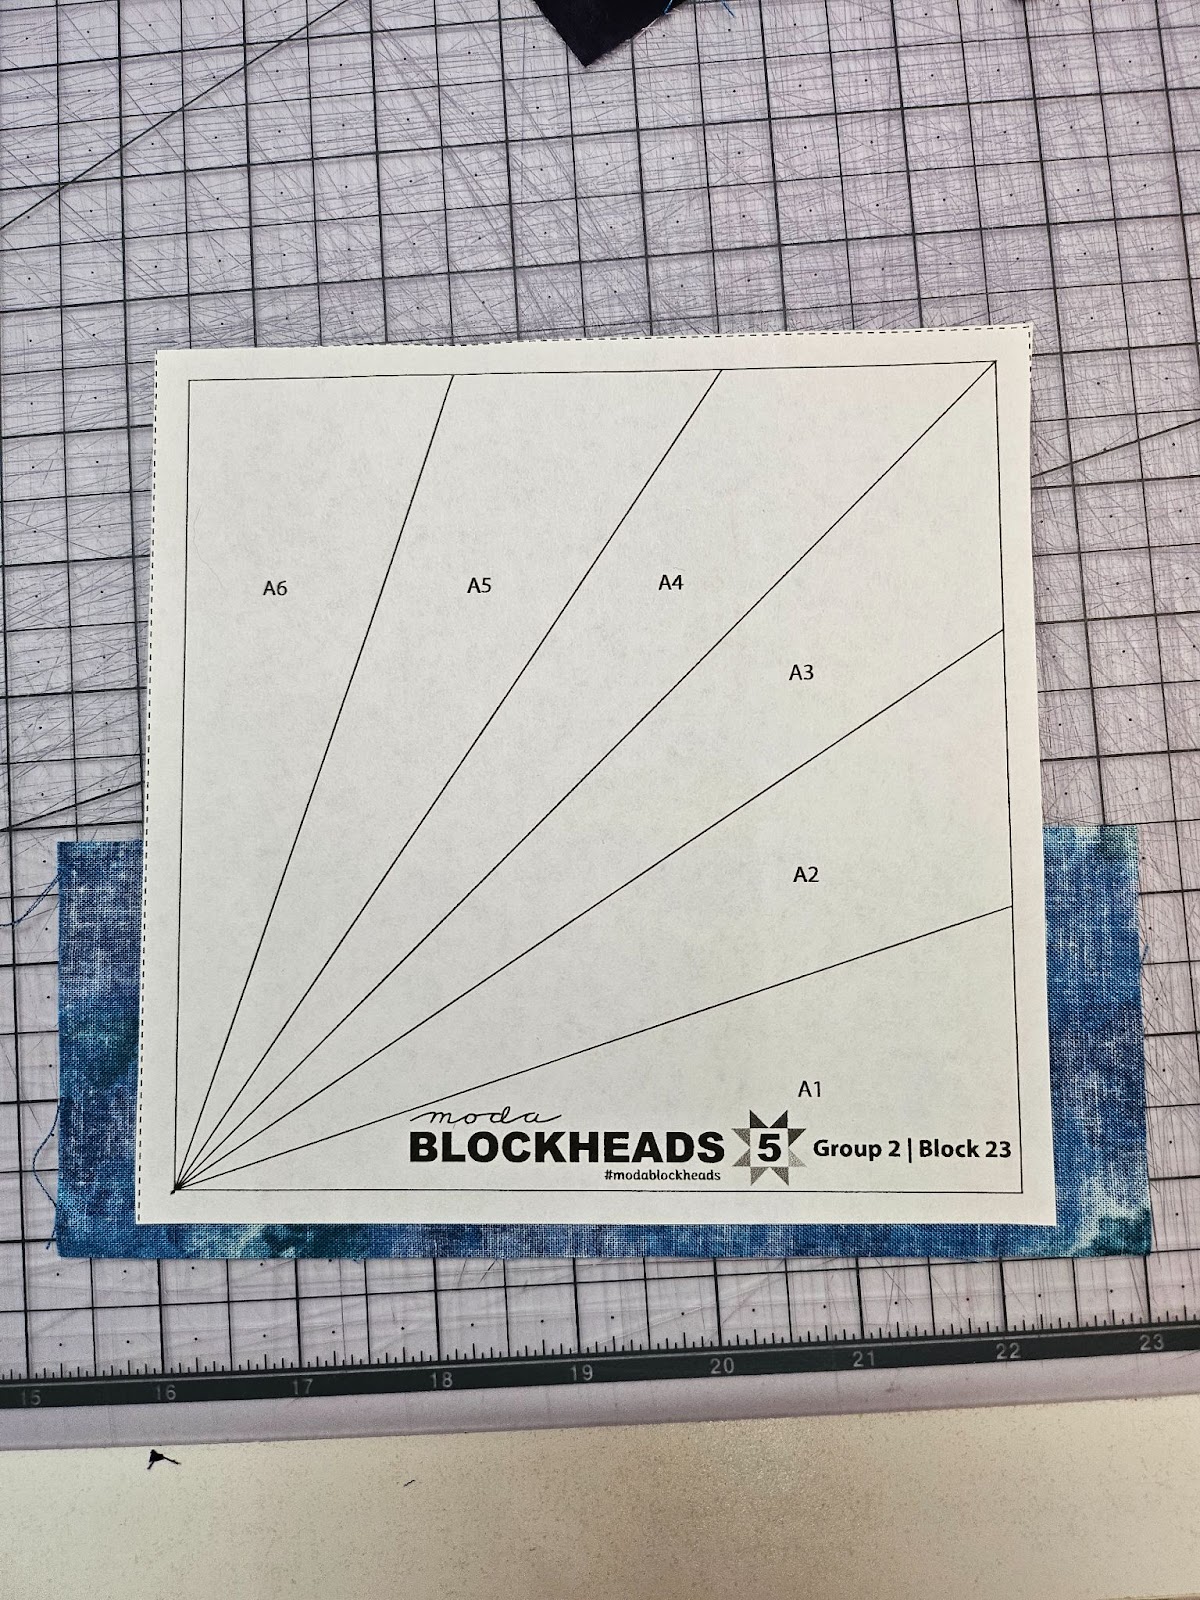
FABRIC
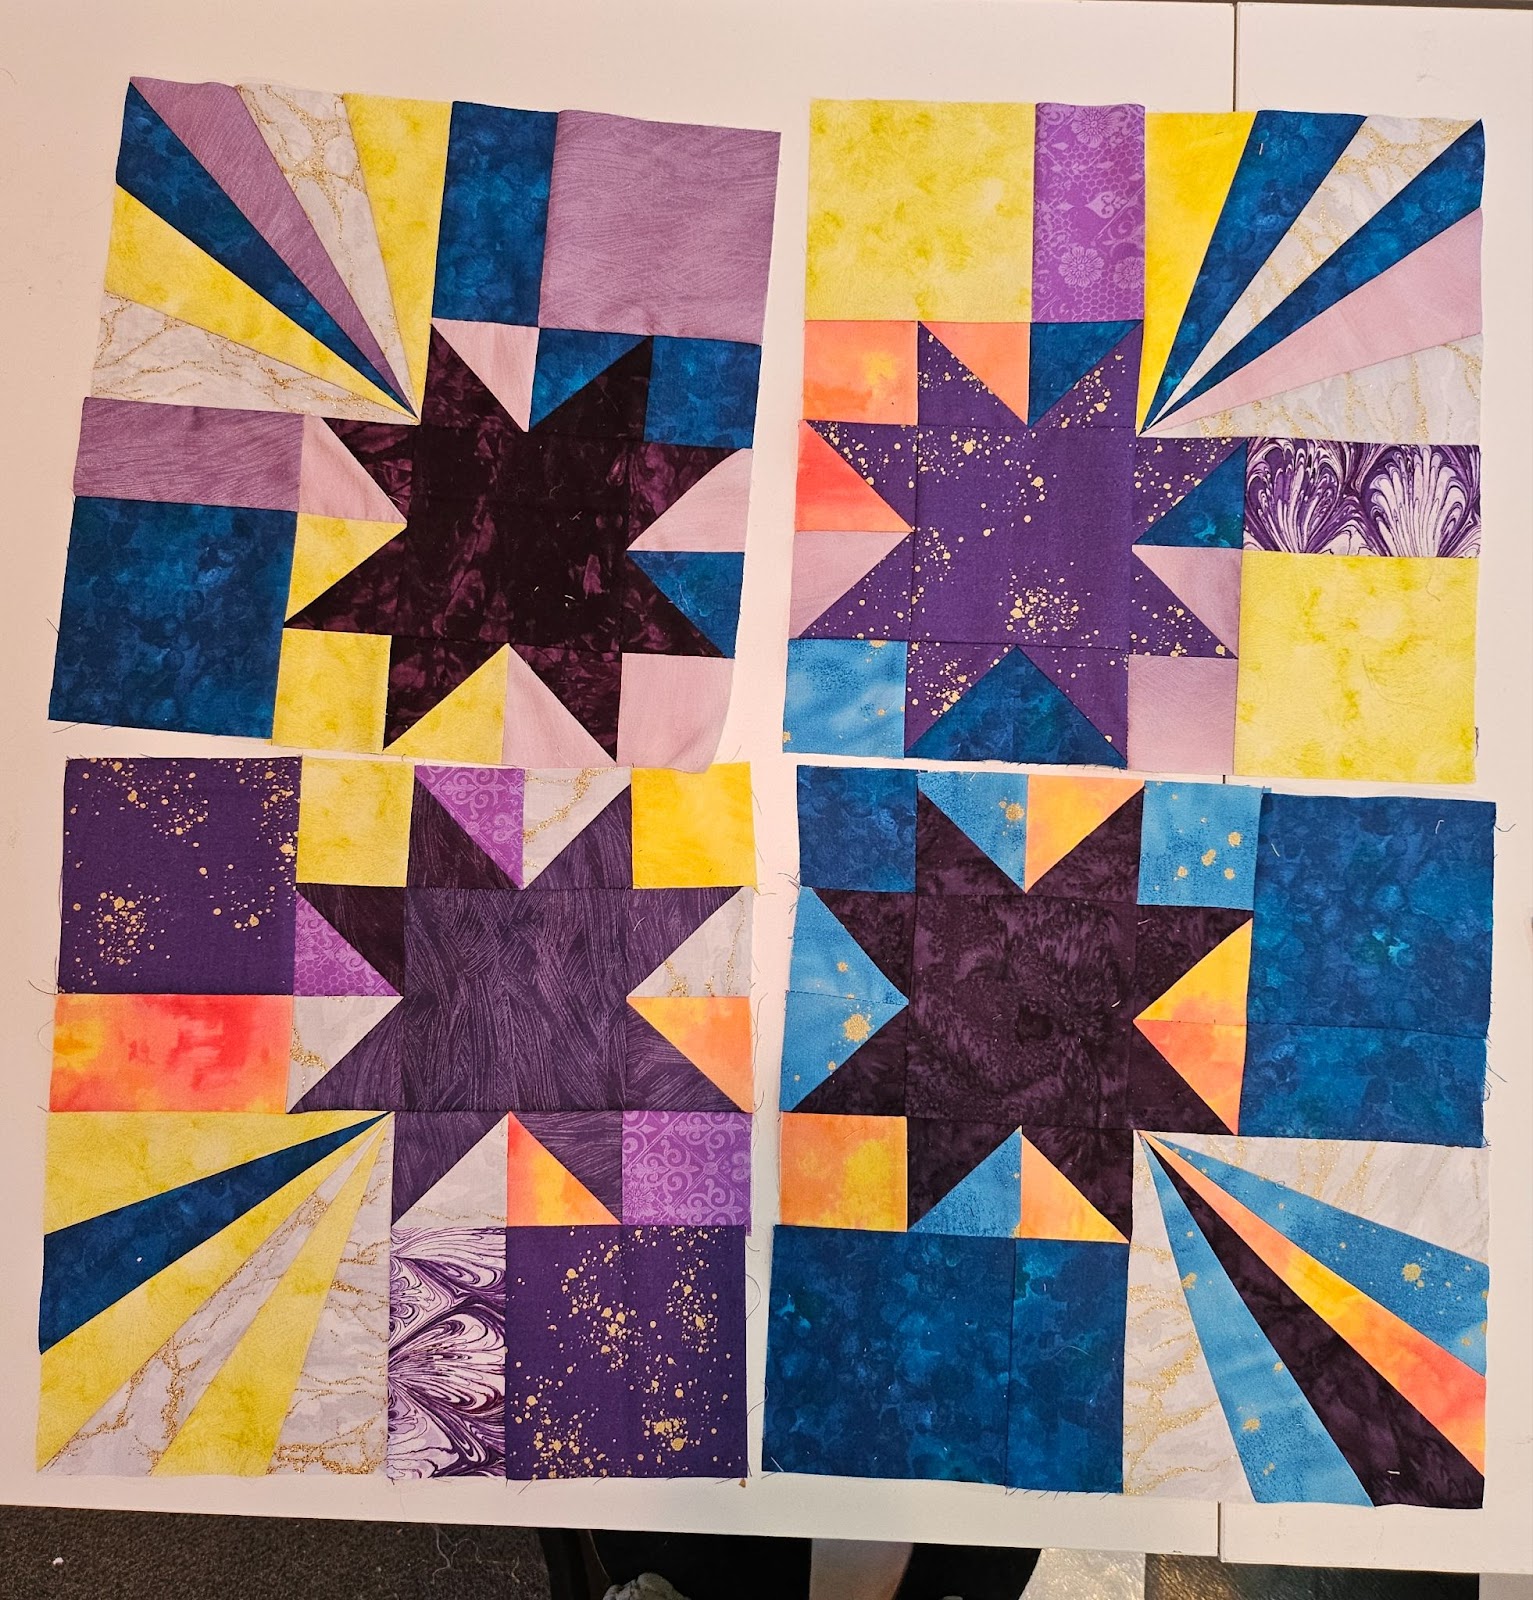
I’m looking for a yellow star with purples, blues, grays. White or yellow can be used in the star trail. Fabrics should be batiks, tone on tone, abstract print or celestial patterns are ok, glittery/shiny are great. No novelty or holiday prints. No solids! Feel free to mix it up: not use the assigned Fabric #s, or mix in other/more fabric choices, so long as the star is yellow and that yellow or white are only used in the trail. You know what looks good! In the fabric pull here I have a hexie design that I think would work in moderation. The one white looks solid in the picture, but there’s a light pattern in there.
NOTE: if you cut the wrong matched fabric number/letter, don’t feel the need to redo it, just use that color, it’s fine (unless it’s yellow or white)
This template helped me out the most:
STEP 1
Place your cut A1 fabric so that it covers section A1 on the back of your paper template, wrong sides together. (You might have to hold your fabric and template up to the light to ensure the fabric is lined up properly.) The printed side of the paper should be facing up.
A1 will be the only piece that will be wrong side up.
Ensure that the piece of fabric covers all neighboring printed lines by at least ¼” and a little more. All cut pieces should allow for plenty of trimming room and seam allowances.
If your fabric piece is short or seems too small, recut a larger piece. Once the fabric is positioned properly, secure it with a pin or a bit of glue.
STEP 2
Place your cut A2 fabric on “top” of the A1 fabric, right sides together and edges aligned along the seam allowance. Make sure that your A2 fabric will extend beyond the A2 section by at least ¼" and a little more after sewing and pressing out. Pin in place.
With the paper template facing up, sew along the printed line between A1 and A2 using a short stitch length and backstitching at the beginning and end of the seam.
With the printed side facing up, fold the paper top part down/towards you and onto itself along the stitched seam to expose the fabric underneath and trim to a ¼" seam allowance.
Press the A2 fabric out and away from A1:
STEP 3
Repeat the previous steps to join A3 to A2. Continue adding sections in order numerically until the unit is complete.
Trim sides of the unit along the dashed seam allowance line, making sure not to cut into the 1⁄4” seam allowance.
Carefully remove the paper from the completed unit and set aside.
STEP 4
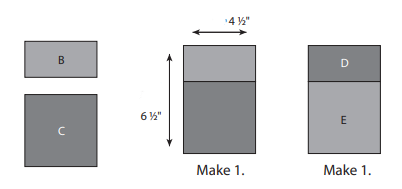
Join the B rectangle to the C square as shown to make a B/C unit measuring 4 ½” x 6 ½”.
Using the D and E squares, repeat to make a D/E unit measuring 4 ½” x 6 ½”.
STEP 5
On the wrong side of each F square, draw a line from one corner to the opposing corner as shown.
Place F and G squares right sides together. Stitch a scant ¼” seam on both sides of the drawn line. Cut the square apart on the line to yield 2 HSTs and press the seams to the darker triangles (G).
Repeat to make 4 F/G HSTs, 2 H/G HSTs, and 2 J/G HSTs.
Trim all HSTs to 2 1⁄2”.
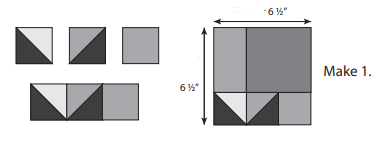
STEP 6
Sew one F/G HST, one H/G HST, and the I square together into a row. Join row to the bottom of the B/C unit to make a unit measuring 6 1⁄2”.
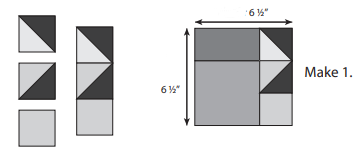
STEP 7
Sew one F/G HST, one J/G HST, and the K square together into a row. Join row to the right side of the D/E unit to make a unit measuring 6 1⁄2”.
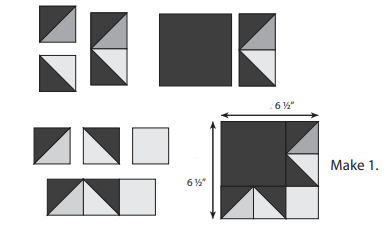
STEP 8
Join one F/G HST to one H/G HST as shown and sew to the right side of the M square. Next, sew one J/G HST, one F/G HST, and the L square together into a row as shown. Join row to the bottom of the M unit to make a unit measuring 6 1⁄2”.
STEP 9
Lay out the FPP unit and the units made in Steps 6-8 as shown. Join units to make the full block. 12 1⁄2”.
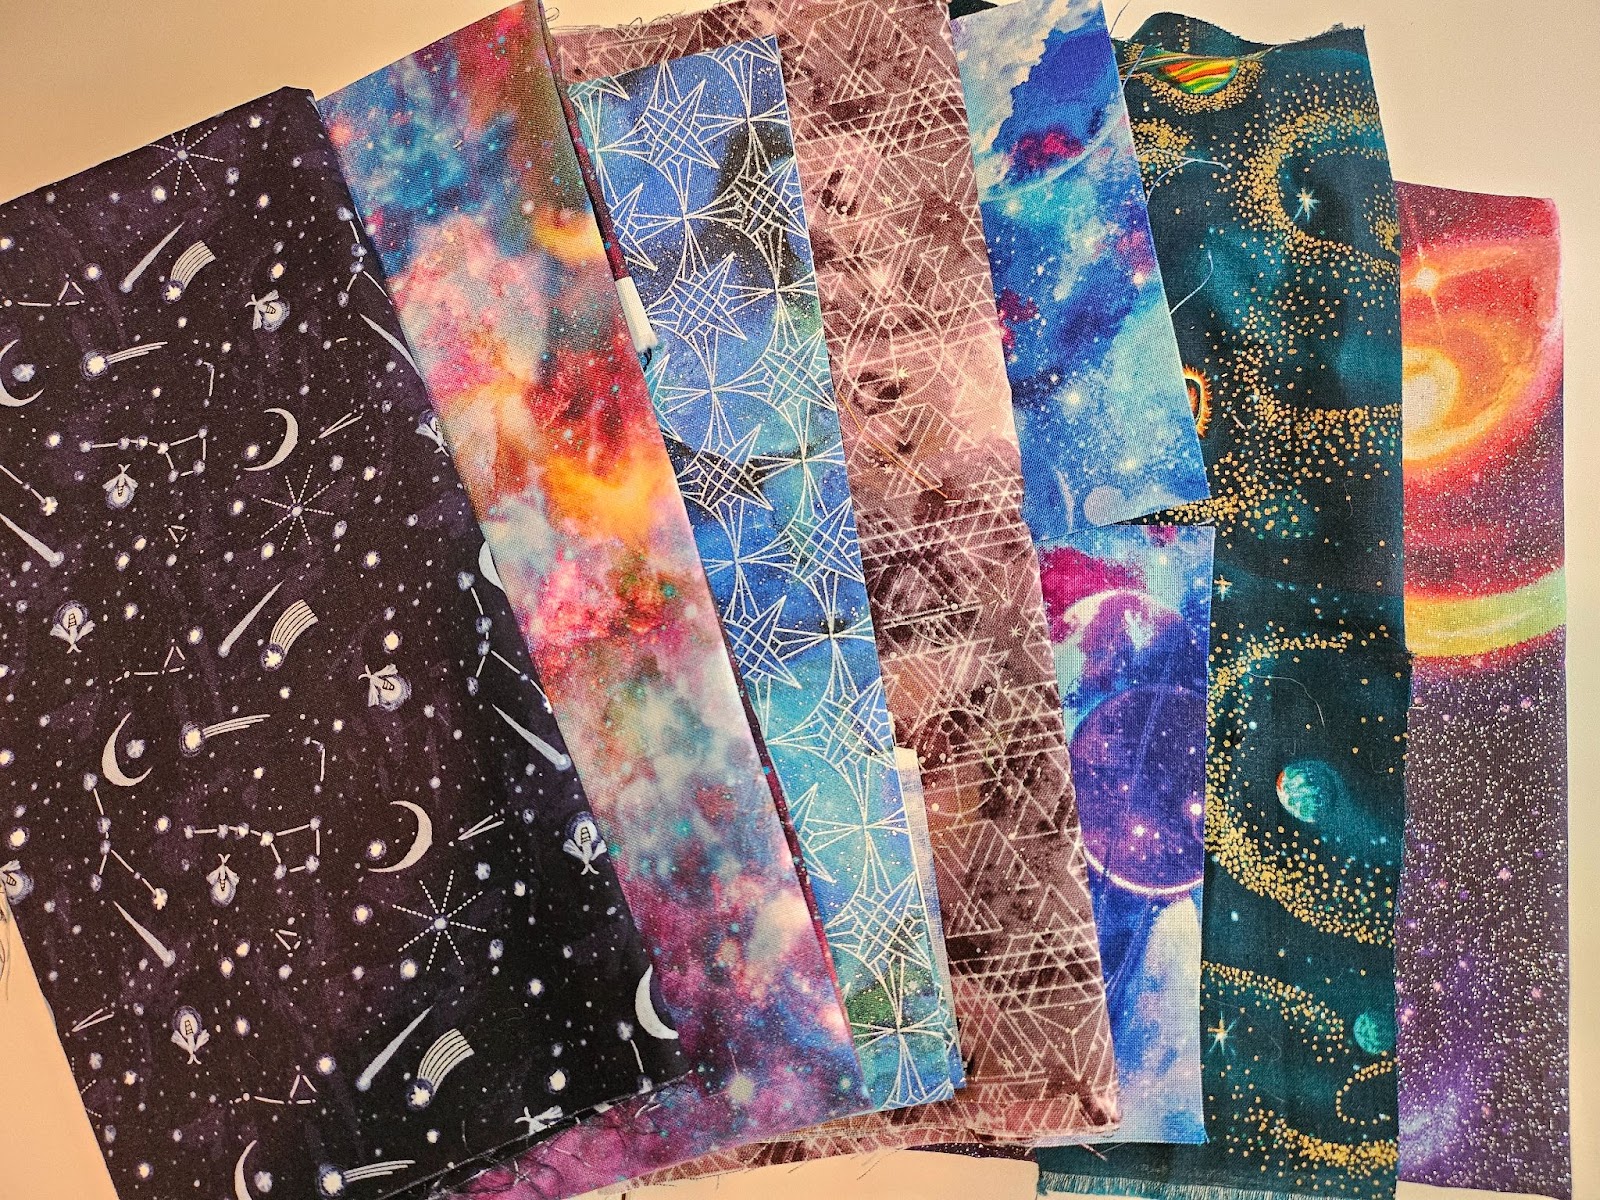
These are ones that I decided to use for the corners since I liked the yellow star better, but these are some other fabrics I’ve pulled: