Sunday, February 28, 2021

Tutorial Hive 1 March - T-Junction Block

 Hello Hive 1 Bee Mates!


I am excited to see what you make of my Block request this month!


I was thinking lately... All these restrictions we have to deal with worldwide, there is mainly nothing we can do about the impacts on our lives. Now, I wondered, which decisions/choices I can make to improve my personal live at the moment.

All this pondering brought me (in a long-winded, round-about-way) to the idea to request 

a ‘T-Junction Block’ from you.


All those choices and decisions sewn into a quilt! The quilt I envision, will be colourful. Just as I hope my live is/going to be! 

Now, I am sure this kind of block is out there somewhere already. (I didn’t look for it.) But I put a tutorial together myself, as you see below.


I have been playing around with Layout Options for this block (three of them below), therefore I want to ask you to make me six 5” x 5” Units each, so I can mix them all up while assembling the Quilt-Top and figure out the final Layout.


Fabric Choice:

For the Main Fabrics:

Please use at least 3 different fabrics for the Main Fabrics.

Bright Colours: All colours are welcome, medium to dark, anything that reads as the one colour (Solids, Tone on Tone, Small Scale Prints, etc.)

For the Strips:

Please use White or White on White, whatever you have.

Seam Allowance:

While testing, I noticed, that a scant ¼“ is best to get a 5”x 5” block at the end.

Cutting Instructions:

  • 6x 5” x 5” of Main Fabrics
  • 6x 5 ½“ x 1” White Strips
  • 6x 5” x 1” White Strips


Tutorial Overview:


Step-By-Step Tutorial:

Cutting:

Step 1

All 6 of the Main Fabric 5" squares:


Step 2

Now you have 3 pieces: Piece A, Piece B and Piece C. I cut 3 layers at a time.


Step 3

Also: Cut from the White Fabric:

6 times:    5 ½“ x 1” White Strips

6 times:    5” x 1” White Strips


Piecing:
For all 6 cut up Main Fabric squares and the corresponding (each 2) White Strips assemble as follows.
This is a good opportunity for chain-piecing. I prepped Step 4 and Step 5 at the same time and chain-pieced them.

Step 4


Step 5
Step 4 & 5 prepped for piecing:
Step 4 & 5 chain-pieced:
Step 4 & 5 pressed:


Step 6


Step 6 prepped for piecing:
Step 6 chain-pieced:
Step 6 pressed:
Don't they look a bit like Stingrays now?


Step 7
Step 7 prepped for piecing:
Step 7 chain-pieced:
Step 7 pressed:


Step 8

The only thing left to do is to square the 6 finished units up to be 5" x 5".


All Done!


Hope you enjoy this. Thank you already so much for sewing for me!

Lots of Love from Ireland,
Rita.

Hive 3 March 2021 tutorial - 2 fabric stripey hearts

Hi Hive 3! 

This month I have taken inspiration from all the February valentines quilts and decided on a framed 2 fabric stripey heart. 

Inspiration

When I was I looking around for a suitable block, I found this super cute ombre striped heart block tutorial from Julie at The Crafty Quilter https://thecraftyquilter.com/2018/01/ombre-heart-quilt-block-tutorial/  

The Block - 2 fabric stripey heart

Super cute right! But in the spirit of using fabric up (a la stashbee), I have sized this up to be able to use up left over layer cake or jelly roll pieces, as I seem to have many of these floating around, and decided that I wanted to keep it to 2 fabrics only. 


Fabric selection and pull

For this quilt I’m requesting colours that feel like “citrus gelato” i.e. soft versions of lime, lemon, orange and pink grapefruit. You’ll need to select 2 fabrics of the same colour for each block. 

It’s for a tween girl, so appropriate novelties are fine, just not overly holiday themed. Solids, florals, text, textures and numbers are all fine to use too. 

Background fabric can be white, off white, white-on-white, low volume etc.

Cutting

Colour 1

3 - 2” x 9.5” strips

Colour 2 

2 - 2” x 9.5” strips

2 - 2” x 5” strips 

Background 

2 - 5” x 5” squares

4 - 2” x 2” squares

2 - 2.5” x 9.5” strips

2 - 2.5” x 13.5” strips 


Assembly

Marking

Using your preferred method, on the back of each of the background squares, draw a diagonal line from one corner to the opposite corner. 
I like frixon pens as they disappear when ironed. 


Inside top of the hearts

NB: I’m suggesting a different method here than I would naturally go for, as it reduces the need to match a corner later on. 

Place a small square on the inside of the shorter strips (see pic) and stitch on the diagonal line. Trim and press one towards the background and one towards the colour. This will allow you to nest the seams.

Sew these together to form a 2” x 9.5” strip.


Stripes

With the strip from above as your top, alternate each colour to form a stripey square. 

Press all the seams downwards.  

Add the outer heart pieces

Place the two smaller square on the outer top corners of the block and sew on the diagonal line. Trim and press towards the heart. 

Place the one of larger squares on a bottom corner and sew on the diagonal line. Trim and press away from the heart. Do the same on the other side. This should be the only “point” that you’ll need to worry about losing when you add the frame. 

Add the frame/border

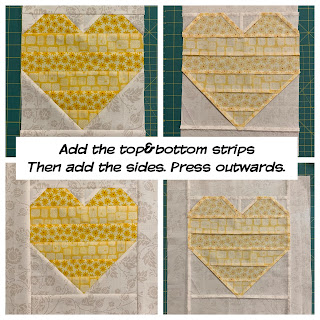
Add the 2.5 x 9.5” strips to the top and bottom. Be mindful of not losing the bottom point. Press outwards. 

Then add the 2.5” x 13.5” strips to the sides. Press outwards. 


NB: do not fret if your block is slightly smaller than the 13.5” square, I will trim then all down to ensure consistency in sizing. I have found over time that rulers and 1/4 inch seams can be slightly different and have designed accordingly.


Friday, February 26, 2021

Hive 1 June for Jayne

 Dear Jayne,

I made my block for you since February was my month as Queen.  Rather than wait for June, I'll mail it to you now before it gets lost in my messy sewing room.  This will make such a nice spring quilt with all the flowers on it.

Kathie Laposata


Sunday, February 21, 2021

February Hive 1 Block for Kathie

Here’s my February block for Kathie! This was a fun one. I hope your mom loves it. 


Block for Kathryn


Pushed it to the very end this month due to school but here's my February block. I hope you're mom likes blues and purple! It'll be in the mail on Monday ☺️

Saturday, February 20, 2021

February Hive 1 block for Kathie


I was able to get so much sewing done today, and I'm so glad getting this block done was among my accomplishments! This was such a simple and neat block to put together. I think they will all look beautiful. Sending all my best to you and your mom, Kathie.

-Julia C


Friday, February 19, 2021

Hive 1 block for Kathryn


 I was not happy with the quality of fabric on my initial block (too thin and it puckered when I joined the pieces) so I made a second one.  Both coming your way.  When combined into the quilt and then quilted, maybe the puckers will work themselves out.  This was a fun one to sew.  I like seeing all the vibrant colors on the posts, it’s going to be a beautiful quilt.

Carolyn


Sunday, February 14, 2021

Hive 1 Block for Kathryn

 Kathryn, this is going to be a fun and colorful quilt.  I don’t have many solids at all.  I did find some old scraps in my stash of the green and blue, something from the way back past I think these fabrics are pretty old from the 60 or 70.   Then for the light color I used a cream colored tone on tone.  


I hope you enjoy.  Carolyn

Thursday, February 11, 2021

Hive 1 June 2021 Quatrefoil for Jayne

Since the pattern was already available, I went ahead and made Jayne's block even though it's now intended to be due in June.  I wasn't happy with my first attempt so I tried a couple more times.  I like the next two much better.  I'll deliver all three to Jayne - maybe the muted one can go on the back.  It's going to  be a beautiful quilt.     Karen


Wednesday, February 10, 2021

Hive 1 February 2021 Blocks for Kathryn

These were fun to make.  I hope the colors are okay.  I like using all solids.  Looking forward to seeing them put together.  They went in the mail today.

Karen


Monday, February 8, 2021

February Hive 1 Block for Kathie

I feel so on top of things this month! Here is my February block for Kathie. It came together very quickly and I LOVE that it's in solids. I think it's going to make a stunning quilt. Can't wait to see it.

~ Diana