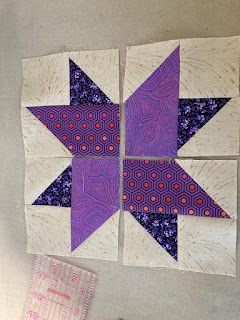
HI Hive 2- Sorry for the delay. we ran into technical problems trying to post miriam's tutorial. It didn't work out for her to post, so I am posting on her behalf. ❤️Alanna
Hi, everyone! This is my first year in StashBee and I’ve spent much of it poring over all kinds of blocks, trying to decide what block to share with you…..I love blocks like Card Trick and Double Aster, where there is a lot of spin to the block – but by September, I was worn out with my jobs, two aging dogs showing signs of dementia, and helping my daughter plan for her eldest’s Bar Mitzvah. So, the block I’ve finally settled on should be easy for everyone, and I will love having blocks from all of you to assemble into a quilt!
Duck Tracks looks like a simplified Carolina Lily and is really an elaborate 4-patch. I took my inspiration from a posting by Elaine Huff that I found noodling around the internet. Her tutorial, if you need another way to understand the block assembly, can be found at https://fabric406.com/blogs/fabric406-blog/duck-tracks-quilt-block-pattern
For fabrics, please choose a cream or very pale tan background textural print, or text print. You will need two medium prints of varying textures, plus a dark print. I hope that you can find monochromatic fabrics, or ones that read primarily as a single color. Please no licensed characters. Metallic flourishes are fine – I love shiny objects! If you can, please stay in the blue/green/violet part of the color spectrum.
Here are some examples to help further explain:
CUTTING
From your light colored, cream/tan fabric, cut:
- eight 2.5” squares AND
- two 3” squares
From your dark fabric cut:
- two 3” squares
From each medium fabric:
- two rectangles 2.5” by 4.5”
Open up the blocks, pressing the seams to the dark side. Square up the blocks so they measure 2.5” on each side.
2) On to the snowball blocks!
Draw a diagonal line on the wrong side of 4 of the eight 2.5” light colored /background squares. Lay each of them on top of the four rectangles, oriented as shown below:
If you are really precise about matching up the edges and corners, and stitching directly on your drawn line, the resulting half-flying goose or snowball block will be 2.5” by 4.5”.
3) Now you will need to attach the remaining 2.5” light colored/background squares to the HST’s you made earlier:
Be sure that the triangles are all oriented as shown above, with the light colored/background 2.5” square to the left of the HST block. These units should all measure 2.5” high by 4.5” wide when assembled.
This is what you should have to work with:
4) Stitch one HST unit to one of the snowballed units, taking care to orient all of them in the same direction!
Check your quarter units to make sure that they each measure 4.5” x 4.5” Once each quarter unit is complete arrange them so that a light colored/background square is at each corner of the block.
5) From here, it is a conventional four patch assembly. It is a little tricky to line up the intersections of the two diagonals but it is really important! Press seams to the same side for each half so that they nest when you put the two halves together.


No comments:
Post a Comment