Welcome to November. The last block of the year. I am sad to see this year end, but excited to see all the beautiful blocks you are going to make.
It has been a crazy week here. We had a big Nor/Easter Storm here in CT last week and a few trees came down on lines taking out poles and power lines. One day of wind = 3 days without power. Trick or treating was an interesting experience when no front porch lights were on to tell the kids where they could go. Thank you for your patience with my delayed posting.
The block I have chosen is the Circle of Geese block by PiecebyNumber
This is a Foundation Paper Piecing block that will measure 12 & 1/2 inches when you complete it.
Colors-
Outer pieces - Grey - medium to dark, for the background pieces
Center - White - low volume with white as a base or white on white (no off white or beige)
Geese - 12 different fabrics of the SAME color family.
Color options are: Teal, Pink, Purple, Orange, Yellow or Light or Lime Green
Yes, you can use 12 different greys and 12 different whites too. Surprise me!
Fabric cutting-
Cut 12 - Use 12 different prints if you have that many.
Piece #1, 4 & 7 - Main Color - 4&1/2 x 2&3/4
Cut 4 of each:
Piece #2 -Gray - 2&1/2 x 3&3/4
Piece #5 - Gray - 3&1/2 x 4&1/2
Piece #8 - Gray - 2&1/4 x 6&3/4
Piece #3 - White - 5 x 1&3/4
Piece #6 - White - 1&3/4 x 6
Piece #9 - White - 2&3/4 x 7
Print Pattern -
The pattern can be found here.
For this block, you will need 4 identical pattern pieces printed at Actual Size
The pattern has clockwise or counter-clockwise spin pieces. . You only need to pick one of the two pages, and print 4 copies of that one. Make sure all 4 printed pieces are the same and printed at Actual size.
After printing all pieces out on computer paper, it is helpful to use a ruler to trace the pattern piece lines from the back side of the paper. This is so you can see where to sew. If you prefer, you can perforate on the lines by sewing without thread. I prefer to draw the lines, and fold the paper as I go from step to step, and I do not perforate. I find the perforations sometimes make the pattern piece fall apart before I am done sewing it.
Note- When I do my paper piecing, I usually keep the printed side up, which is apparently opposite what other people do. Either way you do it, just keep it the same for all 4 pieces and there will be no issues.
Important! - On this pattern, there is a 1/4' seam allowance around the outside. the fabric pieces next to these seam allowances should extend over this area.
Block Assembly:
Start by creasing your paper on the line between piece one and 2, unfold and then lay your pattern face up on the table. Take fabric Piece #1 and lay it face up onto the pattern covering the whole area marked 1, and the seam allowance below the piece marked also. The dimensions I have given for you cut pieces will allow a piece of fabric large enough to cover the whole area.
You can use a tiny dab from a washable glue stick or pin to hold the piece in place.
(
This next step is the hardest part, because the fabric has to be held in place well.
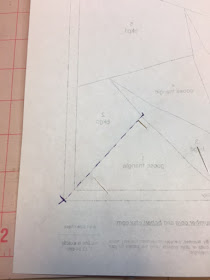
Hold fabric & flip the paper over, and fold the paper back on the line between pieces 1 and 2.
Trim the fabric 1/4 inch from the edge of the paper. (Note: I use an add a quarter ruler, you do not need one, but if you decide you like this type of quilt piecing, it is a very useful tool.)
If you do not have one, just line your 1/4' mark on the folded edge of the paper.
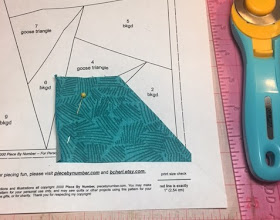
Open the paper back up and flip back up. Your piece should now look like the picture below.
Now take fabric piece #2 (gray), and lay it face down on top of piece 1,
matching the seam with the edge you just trimmed.
Secure with pins.
(See how the grey fabric below extends at least 1/4' outside the shape of #2 on the paper.)
Flip the paper over and sew on the back side.
You will sew directly on the line that you traced between pieces 1 and 2.
Be sure to extend through the seam allowance lines on the outside edge of the block, but do not extend beyond the line into piece 3 more than one or two stitches.
Flip over, and trim all threads on front and back.
Press open.
I prefer to press with a dry iron, but this handy wooden seam roller works great too.
After pressing, your piece should look like this. Part 2 on the paper should be fully covered.
The next step is to now fold the paper on the line between 2 and 3.
Trim at 1/4 inch from folded edge.
Flatten paper back out and place fabric piece 3 face down onto the line your just cut.
Continue sewing as above, going in numerical order until you have sewn all 9 pieces.
By making your blocks kind of in a chain type piecing, it will help you to keep all the fabric pieces organized and will save some time.
Once you have all 4 pieces finished, trim along the outer lines on the paper.
Do not remove paper yet.
Arrange the four pieces so that the geese (triangles) fly in a circle.
Sew the top two pieces together with 1/4' seam allowance (on line) to form a row,
and do the same with the bottom two.
Press the top seams to the right, the bottom to the left.
Nest the two rows together and sew the long seam to form the press seams open.
Please do not remove the papers. It will make it easier for me to assemble all the blocks into a quilt if the papers are intact.
Thank you!
If you are unfamiliar with foundation paper piecing and are concerned that this block may take you more than and hour and a half to finish, please feel free to make this block in its place.
Let me know if you have any questions.
Thank you and Happy Sewing, Heather


This comment has been removed by the author.
ReplyDelete