Hello, Hive Mates and Bees :)
I’m really excited
about my turn as Queen Bee. I stumbled across
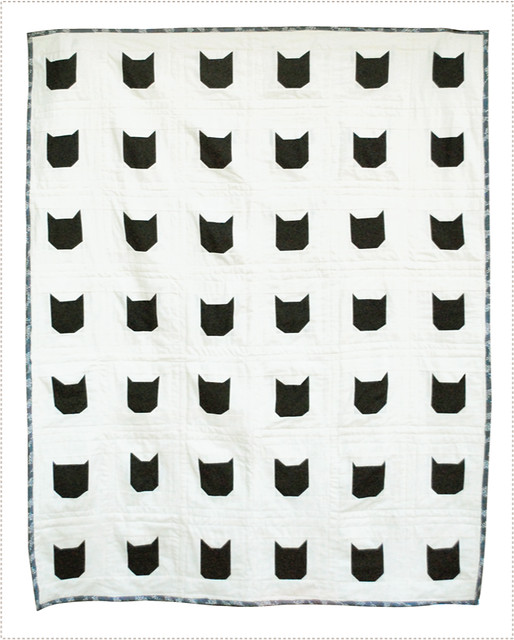
a cat quilt online and knew immediately that's what we were going to make together. Of course I can't find that particular photo now, but it was very
similar to this one - Merrilee's modern black cat quilt
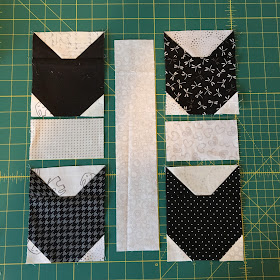
I started by making four of Elizabeth Hartman's basic cat blocks and then just sewed them together with 2½” sashing. Easy enough!
I started by making four of Elizabeth Hartman's basic cat blocks and then just sewed them together with 2½” sashing. Easy enough!
I’ll walk you through it, but refer back to her tutorial above for some great, easy to follow diagrams!
FABRIC:
For the cat faces/ears, please use black or
dark gray. (I prefer solids, tone on tones,
or small white/gray prints on black/gray.
No licensed fabrics please. If your stash allows, four different fabrics
would be great! The ears and face for each cat are the same though. (make sense?)
For the back ground and sashing pieces, think
clean white or ivory. No cream or beige
please. Choose solid white, white on
white, or low volume gray on white. Black on white low volume is ok if used
sparingly. Scrappy is encouraged, but use what you have! I promise I’ll love it!
Here’s what I pulled:
CUTTING:
Black/Gray (Cut
4 sets of the following to make 4 kitty
faces/ears)
1 - 4½”
wide x 4” tall
2 - 2” squares
Background
4
– 4½” wide x 2” tall
8
– 1½” squares
2
– 2½” x 4½” (sashing)
1
– 2½” x 12½” (sashing)
Here’s a look at
all my cuts except for the sashing.
Let’s Sew! Draw a diagonal line on the back of your 1½”
background squares (8) and on the back of your black 2” squares (8). Drawing on black is challenging – sorry about
that. ;)
First, make 4 ear units.
Place two black 2” squares of the same fabric on top of a 2” x 4 ½” background piece with right sides together. Be sure the direction of your drawn lines look like these below.
Place two black 2” squares of the same fabric on top of a 2” x 4 ½” background piece with right sides together. Be sure the direction of your drawn lines look like these below.
Sew on the drawn lines. (Pins are helpful. These little squares like to move.) Make 4! Trim off the extra fabric 1/4" to the outside of your seam. Press toward the dark fabric, admire your cat ears and set aside! :)
Next, make 4 chin units.
Next, make 4 chin units.
Sew on the drawn lines. Make 4! Trim away excess fabric leaving your ¼” seam. Press open or toward the dark pieces.
Next, pair up the face units with their coordinating ear units, place right sides together and
sew. Make 4!
Press seams toward the face units. Cat faces should measure 5 ½” tall x 4 ½” wide. How cute are those?
Almost there! Add the sashing and we’re done here! Arrange
the block as shown.
First sew the 2½” x 4½”
sashing pieces to cat face to make vertical columns. Press toward the sashing.
Add the center 2½”
x 12½” sashing piece. Press toward the
sashing. Your block should measure 10 ½”
x 12 ½” and will look a little wonky until I put them all together with sashing! These are two that I've made.
Sophie gave them two paws up! ;)
I made the second block in about an hour, and I sew purposefully (ahem...slowly). I think this will go together very quickly for you, but if time becomes a concern, just make some cat faces, and I’ll sash them later. No stress here!
I can't wait to see what you come up with!
Happy quilting and Happy Labor Day!
~Cheryl


I love cats... This is definitely a pattern I may borrow from you... Looks great.
ReplyDeleteYay! I'm looking forward to this one! :)
ReplyDeleteLooks fun and easy. Thanks for the cute pattern🐱
ReplyDeleteI can tell you that this one is a winner cuz I want to put aside everything else and sew this block. My black kitty, Chai, and I love it!
ReplyDeleteThough I'm not really a cat lover, this is adorable and will be so fun to make!
ReplyDeleteThough I'm not really a cat lover, this is adorable and will be so fun to make!
ReplyDelete