Pages

Monday, September 30, 2024

Hive 3 October Tutorial: Trickle Down Economy Block for Nina

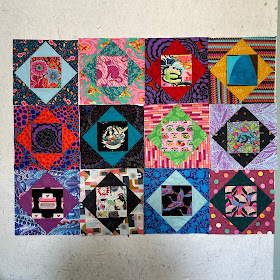
I have a stash of big, loud prints that I love but that have been hard to place in the context of a quilt. So this is the project and it's all about loud!

I'm looking for big, loud, vibrant economy blocks made from your most saturated and busy modern fabrics. The blocks will be 12.5" unfinished or 12" finished.

There's a great tutorial here for traditional piecing: https://www.diaryofaquilter.com/economy-quilt-block-tutorial-and-inspiration/

You can also make this block using foundation paper piecing which many people find easier because it guarantees precision. I pieced all mine because I'm not super fussy, but I know that paper piecing economy blocks is very popular.  I don't have access to a free 12" finished economy block printable template, but you can purchase one from Etsy for instant download quite cheaply here if you think you might use it again: 12" ECONOMY BLOCK  

Here are some I made myself: There's some Kaffe in there, and Tula Pink and Libs Elliott skulls and Alexia Abegg and an Alexander Henry print and others I can't remember :)


I've been inspired by a number of bright and loud Economy Block quilts I've seen around. They're just so cheerful!

Cotton Candy Fabric's quilt


FABRICS


Fabric Pull examples


I'm looking for intense, saturated colours for the most part. Loud printed designs, typical of Anna Maria Horner, Kaffe Fassett, Tula Pink and other designers. Intense, saturated blenders are also wonderful as a contrast to the wild prints for a bit of a breather.  If you want to use a less intense contrasting fabric to set off the really wild ones, and it looks pleasing to you, go for it, but in general I want it to be as wild as possible. I prefer no batiks, no Christmas/Seasonal fabric and no licensed fabric (superheroes, etc) please. 

CUTTING

(My measurements for the squares that become the first and second round of triangles are generous because I like having extra room. If you're confident then you can use the measurements given at https://www.diaryofaquilter.com/economy-quilt-block-tutorial-and-inspiration/)

centre: 1 x 6.5" square - this can be a fussy cut of a motif but doesn't have to be. The fussy cut should be square on -- not on the diagonal.


first round of triangles: 2 x 6.5" squares (contrast to centre) - cut in half diagonally into triangles = 4 triangles


second round of triangles: 2 x 8" squares (contrast or patterned) cut in half diagonally into triangles = 4 triangles


CONSTRUCTION


There's a great tutorial here for traditional piecing: https://www.diaryofaquilter.com/economy-quilt-block-tutorial-and-inspiration/


If you've made an economy block before, the basic steps to piecing this are:


1. Fold your centre square in half each way, so you have a little crease to mark the centre on each side. Fold each triangle, creasing the centre. 

2. Sew one of your first round triangles onto each side of the square, centering it. Press away from the square. Then trim off the dog ears of the triangles even with the edges of the centre square. This will help keep the block flat and true. Make sure you trim keeping the 6.5" width of the centre block. 


3. Sew the other two first round triangles onto the other sides of the square, centering them. Press them away from the square. 


4. Square the block to 9" -- making sure you have a quarter inch of fabric beyond each point of the centre square so the points will be preserved during the next step. Try to keep everything centred. I like to make sure that my 4.5 line is centred top to bottom and side to side through the points and that I'm keeping a quarter inch seam's worth of fabric behind each point on the top and side. Then I trim off those two sides. I rotate the block and I just trim the whole thing to 9"


5. Add the second round of triangles the same way -- centering them on the square and pressing them out from the centre. Trim the first two triangles of the second round even with the edges of the 9" block. 


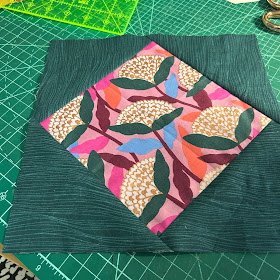
Square to 12.5 inches (leaving a quarter inch beyond the points so the points won't be cut off when the quilt is assembled. (NB: the block above doesn't leave enough room after squaring up to preserve the points of the second round -- I adjusted the sizes of the triangles so the one below is better, and those are the sizes I give in the cutting list above).


That's it! If you don't have a 12.5" square ruler just send me the block untrimmed -- I'm happy to trim that up for you.

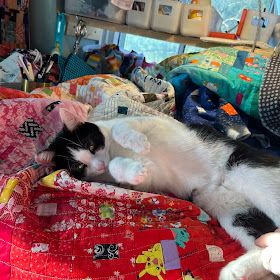
Thank you so much for helping me make this very loud quilt, and thanks from my quilting assistant Vittoria, pictured here helping me quilt spirals on my Colourwash Quilt lol. 


Hive 1: Economy Blocks for Abby

 Hi, Abby,

I really enjoyed making these blocks. Your tutorial really made it easy for me. Thank you. I hope you like the furry friends I'm sending to you.


Thursday, September 26, 2024

Hive 1 Economy Blocks for Abby

 Abby,

I’d never made an economy bloc - so thanks for the tutorial!  Great stash buster.

I’ll place them in the mail on Monday. 

Chris


Hive 1 Economy Blocks for Abby

 As soon as the hurricane passes and I can get to the post office, these blocks will be on their way to you. Hope you like them!


~ Diana @ Red Delicious Life

Tuesday, September 24, 2024

Hive 1 Economy Blocks for Abby!


 I managed to fight through the family plague that absorbed ten days and get these to your screens! I hope you enjoy.

Monday, September 23, 2024

Hive 1 Economy Blocks for Abby

Abby, I'm (gasp!) also in that other swap group, but I had to sit out economy blocks because the timing wasn't great for me. Thank you for getting me back in! I was regretting missing it, but got to have the fun of learning to make these blocks anyway. They'll go out to you tomorrow.


Tuesday, September 17, 2024

Hive 1: Economy Blocks for Abby!

Hello!

I always appreciate an economy block request because I can just FPP them!! No fuss, no  muss!

Hopefully these will fit in your rainbow -- and no blues!! 

In the mail tomorrow, hopefully!

-Molli.


Friday, September 13, 2024

Southern Star Finish

 Many thanks to my hive and friends that crashed. She is a beauty! 


Friday, September 6, 2024

Hive 1 September Economy Blocks for Abby


Hi Abby,

These were fun to make! I loved searching my stash for whimsy prints. Hope you like them and that your quilt ends up big enough to 'drown in it' 😃.

They are going on their way to you today.

Happy quilting,

Rita

Thursday, September 5, 2024

Economy Blocks for Abby

Hi Abby!

Thanks for this fun request for your "extra long" quilt. I did my best to avoid introducing blue fabric, but I failed😂.

Happy Sewing!

Marie


Sunday, September 1, 2024

Hive 5 - September Tutorial - Double Disappearing 9 Patch for Erin

Double Disappearing 9 Patch for Erin

Hive 5 Tutorial for September 2024


The number of times I have gone back to Christina Cameli’s tutorial on

the double disappearing 9 patch (dd9p) block is embarrassing.

Her Blog ‘A Few Scraps’ is a wealth of great stuff and here is her tutorial

https://www.afewscraps.com/2014/07/double-disappearing-nine-patch-improved.html

her original tutorial really inspired my thoughts on color/background and layout ideas:

https://www.afewscraps.com/2011/08/double-disappearing-nine-patch.html


In 2020, another stashbee participant, Em from @moonlightsewing, did another dd9p tutorial withdifferent dimensions. Hers uses charm squares and ends in a 19.5” finished block

https://stashbee.blogspot.com/search?q=double+disappearing+


This is going to be following The first tutorial for a 10” finished block.

The basics of this block are sewing a nine-patch block from your small squares,

cutting that nine-patch into quarters, adding the large squares to create a new 9 patch.

Then you'll repeat the process of cutting, rotating blocks and sewing.

This makes sense when you see it, I promise.

NOTES:

For the stashbee, I’m going to have you stop after creating just the first disappearing 9 patch block.

From here, I’m going to cut them into quarters to create final blocks. I want to play with mixing and matching

parts of the blocks that you have created!

I’m going to post a whole tutorial so you can have it if you want to make some dd9p in the future for a project of yours!


Fabric Choices-

I love a bright rainbow of colors. Think as ‘Neon’ as you can possibly get- like those packs of highlighters or

‘astrobrights’ paper. If you have solids, great! If not, please try to have the fabric read as color-true as possible:

tone on tone, small prints, blenders. Bonus points if you have really cute little prints that have wild/weird things like starry, tula pink, ruby star or other modern designers.


Background: Low volume brighter whites, light greys 

Bright Colors

Cool Colors- turquoise blue, lime green, purple

Warm Colors- Pink, Magenta, Orange, yellow

Fabric Restrictions:

Please Do NOT use brown/cream, batiks, patriotic, large prints


Cutting list:

Small Squares 3”x3”

(4) Background/White

(4) Bright Colors for corners 

(1)Contrasting Bright Center Color - this will remain paired with your corner colors 


Large Squares 4”x4”

(1) Center Color - this will remain paired with your corner and first center colors 

(4) Background/White


BLOCK INSTRUCTIONS:

Make a nine-patch block

Your corners and middle should be your brightly-colored fabric, while the middle pieces will be your white/background fabric


Here's an example with prints and a light grey background instead of white. Please keep your background the same print/color.


Square up your fabric after cutting. 

Prepare to cut your nine-patch down the middle both ways

Spread the blocks out, keeping the original middle block at the center.


Place the new large squares for a new nine-patch. Your center square should be a color fabric, your middle squares should be background fabric. Sew into your new nine-patch


*****STASHBEE- STOP HERE - DON’T TRIM - Send as is!*****


You’re going to stop here and send me your disappearing nine-patch.

I am going to trim and quarter these to mix and match them up for the final product!

I can't wait to see the fun things that you send out!


Otherwise:

If you are following along to make your own dd9p:


Cut your new nine-patch down the middle in both directions,


rearrange opposing corner blocks by rotating 180 degrees, so your corner blocks now are in the center. Sew this together and you now have your dd9p!


There are lots of other fun variations you can do with this by just rearranging your small blocks before the final sew


Finished Quilt -Disappearing 9-patch block

Dear Bees in Hive 1 and Hive 6, 
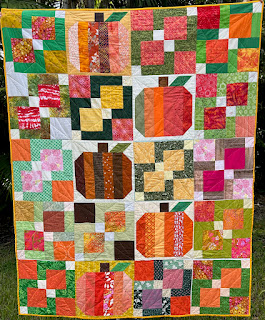
I am happy to report that I have completed my quilt, and it is thanks to you!
This quilt was inspired by the theme of Autumn. 
I used the blocks from Hive 1 and a few from Hive 6.
I appreciate your help, you Bees are great!💕
Thank you!
Marie


Hive 7 - September Tutorial - Quilts of Valor

September has arrived too quickly. I had a million ideas flirting in my head. Since the traditional guild in my town is celebrating its 50th anniversary, they have decided to create 50 Quilts of Valor this year. I have committed to making two. One is now at the long armer. I would love you to help me build a second one with a modern feel. 

I would like STARS. Since our hive has been having so much fun with the "choose your own adventure" approach, you may choose the pattern and size. 

There are many interesting patterns that are not too traditional (see examples in final picture). Please choose whatever pattern you prefer, in whatever size you wish, as long as they read as stars. They may be pieced or paper pieced, but please no appliqué. 

If you'd like some ideas, Moda has directions for 40 different stars at their blockheads5 website. To see the directions, click on the view button under each one.

I will lay out the all the blocks randomly and will fill the blanks to give the quilt a modern look. 

Colours are WHITE, RED and BLUE: in solid, in geometric, in stripes, in modern prints. Please no flowers, no civil war, no calico, no patriotic pattern either. 

    Reds: clear or rich (no pinkish or orange tones) 
    Blues: from medium blue to dark navy 
    White, white on white (avoid the off white, beige, cream) 

Here are some print style examples:
Here are 3 examples of star blocks:
These 3 patterns were picked from quilterscache.com. There are tones of block ideas of every style on that site. You can choose by name or by size or go through all the pages. 

Thanks for warming the heart of a deserving veteran❣️  

Here's an unusual request. Please mail your block(s) after September 10th. My mail is being held at the post office until September 12th. Of course, you may post them on IG as soon as they are done as I would love to see them earlier. I will notify you about their arrival after September 12th.

 Diane

Hive 2- September Tutorial- Interlocking Pipelines Square


Hive 2- September: Interlocking Pipelines Square

12” finished square- 12.5”with seam allowance


This is based on an image of a block I saw once and have no idea where and cannot find again since I don’t know what it’s actually called. This isn’t an original idea, and I would happily give attribution to whomever did think it up if anyone knows who that is.

Color choices:  colors 1 and 2 should contrast though they don’t have to be straight color opposite. Color 3, where colors 1 and 2 intersect, should also be quite different from 1 and 2. Try not to use directional prints or patterns with words as I will be turning these different directions when assembling the quilt top.

For colors- think “Obnoxious” and go BRIGHT (does not have to be light- see examples below) and BOLD and BUSY. Please- Not pastels & not muted.  Prints are ok- but please no children’s patterns or thematic- they should be generic images not specific ones. Batiks are ok. Neon is ok, but not exactly what I mean by bright. There are some examples at the bottom of the instructions.


Fabric needs and cutting:

1.       Color 1-

a.       1 of 6.5” square

b.       4 of 2.5” squares

2.       Color 2-

a.       1 of 6.5” square

b.       4 of 2.5” squares

3.       Color 3-

a.       2 of 2.5” squares

4.       Background- plain black or something that reads very dark black (I used Kona black, but I’m ok with black on black or dark grey on black)

a.       16 of 2.5” squares


Sewing:

First the snowball blocks

1.       Need to make a 6.5” snowball for each of color 1 and 2 using black in the corners-

a.       start with the 6.5” color square and 4 of the 2.5” black squares for each of color 1 and color 2.

                                                               i.      Draw a diagonal line across the wrong-side of the black fabric from corner to corner.

                                                             ii.      Line up the small black square right sides together on top of the 6.5” color square in a corner. The diagonal line you drew should look like it cuts off the corner.

2.       Sew along the diagonal and then trim the comer off ¼” above/outside the seam you just sewed- actually cut off the corner!

3.       Repeat for all 4 black squares putting one on top of each corner of the colored square.

4.       Open the black triangles so the center becomes an octagon with black triangles in the 4 corners- press seams out towards the black.

(instructions and based on https://scissortailquilting.com/quilt-block-library/snowball-quilt-block/


Second the pipe blocks- this is just two 9 patch blocks.

For each nine patch you need: 

2 of 2.5” squares of color 1; 

2 of 2.5” squares of color 2; 

1 of 2.5” square of color 3; and 

4 of 2.5” squares of black; 

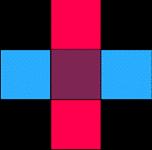
Arrange with the 1 of the color 3 square in the center, the 4 black squares in the outer corners. The squares from colors 1 and 2 should be on opposite sides of the center block, one going across and one going up and down. You should have 2 of these nine patches at 6.5” square when you have finished

Sew: Row 1- Black, Color 1, Black; Row 2- Color 2, Color 3, Color 2; Row 3- Black, Color 1, Black

For rows 1 and 3 press seams out towards the black, for row 2- press seams in towards middle color 3

Sew the 3 rows together and press seams outwards towards rows 1 & 3.


Assembling the block

Now lay out your snowballs on the top left and bottom right corners. Put the nine-patches in the other corners- top right and bottom left. The colors at the edges of the the nine patches should meet the same colors at the edges of the snowball- if not rotate them until they do. Ideally- it’ll look like the color is flowing from the pool out through the pipes- see examples at the end. 


Sew them together for final square of 12” finished, 12.5” with seam allowance

 Viola! Complete! 


Final note- I will be making a border with “caps” for the open pipe ends- if you have at least 6.5” x 4.5” of any of your 3 colors leftover that you would be willing to send so I can incorporate it into the border- that would be awesome. I’d rather use what’s in the quilt over introducing new fabric in the border.


Here is an image of some of the blocks I made in trying to create these instructions, for inspiration: