Pages

Monday, June 30, 2014

Hive 12 - July Block Tutorial

Hello, my name is Laura Wolverton.  I have a blog/quilt journal at SewFrouFrou Quilter (in college, my friends use to tease that I would definitely like this or that because it was "frou from"); I can be found on Flickr and Instagram by the same name too.  I live in Indiana, in a small town just east of Indianapolis with my 3 children and my husband, Steve.

 My mother sewed clothing and made quilts when I was a child.  I have to be honest--I had no interest back then in that ugly country fabric that she was using.  It wasn't until I had my first child that I began noticing the nicer, more modern fabrics in her quilts and I became interested.  Around 2002-2003, there was a bookstore in the lobby of the building that I worked and I bought 2 quilting books:  one on designing your own quilts and the other was on Baltimore Album quilts.  I initially attempted to design and sew a quilt with an old machine that belonged to my grandfather (not a nice vintage machine but rather a little darning machine that I think he may have bought at Woolworth's to hem his pants).  It didn't go well so I put the idea on a back burner.   Around 2009, my mom bought Singer sewing machines for both my sister and me for Christmas because we both had (finally) exhibited an interest in sewing.  I think she was a little tired of us asking her to hem things--which I finally understand now:).   I was so worried about wasting fabric that I made a few pairs of pajamas for the kids before I finally started quilting.  It wasn't long before I had a stack of WIPs.  Only 2 of my finishes live at my house so far--my son's quilt (in the above photo) and my husband's T-shirt quilt (which I finally finished a few months ago after cutting all his running shirts up 2 years ago).  I am trying frantically to finish a quilt for my youngest daughter before her birthday this month because I've had the fabric for maybe 2 years now.  And my oldest daughter has requested a triangle quilt out of Echino fabrics -- so I am slowly collecting fabrics for that too.

How do I organize my stash?  Not very well.  I have tried to organize by color but usually it tends to gravitate back to the fabrics I bought together or   I keep my non-designated stash fabric and scraps in this cabinet that used to belong to my grandparents.  Random fabric scraps are kept in the containers above the cabinet.
I have a few special project stacks like my Ruby fabric for my future Swoon quilt, my AMH cuts, and some fat quarter bundles I have that I haven't found a purpose for yet that I keep in a bookcase along with some yarn and quilting books.

Fabric and projects I am currently working on are kept on/in my cutting table.


Who are your favorite designers?  Bonnie and Camille, Anna Marie Horner, Bari J, Pat Bravo.  I pretty much love anything that Art Gallery puts out.

What is one thing you have learned that you wish you knew when you first started quilting?  Never be afraid to do something because it looks hard.  Last year, I made paper piecing a goal and was so surprised at how easy it was (granted, I haven't tackled anything with 100 pieces yet or done an entire quilt of paper pieced blocks).

What is your favorite sewing/quilting tool and why should we all go out and buy it?  That's a hard one.  I love my rotating mat for when I am squaring up small blocks and HST's.  I also love my little Tweezer girl that I use to pick the paper out of paper pieced blocks.  Probably the most helpful tool I have though are my Ott lights since most of my sewing is done at night.

Who is your favorite fictional character?  My all time favorite character is Scarlett O'Hara from Gone with the Wind.  I like that family was so important to her; she may not have been the nicest to her sisters but she usually had the greater good of her entire family in mind.  I hated that she had the love of her life right there and spent all her time trying to get Ashley to fall in love with her.  Ashley would never understand her or appreciate her personality.

The Block:  I have been bookmarking so many different block tutorials and ideas and finally chucked them all and decided to design my own block.  My first design didn't work out, it was going to be too big but I was able to use all the pieces for the block design that we are doing here.  I am calling this block "ROYGB Geese" it is a 14 1/2 inch block.


For the fabrics, I want the block to be very scrappy.  I would like the geese to be  a range of different colored prints. You can use whatever you like--I tend to go for color shades that are a little left or right of primary colors.  I honestly just grabbed fabrics from my stash that never seem to go with anything and I think they work together. I would like a variety of low volume fabrics for the sky part of the geese.  I used a different fabric for each color of geese but if you don't have 5 different low volume fabrics, I understand.  I have been on a low volume bender for a few months now and have amassed quite a collection.  

The center block, I would like it to have mustard and peachy pink or rose colors in it.  Below is a picture of several other fabrics from my stash that I think would fit this criteria just to give you an idea of what I am looking for.--it doesn't have to be primarily mustard or primarily pink.  Honestly, if you don't have anything that works, just let me know and I can either send you some fabric or you can just send me your geese strips and I can add the center square to it.


Fabric Cutting:  

5 different colored fabrics fabrics for the geese:   5 1/4 in. square (one of each color)

Variety of low volume fabrics (I used 5 but you could easily use more):  2 7/8 in. square (you will need 20 squares total-I used 4 of each of the 5 fabrics)

1 Center square (with mustard/peach or rose tones):  6 1/2 in. square 


For the geese, I used the no waste method for flying geese.  You can find a detailed tutorial here.  Once you have your 20 geese made, arrange your geese so that there is one of each color goose on each side of the block so that they are going in the same direction around the block (see finished block above).  You'll probably notice that I tried to do it in ROYGB order and messed up one side-I didn't fix it-so don't feel that you have to do it in a certain order either unless it makes it easier for you.  You will then sew your geese strips as noted in the picture below:

 Sew the 3 geese strips to the top and the bottom of your center square.  (I don't care if you press open or to the side.  I usually do it to the side unless someone specifies they want them open because I think my machine handles that better.)  Press your seams.  Attach the 7 geese strips to the left and right sides of your block.  Press.   Do not square up your block, I will do it.  Thank you.  I hope you have fun with this--I'm very excited about it and can't wait to see what you do.

Hive 2 - July Block Tutorial

Welcome to July!
My name is Meghan Weyrens Kuhn and I live in the heart of the New River Valley of Virginia and home to the Virginia Tech Hokies!
Dave, Ella Bea and me at her first Virginia Tech Football Game!

Family background-
I am happily married to the love of my life, Dave. We met my freshmen year of college and have been together ever since. We dated for a long time before we got married. I actually followed him down to Virginia from New York City after college. I am glad it worked out! We both attended Virginia Tech for grad school and planned to move back to the North (Dave is from Maine) or the Midwest (I am from Minnesota). But the Hokie Nation drew us in and we are Hokies for life. It is beautiful here, the only drawback is being so far from family and there are not many lakes. I am a lake girl!
We have one adventurous daughter, Ella Bea who is 21 months and a delightful English Springer Spaniel, Hudson (hence the name of my blog). These two are best friends and Ella Bea has started to called Hudson, "Hudsy". So cute!
Ella Bea "walking" Hudsy and picking flowers


Quilting interest-
I always have had an interest in fabric, quilting, crafting, yarn, you name it, since I was little. My mother taught home economics at the college level and sewing and fabric have been in my life forever. The first time I was introduced to quilting was when I was 3 or 4 and a family friend, Bernice, made my doll a quilt. I was amazed at the pieces coming together and all the stitches. I can still see the quilt frame set up in her living room and the smell of homemade bread and cookies from her kitchen. Very special memories.
The next time I had a brush with quilting was when I was ten and our neighbor Cindy was making a quilt for her son. Again, I was amazed at the beauty of picking out fabric and placing them together. Cindy is a watercolorist, so I also noticed how her quilt colors flowed.
This is where I began quilting. I got out my mother's Kenmore sewing machine and started to sew fabric blocks together. But, the tension on the machine was a nightmare and the machine ate my fabric! I was so upset. My mother could tell this was going to be a life long hobby and we went to the local sewing store. She bought me a used Bernina. This machine is heavy, tension is not a problem and it is by far one of my prized possessions. They do not make this type of Bernina anymore.
I took quilting classes at Gruber's Quilt Shop. I made a quilt in a day and was hooked. This was a long way around a short story, I started quilting when I was ten and have been quilting ever since. I even worked at Gruber's and Joann's during high school and college to help feed my addiction to fabric. Such a great hobby!

Fabric Stash Organization-
I have a closet full of fabric and crafty items. I organize by color and type of fabric. I also have my scraps in photo boxes. I would like to re-organize my fabric so I can see all of it a little better. Potentially a summer project. Most of the time, I pull out the colors I am interested in and go from there.


Fave Fabric Designers-
Amy Butler, Kate Spain, anything floral with a modern vibe to it. Also, love geometric patterned fabric too. I really love all fabric that is bright, fun and whimsical. I am a self diagnosed hoarder of fabric. I have to hide it from the hubby sometimes. He doesn't mind though, even though he hasn't gotten a quilt yet!

One thing I wish I would have known-
The importance of pressing. I was taught early on about precise cutting and seam allowances, but pressing would have been good too.

Fave Sewing/Quilting tool-
Okay, so this is pretty lame fave sewing tool, but it has to be my Bernina. I love this machine! And if I didn't have a sewing machine I wouldn't be able to quilt as much. Yes, I could quilt by hand, but I am way too impatient for that. When I moved to New York City after college. I told my mom, that I didn't care what came with me as long I had my sewing machine. Love it. Will keep it forever. I may get a computerized sewing machine, but I am holding on to this baby!


Fave fictional character-
Betsy Ray from The Betsy-Tacy Series by Maud Hart Lovelace. These books take place in MN and Betsy is a cool girl who follows her dreams. I strongly recommend them for you or any other dreamer. Her stories are imaginative and based on the life of Maud Hart Lovelace. My mom read these books when she was young and she read them to me when I was young. I hope Ella Bea likes them too.


Butterflies! Oh my! 
Inspiration quilt:


Source


As a mom of a little baby girl, who now is a toddler (tear, growing up too fast), I am obsessed with her and making her smile and laugh. I have decided to make a butterfly quilt for her, sorry Dave, next time!

Do you remember Lisa's May block? This block will be similar to her lovely Road to Tennessee, with a few adjustments to it.

Fabric Pull-
As I was thinking of my block, summer had arrived in the New River Valley. My inspiration for my fabric pull is the bright blue skies, green grass, and hot, sunny colors for our butterflies.
You can chose to make the butterflies all the same color/fabric, two different fabrics, or four different fabrics. If you choose to do the four different fabrics, please try to make the four fabrics have some similar theme within them.
You can use either all green or all blue for your background squares.
The butterfly body can either be a dark brown and black, it can have pattern to it.
Isn't my Hudson such a good quilt poser? 

Fabric pull for your greens, blues and butterfly body.

Step #1
Cut four 5 inch squares (charm pack squares work too!) You can choose all the same fabric, two different fabrics or all four different fabrics.  If you choose to do the four different fabrics, please try to make the four fabrics have some similar theme within them.


Step #2
Cut eight 2 inch squares in either blues or greens. Please choose one or the other color for your two inch squares. They can be different shades of green or blue.

Step #3
Cut one 2 x 9.5 inch strip in either dark brown or black. This will be your butterfly body.

Step #4
Cut two 1.25 x 11 inch strips to match the blues or greens you chose for your corners. These strips will help make the block a square shape.


Step #5
Take your ruler and draw a diagonal line down the WRONG side of your green or blue squares. You will be connecting diagonal corners. Please draw a line on all eight blocks.


Step #6
In this step, you will be creating the butterfly wings. Take one 5 inch square and place it pretty side up on your table. Take two of the marked 2 inch squares and sew them diagonally on the corner of the 5 inch squares. You will sew 2 squares to each 5 inch square. You are sewing the pretty sides of the fabric together.

Step #7
Using your ruler cut off the extra on each corner with the square making sure you leave a 1/4 of an inch.
Press out the fabric to make your 5 inch square again.


Step #8
Arrange your blocks to make your butterfly wings. Sew together and press seams open.


Step #9
Sew the wings to the butterfly body and press the butterfly body seams in towards the middle.

Step #10
Sew the 11 inch strips to the top and bottom of your butterfly, press and you are done!


Enjoy!
Please let me know if you have any questions or concerns.


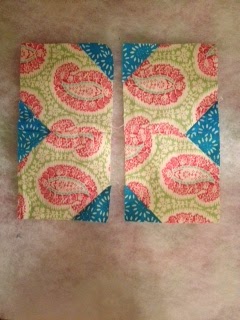
These are two blocks that I made. You can see in the left block that I used blue scraps for the sky. Please use fabrics from your stash. This is to help bust up your stash a little bit! 


Saturday, June 28, 2014

Hive #1 - July Block Tutorial

What is your name? Hi all, my name is Tina and I'm totally in love with big color, fabric and quilting.  


 I live in Santa Cruz, Califonia where the weather is usually not too hot or too cold.  I love taking my kids outside and to the beach.
 
At the moment I'm a stay and home mom, but have worn many hats including pastry chef, technical writer and also fabric buyer for a shop which was incredibly fun and I learned so much.  I became interested in quilting as a young kid when I had my great-grandmother's quilt given to me and put on my bed.  It was a double wedding ring quilt that was made completely from feedsacks.  I would trace my fingers over the arcs of the rings and figure out which print was my favorite.  I never thought to make quilts because I didn't really decorate my home in a vintage or shabby chic way.  But, all of that changed when I was buying fabrics for a kid's craft project and saw some awesome Japanese fabrics at the store.  
Being a curious person who likes to research what I'm interested in, I went online to look at quilting pictures.  I found that quilting wasn't necessarily all about small, sweet prints, or had to be done a certain way.  I was soon immersed in the online quilting world and joined in Flickr bees, swaps and became enamored of Denyse Schmidt's work.  
After that, there was no stopping me!  I was drawn to all the modern quilting and wanted to find my own way in the quilting world and taught myself with tutorials.  I try to do a little quilting every day, even if it's just a few minutes' worth.  Last year, I was lucky enough to have a quilt accepted at Quiltcon and my quilt received a judge's choice ribbon :)


As far as my stash is concerned, it's kind of a hodge podge of prints and lots of solids.  For prints, my personal fabric crush is on Anna Maria Horner.  I just love her use of rich color and originality of design.  I am also very drawn to Japanese designers like Echino and Nani Iro.  I love also love working in solids especially shot cottons.  
A link to my stash is HERE


When I first started quilting, I wish someone had told me how important it was to keep your quilt piecing as flat as possible.  If your block doesn't lie flat, and if your seams aren't pressed open, then your quilt won't really be as square or as flat as it could be.  Yes, I am in the seams open camp and I'm there to stay :)  I really love it when your quilt is all finished, and the seams visually disappear and your blocks seem to be floating on the background.  

My favorite quilting tool I think is starch!  Starch helps again with the flatness factor and accuracy.  That and a fresh new rotary blade. 

My favorite fictional character?  Madame Bovary?  Mr. Darcy? Harry Potter? Don Draper?  I don't know... it's probably a different answer on any given day.  Alrighty then, enough about me:)  The block!!  Danny gave me the green light to mail out my fabrics to you.  (They should have already arrived by now) I've wanted to make an all Anna Maria Horner quilt with a block I designed which is somewhat inspired by my blog/social media name - Little Blue Cottage.  Here it is!  The Little Blue Cottage Block.  As you can see, I've made the block three times and each time it's taken me less than 20 minutes to make once the components are cut out.  

Here, we'll break down the pieces to the block and their sizes. 


Each block has 9 pieces to it.  
GRASS:  The long bottom strip - 3.5"x12.5"
SIDE GRASS: Two pieces, along either side of the house, matches the grass strip below.  2 pieces 3.5" x 3.75"
HOUSE: Square in the middle - 6.5"
ROOF: Upper rectangle above the house 3.5"x6.5"
SKY ABOVE HOUSE: Two pieces, 3.5" 
SKY ON THE SIDE OF HOUSE: Same fabric as the sky above the house.  2 pieces 3.5"x6.5"  

With me so far?  Ok, let's make that roof.  It's a basic flying geese unit.  Easy peasy :)  I'll show you in pictures how I made mine.  
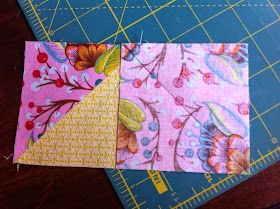
Take your roof fabric and one of the sky squares and place it on the left side of the rectangle.  Mark the square from the middle of the top to the bottom, outside corner.  Sew along this line.  Then, trim to the right of the seam, leaving 1/4" seam allowance. Press seam open.  It should look like this:
Ok?  Let's do that on the other side of the rectangle to complete that flying geese.  Place the second sky square on top of the rectangle and mark a line to sew on.  Trim to 1/4" and press open the seams.  
You should then end up with THIS...


What's important here is that there is 1/4" of "sky" above that roof.  So, when I put the blocks together, the roof top will not be lost in the seam allowance.  

Ok, so putting the rest of the block together goes really quickly.  Piece the roof to the body of the house.  Then, piece the sky pieces to the grass pieces for either side of the house, then sew them to the house.  Piece the lower grass strip to the bottom and VIOLA!  You have a Little Blue Cottage block.  (Please remember to press seams open)  Block will finish at 12.5"

Please let me know in the comments if you have any questions.  Fabrics were mailed out before June 1st to make sure that everyone would have their fabrics on time.  There should be more than enough to make the block and please keep whatever is leftover.  I'm excited to see how these all shape up!